Zebra Sticker Printers
Creating
This thearticle Templateprovides a
Tocomprehensive useguide for configuring Zebra sticker printers youfor first need to create a new template to be useduse with the messaging.OPSCOM StartAdmin byPortal. goingThis process involves setting up a custom layout and system message in OPSCOM, as well as configuring local printer and browser settings, to enable the printing of physical permit stickers.
Setup & Configuration
This is a one-time, multi-phase setup process. It is recommended to complete all phases in the specified order before attempting to print.
Phase 1: Create the OPSCOM Layout Template
-
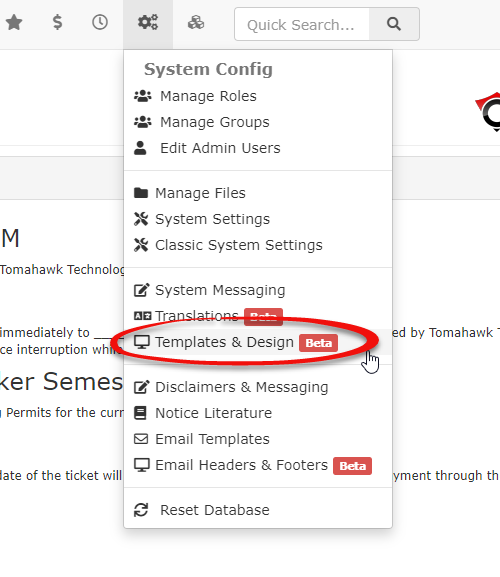
Hover over System Config and click Templates & Design
page underSystem Config.
-
This will take you toOn the Layouts Listpage where you want topage, click the Create Layoutbuttonbutton.to -
Enter a
new layout. This will bring up thedescriptiveAdd LayoutNamemodel window.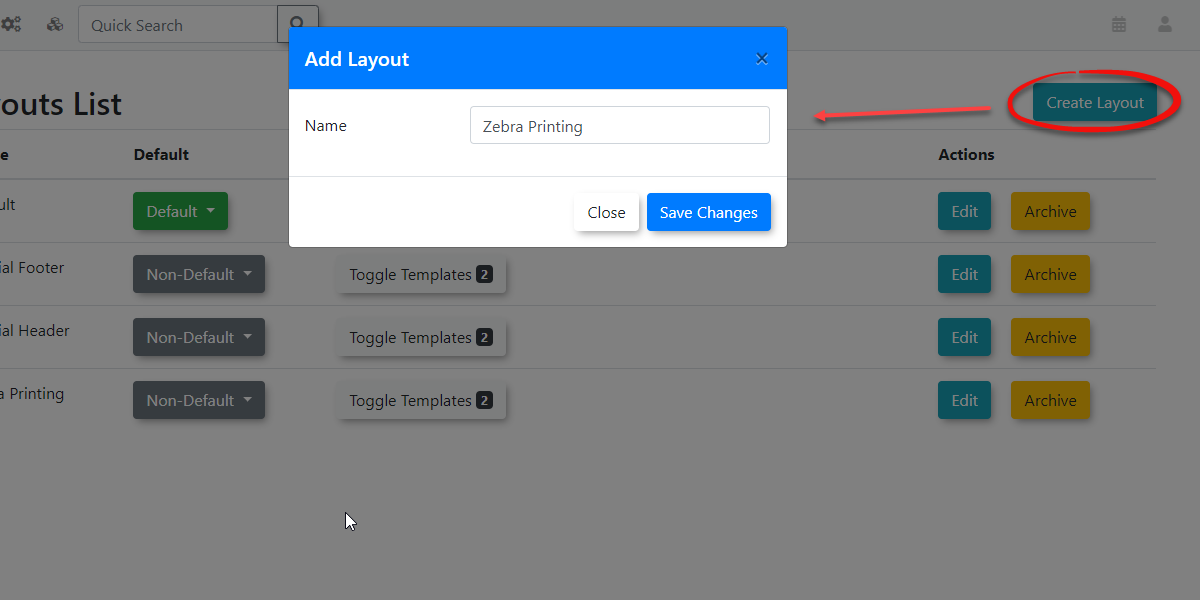
Namefor the layoutwhatever(e.g.,makes sense for you, in this case I will be naming mine layout"ZebraPrinting.Printing")Clickand click Save Changeswhen you are finished..Providing -
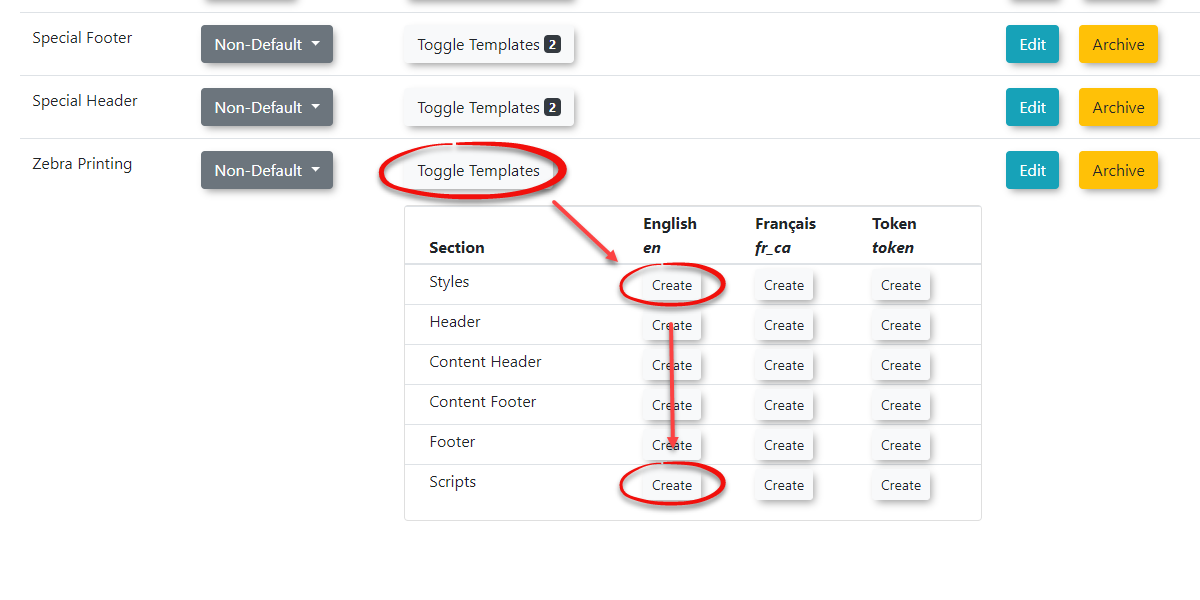
On the
SectionsnextClickscreen, click Toggle Templatestoandbring upcreate alist of the available sections we can create. For this template we only care about creating theStyles section and a Scriptssections.
section.
-
Copy the provided styling and
scriptsscriptfound belowcode intoeachtheof thecorresponding sections fortheeachlanguageslanguage you wish to support.
MessageCreatingCreate the SystemMessaging-
Next we will needNavigate tocreate the system message that uses our new layout.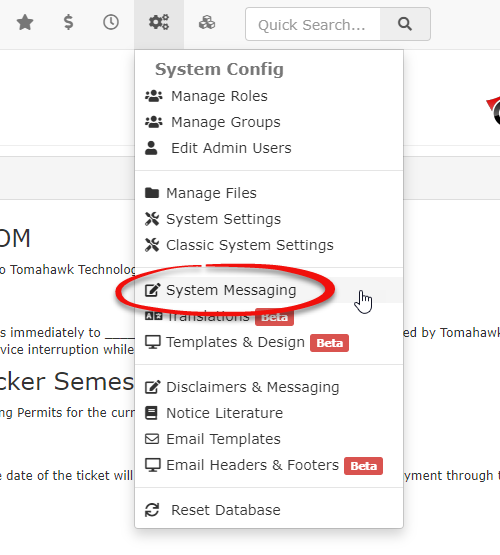
From theManage System Messagingpageand click the Create Page/Messagebutton
button.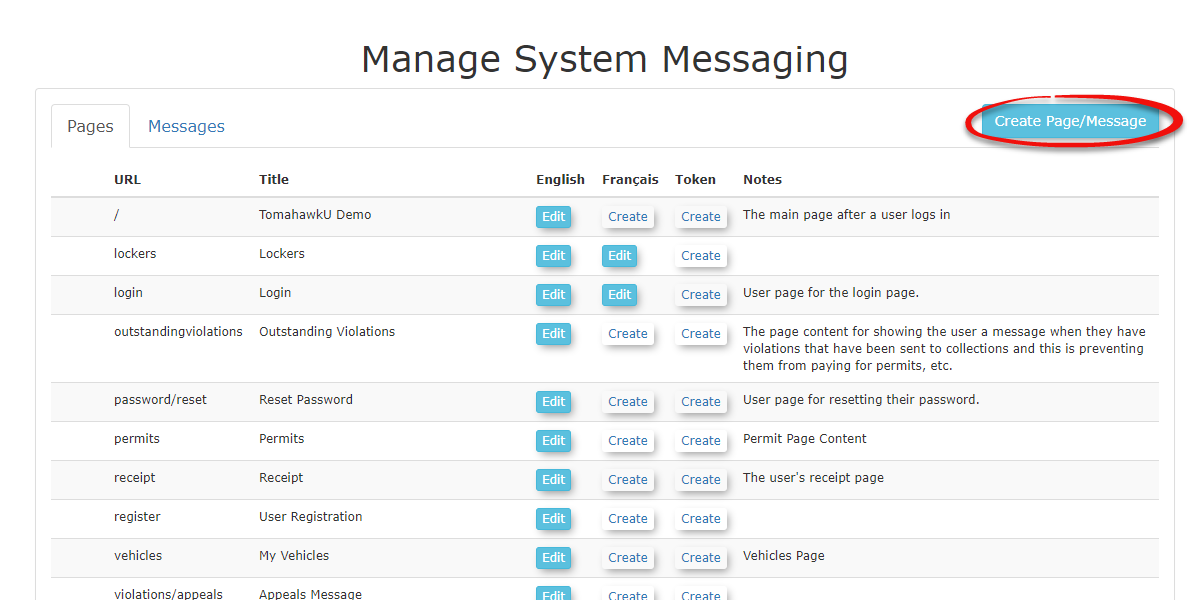
-
youCompleteFill in thefieldsrequiredwithfields, ensuring you select thedatanewshownlayoutbelow.
created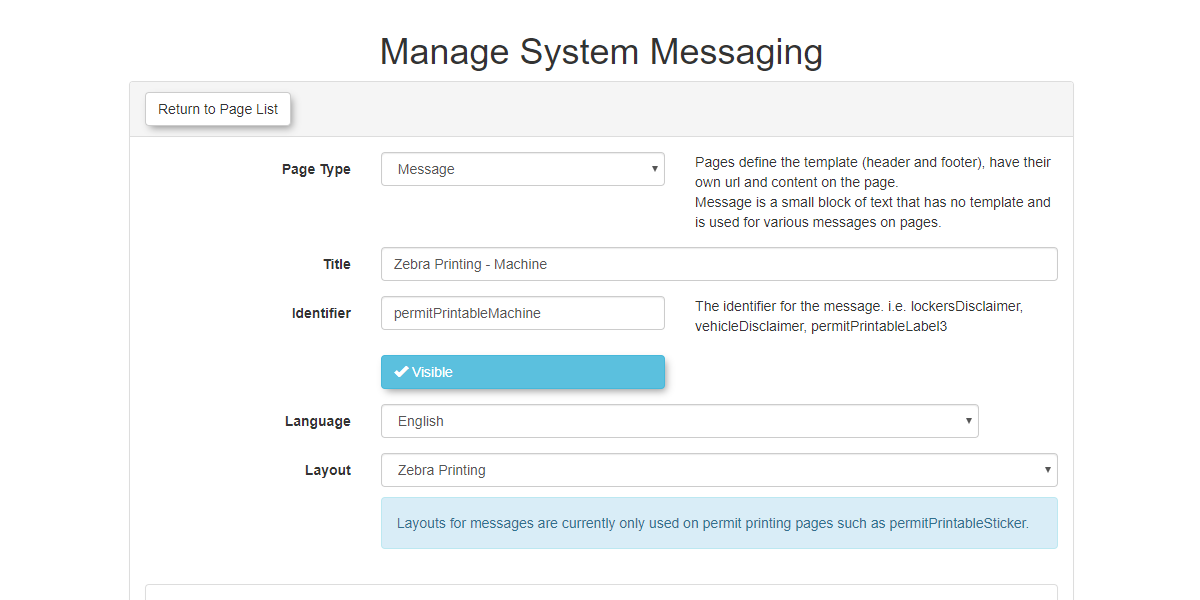
NextinwePhaseneed1to includefrom theshortcodesLayoutthatdrop-downwillmenu.be -
to display the actual permit information displayed on the sticker. To do this hover overIn the content
boxeditorfollowedbox,byhover over Tools and click Source Code.
-
AddPaste thefollowingrequiredtextshortcodetoHTML into the source codesectionviewofandyour message followed byclick Savewhen you are finished..Setup theWindows Printer Drivers-
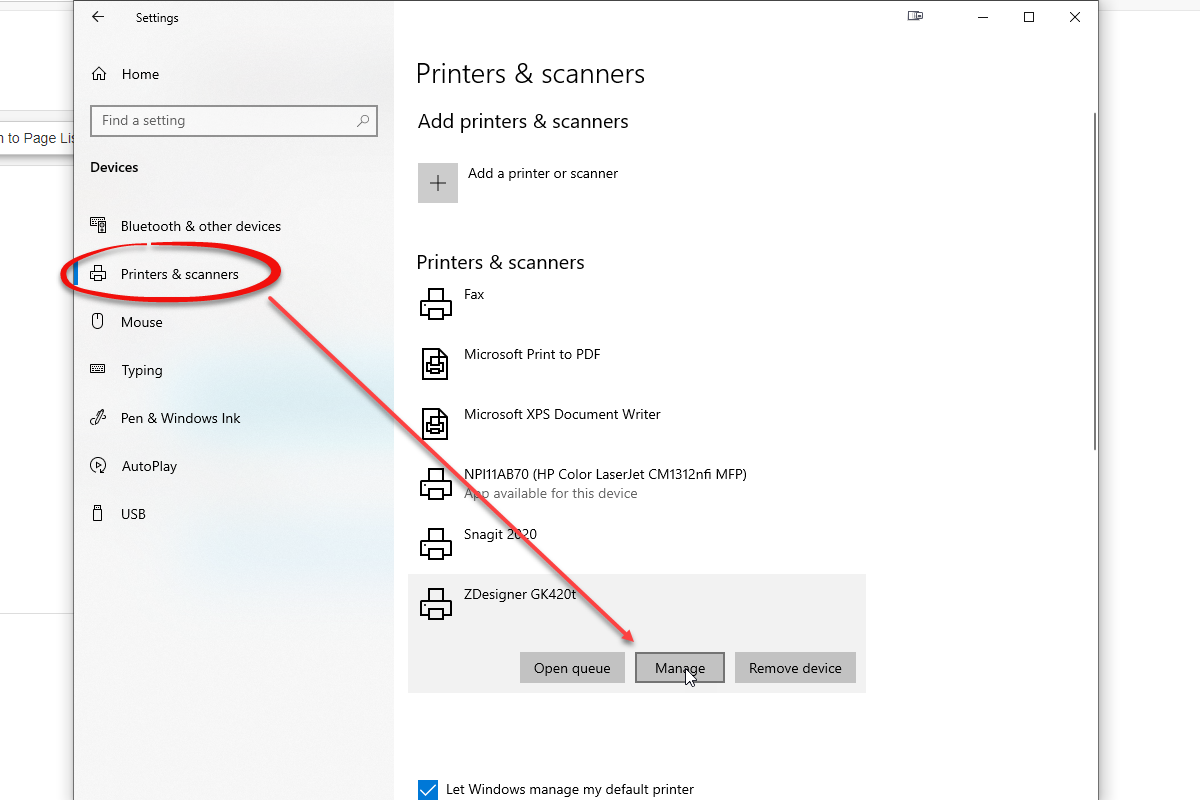
,This guide will show you how to set up the printer drivers on your machine. We will be showing you how this can be done on Windows machines. Start by going into theOpen Windows Settingsfollowedandbynavigate to Devices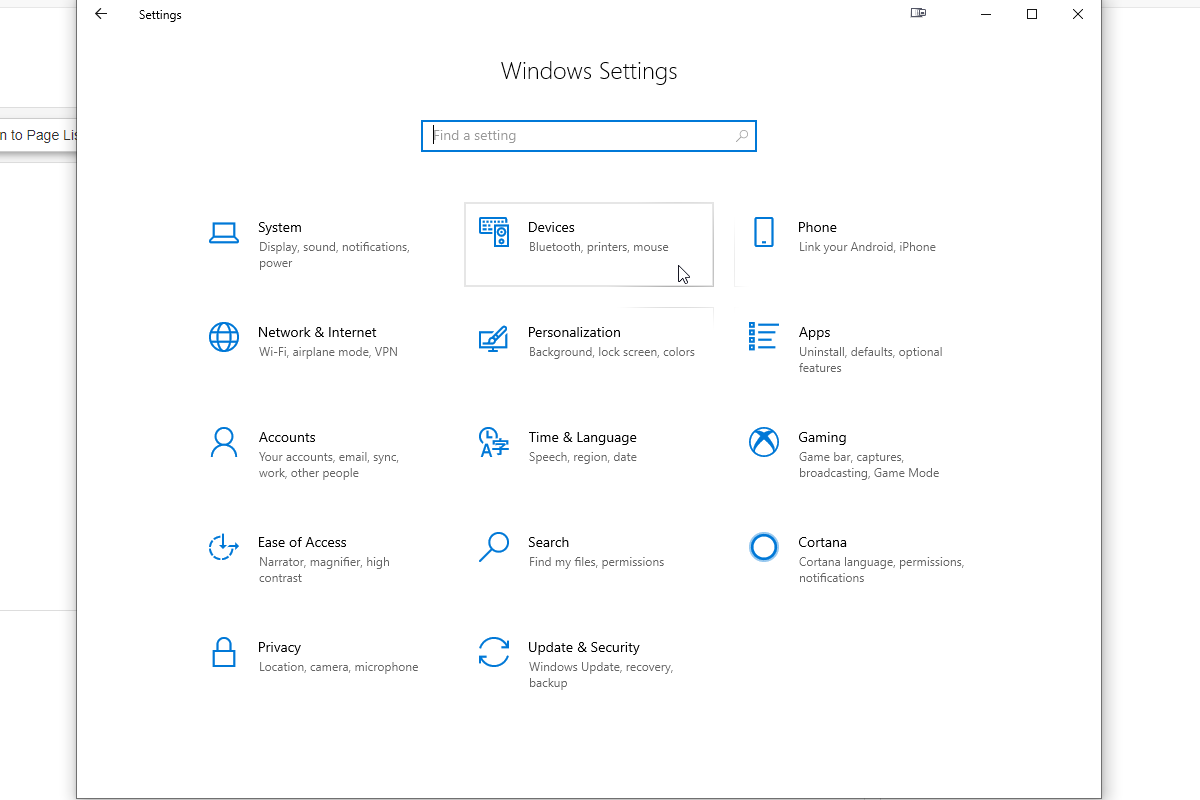
Clickthen Printers & Scanners.as -
asSelect
theyour Zebra printeryouandwish to manage followed byclick the Manage button.
-
Select theClick Printer Properties andclickgo to the Stocks tab.From -
you want to clickClick the New... button to
createdefine a new stocktothatusematchesforyourprinting.sticker
label dimensions.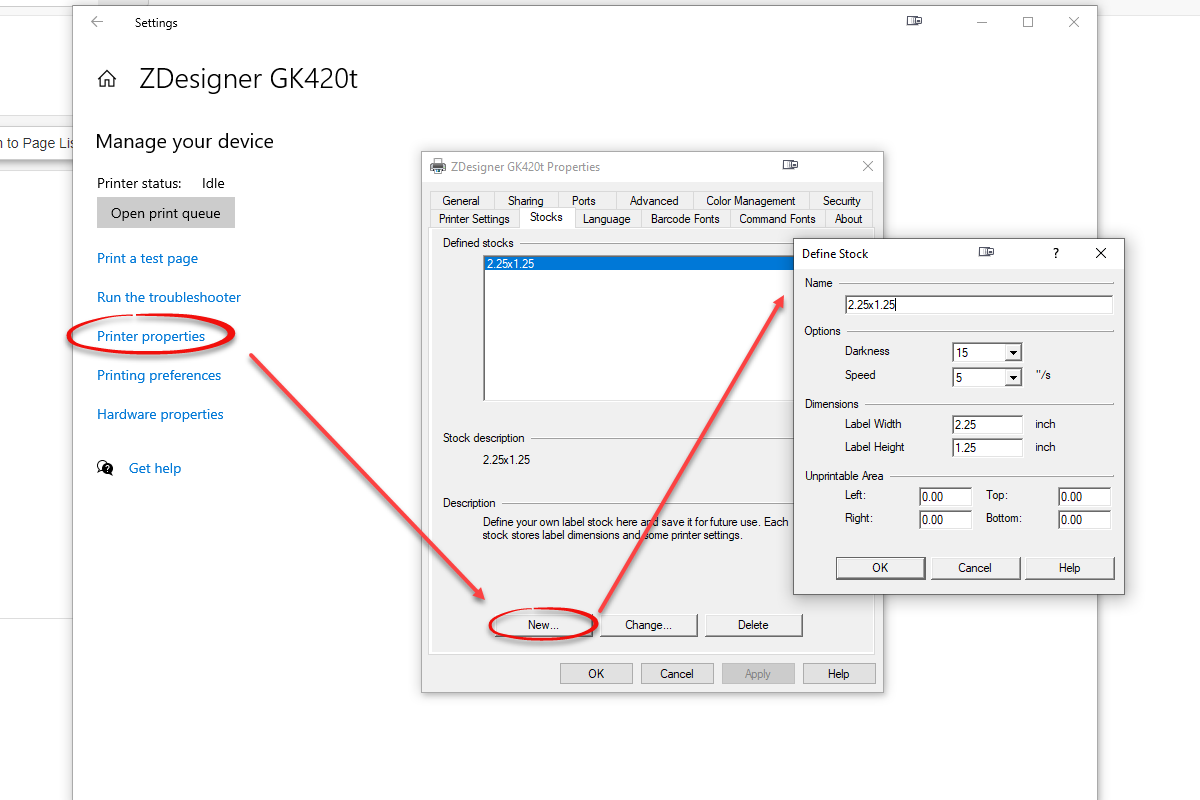
-
NextAfterwecreatingwantthe stock, navigate toselect thePrinting Preferencesfollowedandbyselect the new stockweasjustthecreated.
default.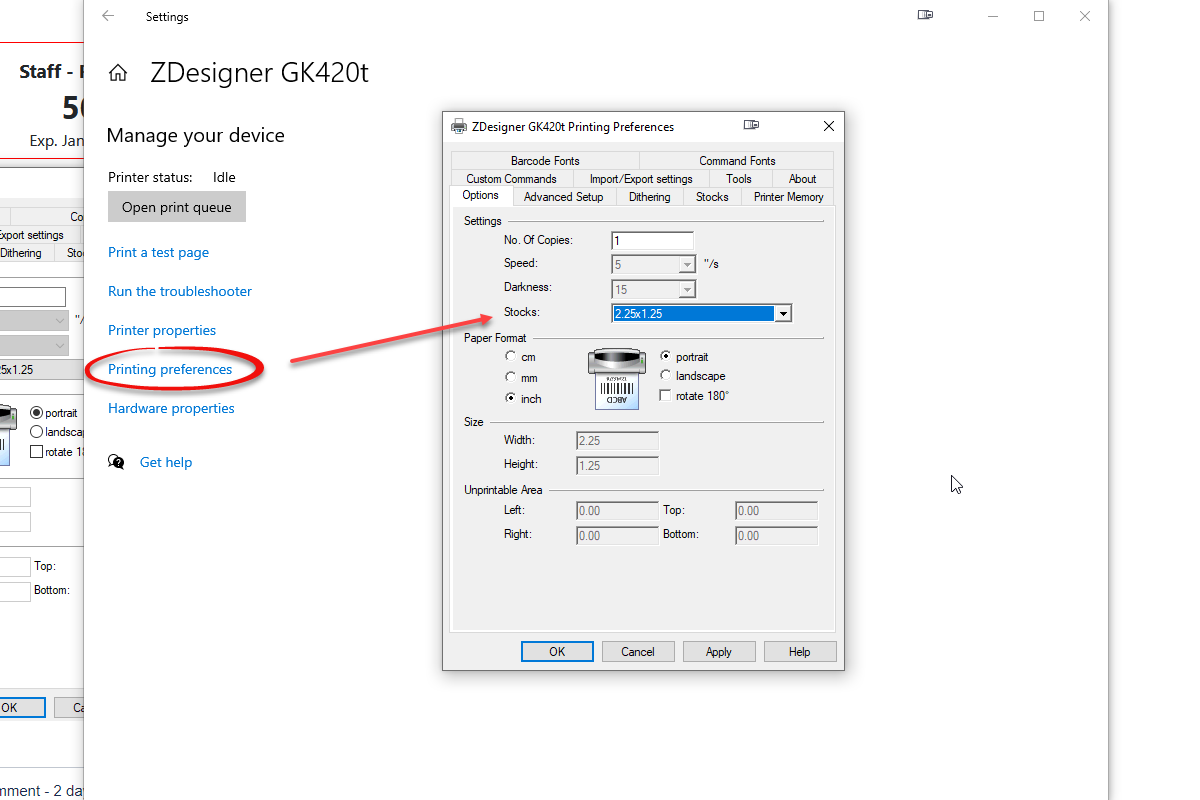
wellthereSetupthePhase 4: Configure Browser Print Settings
Before
adjustingproceeding, you must temporarily disable thebrowsersauto-printsettingsscript.weNavigateneedback togo into theyour layout templateofinsystemOPSCOMmessage(System Config -> Templates & Design) and comment out the code in the Scriptssectionsection.soThisthatwill prevent the stickeris notfrom automaticallyprintedprintingwhich willand allowusyou to adjustthesethesettingsbrowserourselves.settings.Chrome-
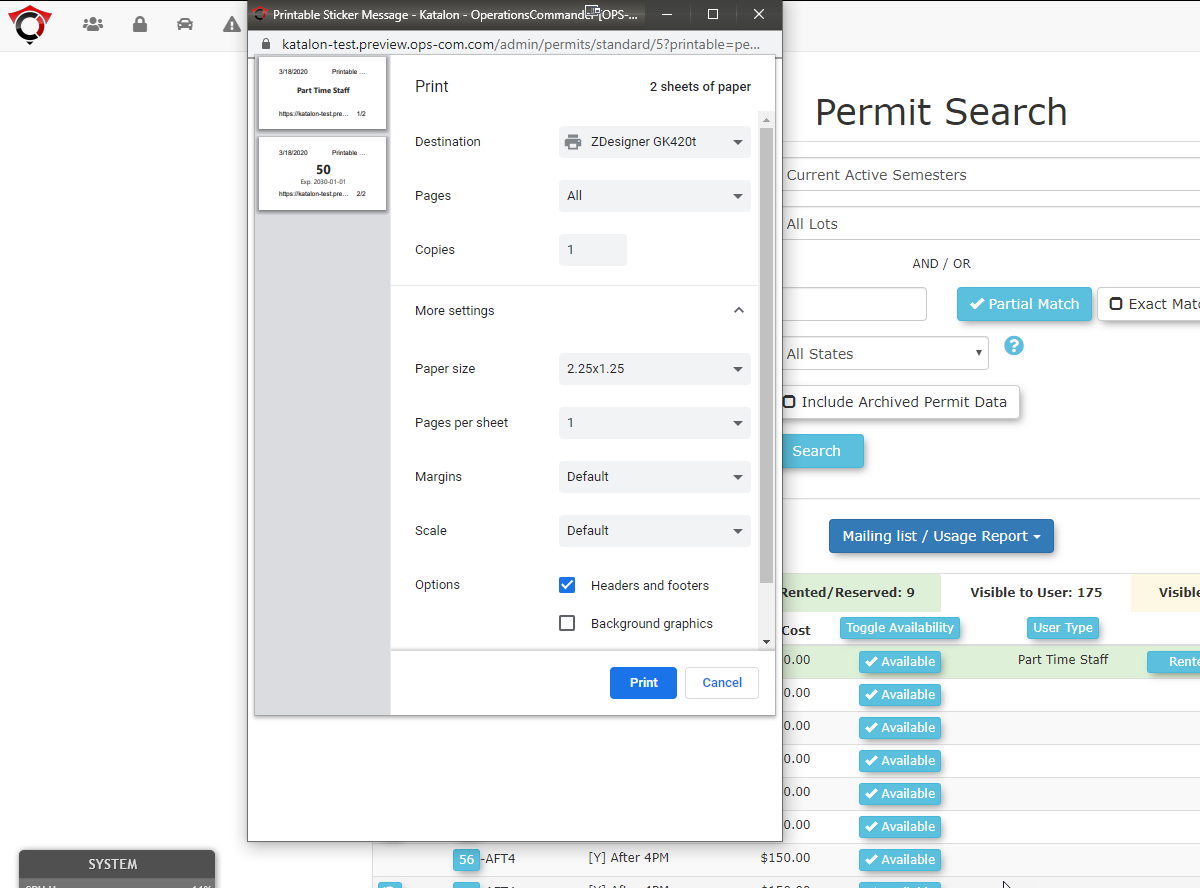
ToFormakeChrome:sure thatAdjust thesticker prints properly on the chrome browser we need to adjust some of the printer properties. Below you can see some of the default properties that will cause problems when trying toprintwith your device.
closeMake sure that you change thesesettings to match theimagerequiredseenconfiguration,belowpaying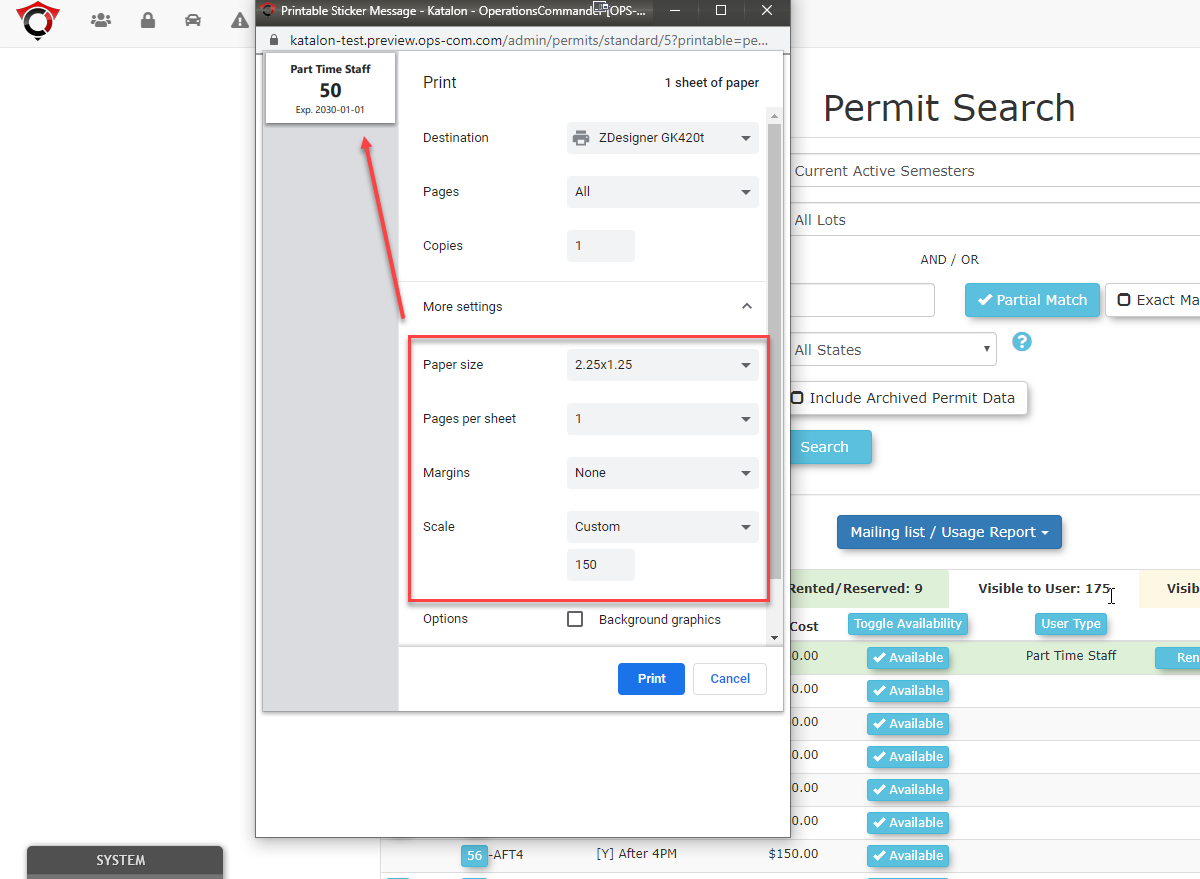
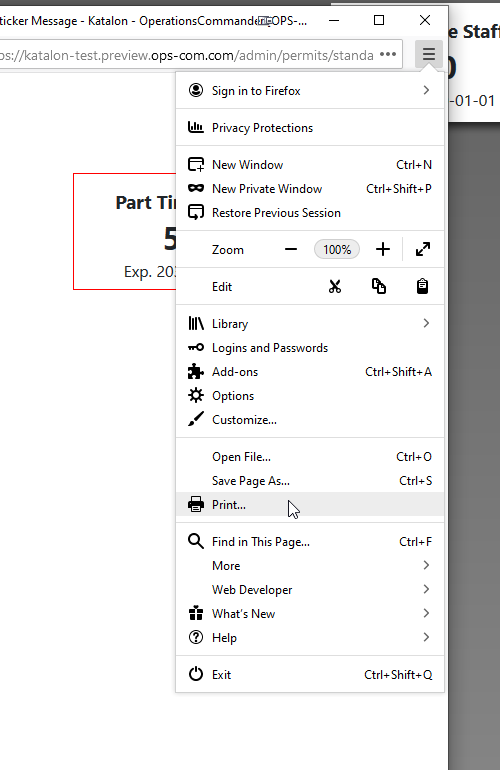
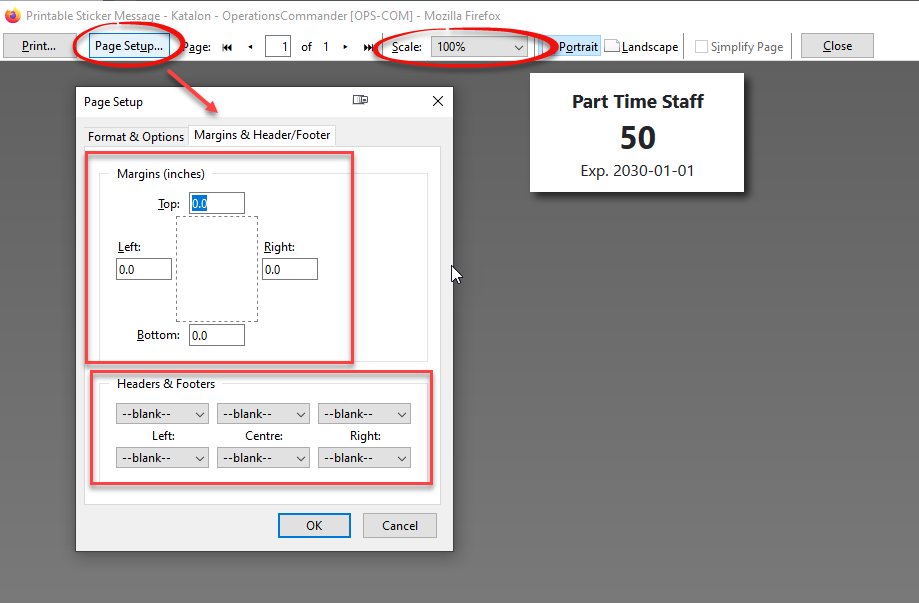
FirefoxTo make sure the sticker prints properly on the Firefox browser we needattention togomarginsintoand ensuring headers and footers are disabled. -
For Firefox: Open the print
settings from Firefoxmenu and adjustsometheofpage properties to match theproperties.requiredToconfiguration,dofocusing on orientation, scale, and margins.
Using this
click the hamburger followed byPrint.
Feature
Once
Nextallyouconfigurationshouldstepsseearesomecomplete,ofadministratorsthe default settings used tocan printinpermitFirefox as seen below.
We want to adjust the fields so that they match all fields shown in the image below.
You should now be able to begin printing your new labelsstickers from theadminAdminside.Portal.Where-
Go to
Print Permits
Printing permits from the admin side can now be done from theParking Permit Information pagebyforclickingthe desired permit. -
-
Click the green print
buttonsbutton located next to the Update Permit button. -
The browser's print dialog will appear, allowing you to print the sticker.
-
After confirming the print settings are correct, you can uncomment the code in the Scripts section of your layout template to re-enable automatic printing.
- Incorrect Windows driver or browser print settings
button.are
the
most common cause of printing issues. Double-check that margins, headers/footers, and paper/stock size are configured exactly as required for your specific sticker labels.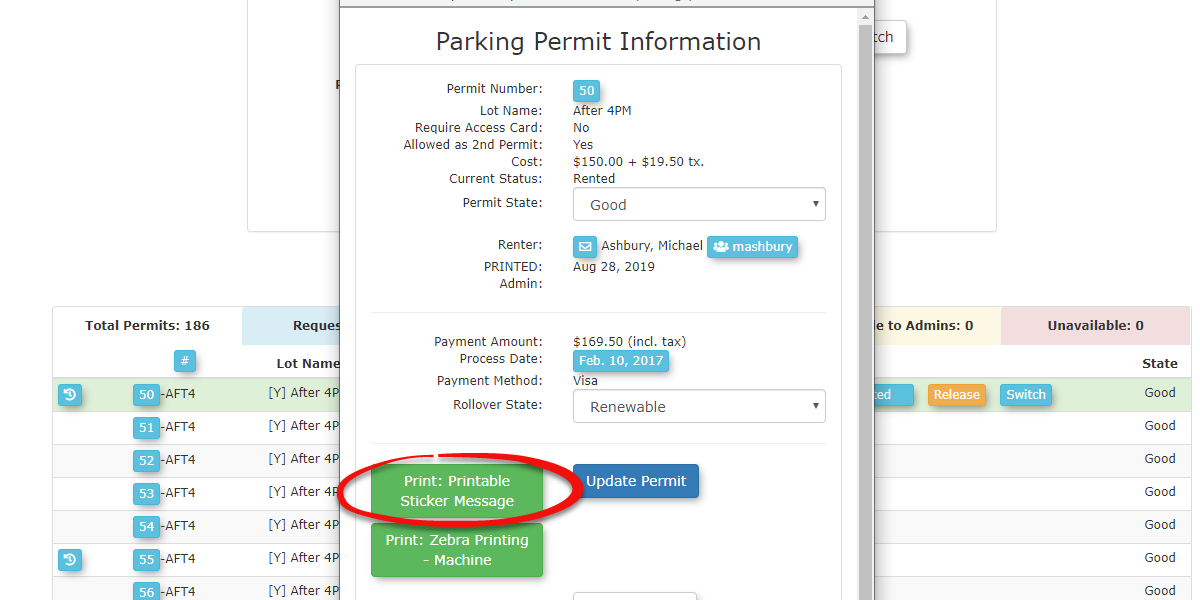
- The Layout Template controls the styling and printing action, while the System Message controls the content and data that appears on the sticker. Ensure both are configured correctly for the integration to work.
usedBest Practices & Considerations
-