
Creating a Violation on the Admin Portal
The Manual Violation Entry in OPSCOMfeature allows administrators to record violationsparking citations directly into the system via the web interface. ThisIts featureprimary purpose is crucial forto digitally logginglog hand-writtenhandwritten tickets,tickets or citations created withfrom a laptoppatrol instead of a handheld device,laptop, ensuring all violation data isremains centralized for tracking, reporting, and court purposes.processing. This article is intended for OPS-COM administrators.
Setup &and Configuration
ThereBefore utilizing the web entry portal, administrators can adjust specific global settings to manage how these tickets are a few settings that relate to Violations issued from the Admin Portalgenerated and not on handheld devices. To access these settings:printed.
-
Hover over System Configuration
,and click System Settings. OnClick the Violations
tab,tab.locate-
Enter a specific prefix into the Prefix to go in Front of Ticket Number
setting. If you wantfield to easily differentiatebetweenadmin portal ticketscreatedfromonhandheld device tickets (e.g., TT-). -
Enter the
Adminstartingportalsequenceand tickets created on the Handheld devices you can set a prefix here. By default it is TT. If you wish to have ticketsAuto Generated, you can setinto the Next Number for Printingsettingfieldasifwell.you wish to have the system automatically generate your ticket numbers.ForTickets that are issued on Car laptops throughEnable the
Admin Portal, there is a setting that showDrivers License on Ticketsif you wish thatcheckbox toprint.print this information on citations issued from a patrol laptop.-
Enable the Signature Required on Tickets
setting if you want there to be an areacheckbox to include asignature.signature line on the printed ticket. -
Save your settings.
The Printexact settingsprint dimensions for tickets issued via a laptop arecan includedbe inadjusted within the Printable Area for Tickets section on this same settings page.
Setup and Configuration
Before utilizing the web entry portal, administrators can adjust specific global settings to manage how these tickets are generated and printed.
-
Hover over System Configuration
section.and click System Settings. -
Click the Violations tab.
-
Enter a specific prefix into the Prefix to go in Front of Ticket Number field to easily differentiate admin portal tickets from handheld device tickets (e.g., TT-).
-
Enter the starting sequence into the Next Number for Printing field if you wish to have the system automatically generate your ticket numbers.
-
Enable the Drivers License on Tickets checkbox to print this information on citations issued from a patrol laptop.
-
Enable the Signature Required on Tickets checkbox to include a signature line on the printed ticket.
-
Save your settings.
The exact print dimensions for tickets issued via a laptop can be adjusted within the Printable Area for Tickets section on this same settings page.
Using this Feature
Offence typesAdministrators can applyissue violations to a Vehicle,specific vehicle, a Personspecific person, or both.both, Referdepending toon thisthe wikioffense articletype forbeing information about setting up your Offence Type items.cited.
EnterEntering a Violation for a Vehicle
-
Hover
overover Violations,and click ViolationEntry.Entry.TheEnter -
Violation Informationscreen provides several fields and options to detailSelect the
violation. Enter all known information into the provided fields:- Ticket Writer
-andAdmin user who is issuingchoose theticket.Ticket - Category from their respective drop-down menus. (The Ticket Number
,ifAuto Generatedis enabled, ticket numberswillbepopulate automaticallygeneratedifbyauto-generationtheissystem.enabled - Ticket Writer
TicketinCategoryyourfrom the dropdown list.-
Click the Toggle More Options button to
show:reveal- additional
- parameters, such as the Spoiled
:Thischeckboxis(tousedvoidtothe entry), thecancelWarning checkbox (to issue without amanual ticket. Enabling this allows incrementally numbered paper violations to be accounted for even if they are not issued (e.g.fine),iforathephysical ticket was ruined). Warning: All violations can now be issued as awarningby enabling this checkbox. You no longer need to pick "Warning" as a separate Ticket Type.- Towing
:iffeethere is a towing charge you would enter the dollar amount here.
- parameters, such as the Spoiled
SearchVehicles:Click the Search Vehicles button to find vehicle information using the license plate or
VINVIN.number.FromClick the
search results, you can:Click thespecific Plate number from the search results toselect andassociatethat vehicleit with the violation.Click theEditbutton to edit the vehicle details if needed.Click thePermit iconto view the permit details for the vehicle.Click theRed Flag iconto view Alarms related to this individual.(This is only available if the Alarms feature is enabled).
Click theRed Alerts buttonto see Incident Alerts associated with this individual.(This is only available if the Incidents feature is turned on).
- If the vehicle
doesisnotunregistered,exist infollow thesystem, you will have the optionprompts to add a new vehicle.This is crucial for logging hard-copy or anonymous tickets. EntertheLocationfrom the dropdown list, theOffencesyou are issuing,Select the
CommentsLocation and the specific Offencesifanyfromcantheiralsorespectivebedrop-downadded.menus.Addany pictures as evidence by usingClick the Attachments
button.button to upload any supporting photographic evidence from your computer.AfterselectingClick the
correct fields and associating a vehicle/person, click theRecord this Violationbutton.button to review the details.OnClick the
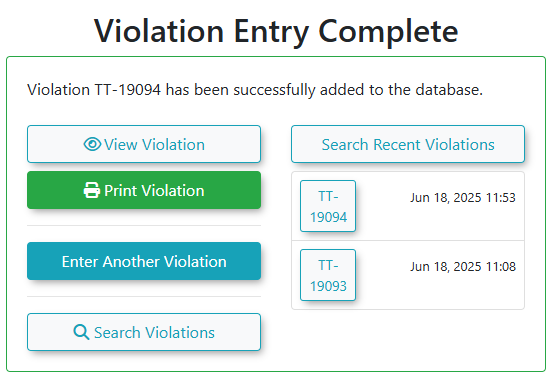
next screen, confirm your violation details by clicking theRecord this Violationbutton, or click the backbutton again on thebrowserconfirmation screen tomake changes.Once you have submittedfinalize theviolation, theViolation Entry Completescreen will appear. From here, you have options to:entry.Print: Print a copy of the violation.View: View the newly entered violation's details.Search Violations: Navigate to the Violation Search page to find other violations.Search Recent Violations:Recent tickets you have entered will show up here.Enter Another violation
EnterEntering a Violation for a Person
FollowstepsHover
1-3overasViolationsabove.and click Violation Entry.-
Complete the initial ticket details and open the extra options if necessary.
-
Click the Search
PersonUsers:Enablebutton to locate the individual by name, ID number, or driver's license. If the person refuses to provide ID, enable the Failed to Identify checkboxifinstead.the person refuses to give you their ID and to identify themselves. If you do have User details, click theSearch Usersbutton to find the user by Name, Student or Employee number, or Drivers License. Fromthe search results, you can:Click the Select button from the search results to associate that user with the violation.
Click thePencil iconto edit the user details if needed.Click thePermit iconto view the permit details for the vehicle.Click theRed Flag iconto view Alarms related to this individual.(This is only available if the Alarms feature is enabled).
Click theRed Alerts buttonto see Incident Alerts associated with this individual.(This is only available if the Incidents feature is turned on).
- If the user does not
existexist,infollow thesystem,promptsyoutowill have the option toadd a new user. profile.
FollowstepsComplete
5-9the remaining location, offense, and attachment fields.-
Click the Record this Violation button, review the details, and click it again to
recordsubmit.this violation
Available Actions and Status Indicators
SomeWhen Offencesearching types will require bothfor a vehicle or person during the entry process, several icons provide quick access to related profile data:
Once a personviolation is successfully submitted, the final completion screen offers quick action buttons allowing you to bePrint added.
Manuallycopy Enteringof Hardthe Copyticket, View the newly entered details, Search Violations, view Search Recent Violations, or Anonymousquickly TicketsEnter Another violation.
Best Practices and Considerations
-
TheAccuracy is Paramount: Ensure all information is precisely transcribed when manually entering violations from a handwritten hard copy. Accurate plate, location, date, time, and offense details maintain critical data integrity for tracking and court purposes. -
Utilize the Spoiled Option: If your organization uses pre-numbered physical paper tickets, consistently use the Spoiled checkbox during manual
violationentryprocess allowsforenteringany physical tickets thatdowerenot have an associated user profileruined orareotherwise unissued. This ensures a complete and accurate audit trail of your sequential ticket stock. -
Leverage the Warning Feature: Use the Warning checkbox to easily issue non-fine warnings for first-time offenders without needing to select "Warning" as a completely separate ticket category.
-
Anonymous Tickets: When logging a hard-copy
tickets.By searchingticket for a vehicle that does not yet exist in the system,youcreate an anonymous vehicle record during the search step. The driver canwritelaterananonymous ticketto that plate or transcribe details fromhard-copied ticketsthat have no linked user.The system typically allows users to navigate touse thelogin screen and pay for such tickets usingOPSCOM Quick Pay/Guest Payments portal to securely look up and pay the ticket without needing tologcreatein.a full account.
Best Practices & ConsiderationsAccuracy is Paramount: When manually entering violations, ensure all information (plate, location, date, time, offence, fine) is precisely transcribed from the hard copy or incident details to maintain data integrity for tracking and court purposes.Utilize "Spoiled" Option: If you are using pre-numbered paper tickets, consistently use theSpoiledcheckbox in OPSCOM for any physical tickets that were not issued, to maintain an accurate audit trail of all ticket numbers.Leverage Warning Feature: Use theWarningcheckbox to issue non-fine warnings, which can be useful for educating parkers or for first-time offenders.Vehicle vs. Person Violations: Understand when to apply a violation to aVehicleversus aPersonbased on the nature of the offence and your organizational policies.Comprehensive Linking: Ensure all relevant photos and documents from your PC are uploaded and linked to the digital violation record for a complete court-ready package.Training: Train staff thoroughly on the manual entry process, especially regarding correct data fields, vehicle/person selection, and the use of "Spoiled" and "Warning" features.