
Payment Reconciliation: Submitted / Processed
The Payment Reconciliation page allows usersadministrators to effectively track and manage the status of payments within a defined time period. ThisIts reportprimary purpose is specifically designed to reconcile the dollar value of received payments with your bank or credit card merchant by accurately comparing the amounts charged between the two.two Userssystems. This article is intended for OPS-COM administrators responsible for financial reporting and auditing.
Setup and Configuration
To effectively filter reconciliation data, administrators can create designated groups and assign specific members to them.
You must have the View Payments permission enabled on your profile to access this report. This permission can be added to your role by a Primary Admin.
Creating a Payment Reconciliation Group
-
Hover over System Configuration, click Admin Management then Manage Groups.
-
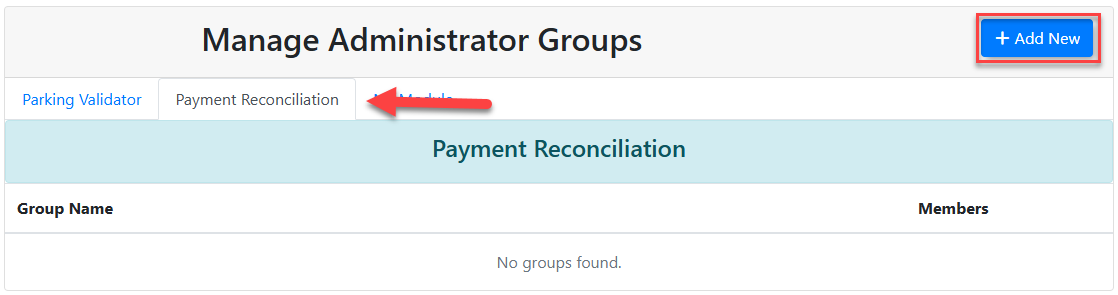
Click the Payment Reconciliation module tab.
-
Click the Add New button in the top right corner.
-
Enter a name for the group into the Group Name field.
-
Set the purpose of the group using the Module drop-down menu.
-
Add the appropriate staff to the group using the Admin Members selection area.
-
Click the Save Group button. The new group will appear at the bottom of the Administrator Groups list.
Adding Members to an Existing Group
-
Hover over System Configuration, click Admin Management then Manage Groups.
-
Click the Edit button next to the specific Administrator Group you wish to modify.
-
Click the Admin Members bar to select and add additional members to the group.
-
Click the Save Group button at the bottom of the window to apply your changes.
Using this Feature
Administrators can filter results to view either submitted or processed payments.
Setup & Configuration
To access the Payment Reconciliation page you must have the permission to View Payments turned on. This can be added to your role by your Primary Admin.
Creating a Payment Reconciliation Group
Navigate toSystem Configuration, thenAdmin Management, and clickbased onManagespecificGroups.This brings you to theManage Administrator Groupspage.To create a Payment Reconciliation group click on thePayment Reconciliationmodule and then clickAdd Newin the top right corner under.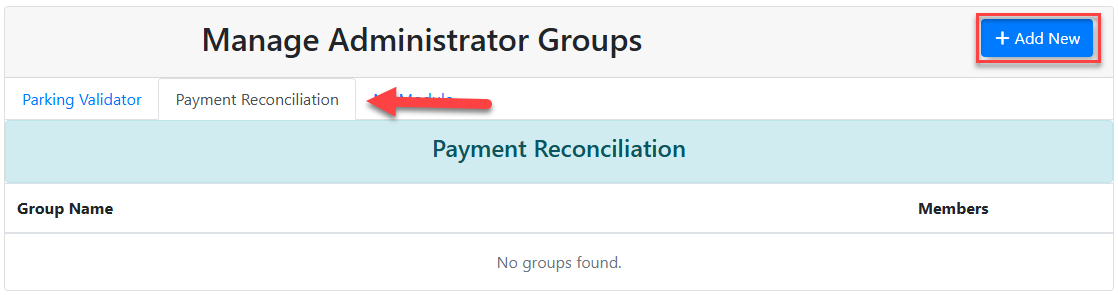
TheAdding New Groupwindow will appear with the following options:OptionsInfo1. Group NameThe Group Name is how you set the name of a group.2. ModuleThe Module is where you can set the purpose of the group.3. Admin MembersThe Admin Members is the area in which you can add admin members to the groupWhen you are finished click theSave Groupbutton. You will see your group added to the bottom of the Administrator Groups.
Adding Members to a Group
Navigate toSystem Configuration, thenAdmin Management, and click onManage Groups.Click the Edit button next to the Administrator Group you wish to edit.Click on theAdmin Membersbar to add more members to the group.When finished, click theSave Groupbutton found at the bottom of the Editing Group.
Using this Feature
-
GoHovertoover Payments,and click Payment Reconciliation. -
On this page, you can apply filters to refine the payment data displayed:Filter by Date Range:view.view using the Filter by Date Range fields.-
Filter by Payment Type:method(s)methods you want to include in theresults.results using the Filter by Payment Type drop-down menu. Filterby Admin Group:Filter reconciliation data based on specific
admindesignated groupsdesignatedusingforthepaymentFilterreconciliation.by
-
Click
Search.the Search button. The resultsarewilldisplayeddisplay directly below the search criteria. -
Click
onany column header within the results table to reorder and sort the data.
SystemAvailable Task (Export Options)Actions
The report page offers various export options,options shown(displayed inas green,green buttons) that allow usersadministrators to generate files for external use:
-
Copy: Copies the row data to your clipboard, allowing you to easily paste it into
anyexternalprogram, such as Excel.programs. -
CSV: Creates and
prompts you to downloaddownloads aCSVComma-Separated Values (Comma-separated values,.csv)csv) file for use inyourspreadsheetprogram of choice.software. -
Excel: Creates and
promptsdownloadsyouato download anMicrosoft Excel (Microsoft.xls)Excel,.xls) file for use in your program of choice.file. -
Print: Prompts your web browser to print the current page view.
Best Practices &and Considerations
- Avoid
Reconciliation Focus:The Payment Reconciliation report isusing thecorrect tool for comparing system payments with bank/merchant payments. AvoidDaily Payments Itemized report forReconciliationreconciliationTasks:tasks.TheWhile the Daily Payments Itemized report shows received payments,butit is not recommended forreconciliationfinancialbecausereconciliation.itIt may display tax differently and can lead to rounding errors, making exact dollar-valuecomparisoncomparisons inaccurate.-
Reconciliation Focus: Always use the Payment Reconciliation report as your primary tool when comparing internal OPS-COM system payments with external bank or merchant settlement statements.
-
[!WARNING]