
SchoolPay
OPSCOM supportsThe SchoolPay hostedHosted Payment Setup process allows administrators to configure SchoolPay as an integrated payment integration.gateway Thiswithin meansthe yoursystem. OPSCOMIts primary purpose is to enable users canto use SchoolPay tosecurely pay for items in OPSCOM items—such as permits, lockers, violations,and etc.violations—directly through the SchoolPay platform during checkout. This article is intended for OPS-COM administrators.
AddSetup aand new Payment Type:Configuration
YouBefore canadding create a newthe payment typetype, byensure selectingyou have your specific SchoolPay account credentials (Username, Password, and Item ID) readily available.
-
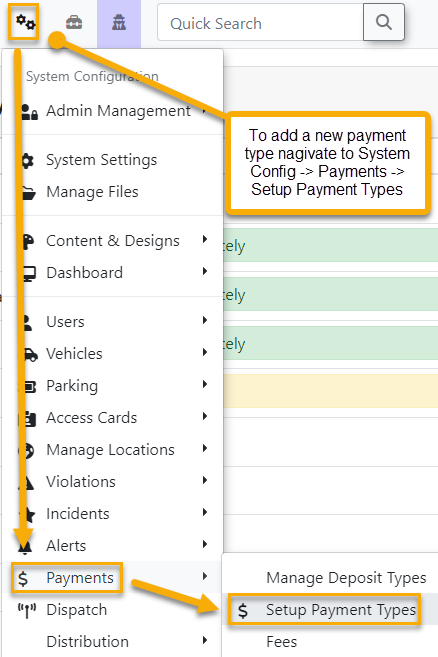
Hover over System Configuration
→and click Payments→then Setup Payment Types.→ -
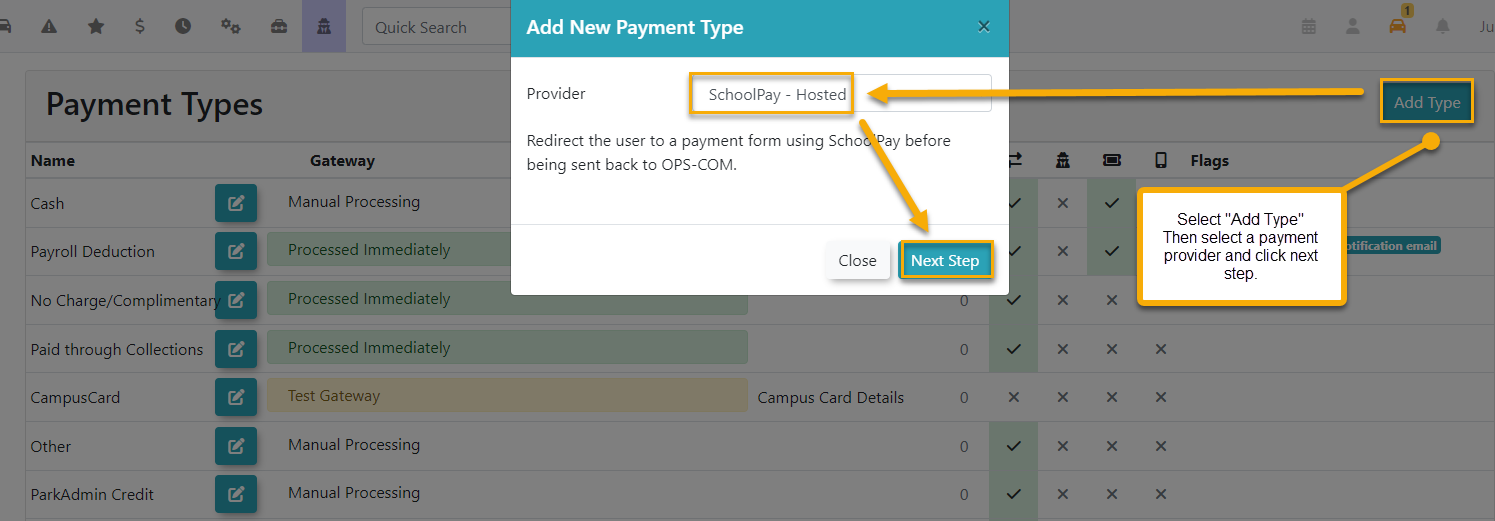
Click the Add
Type.Type button.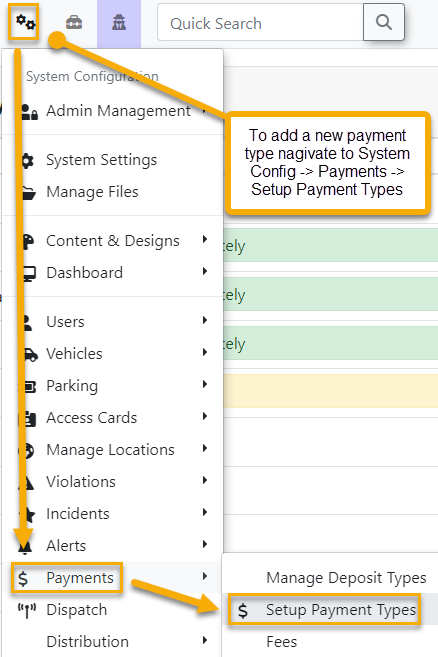
-
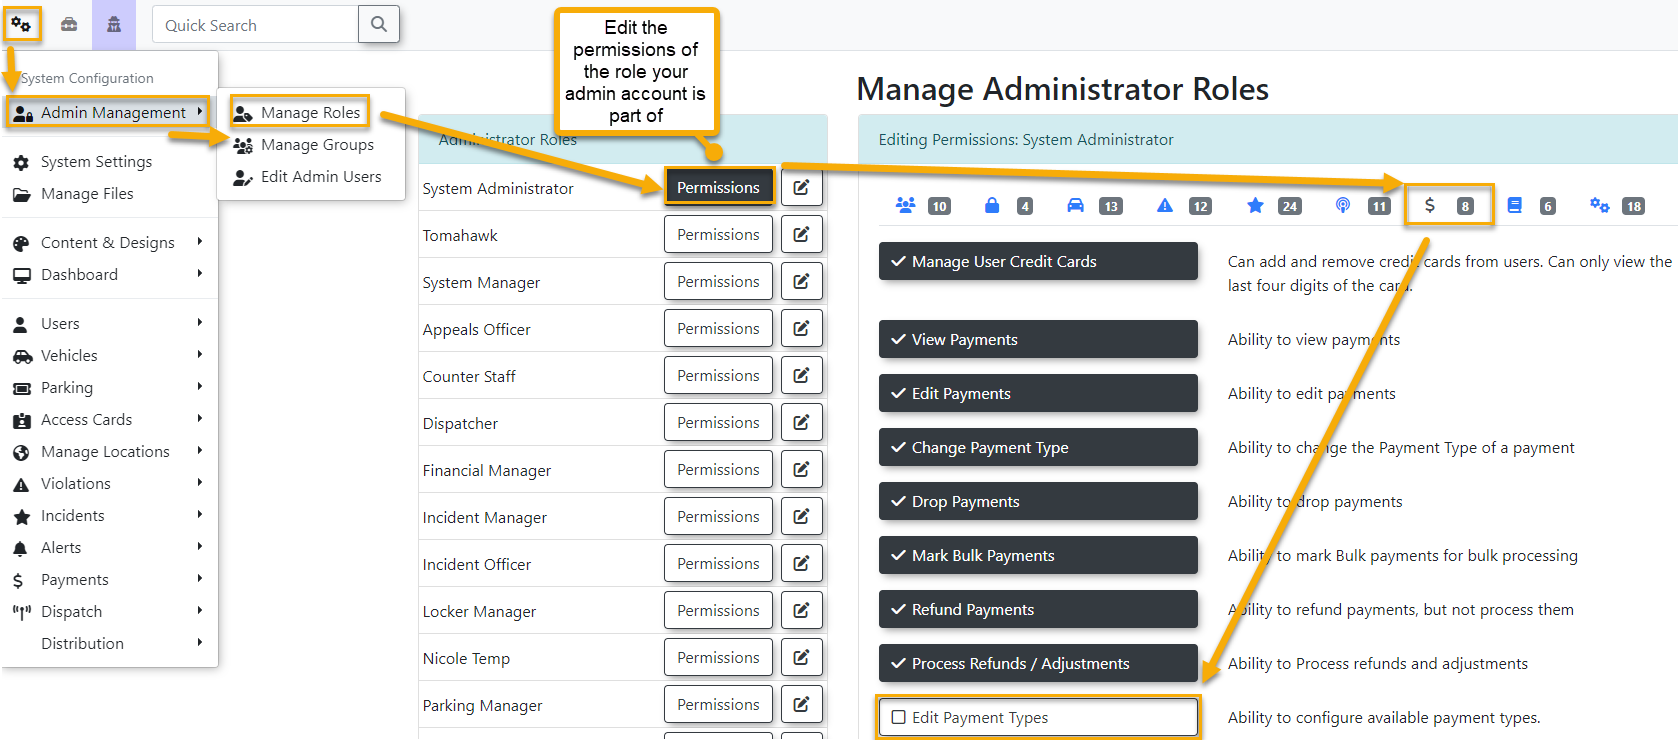
If you don't see "Setup Payment Type" as shown above you may need to give your role thepermissionto do so.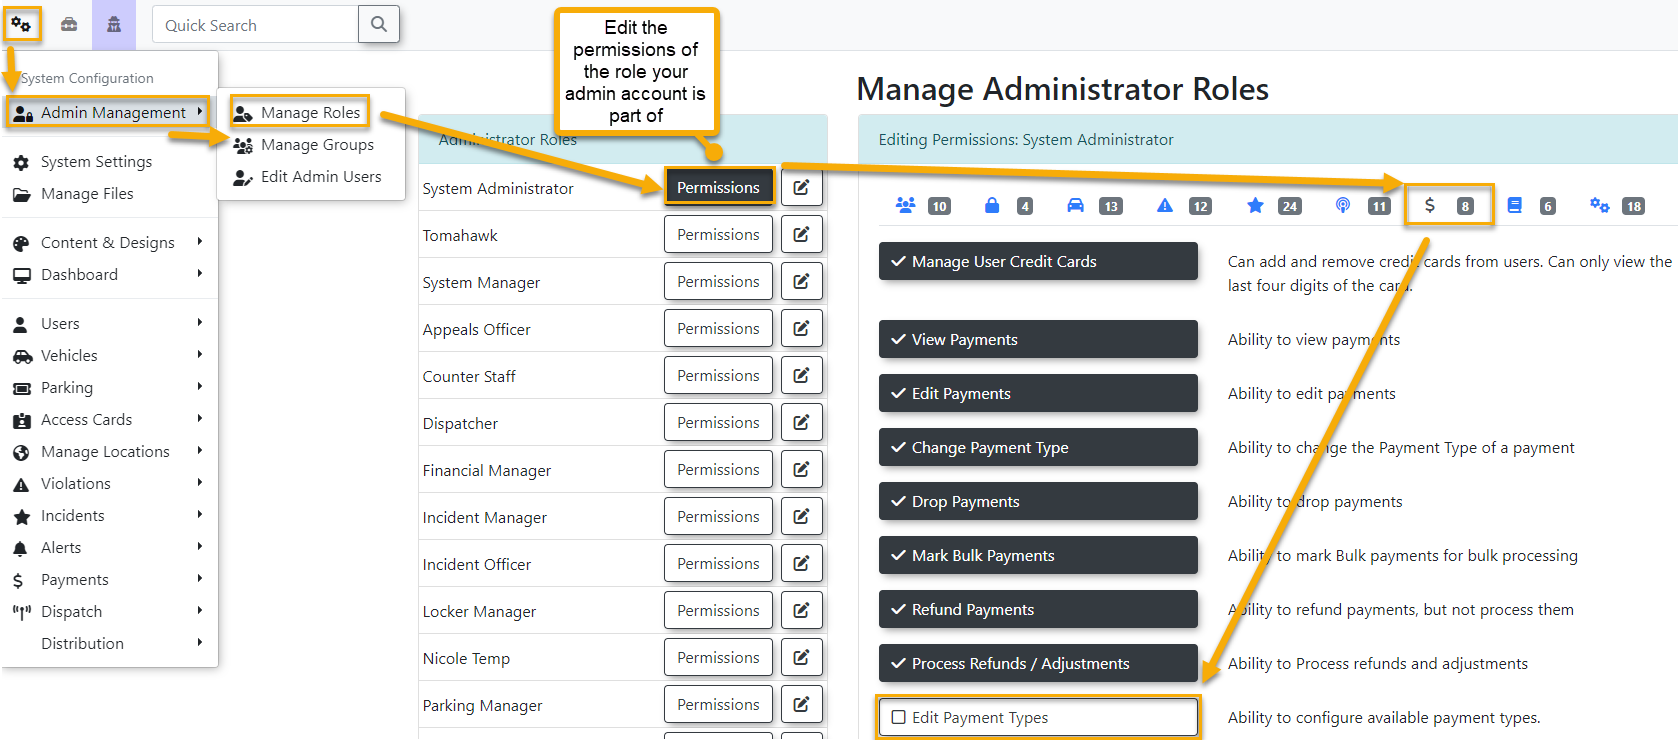
Select
"SchoolPay - Hosted"asfromyourthe provider→drop-down menu. -
Click the Next Step
.button.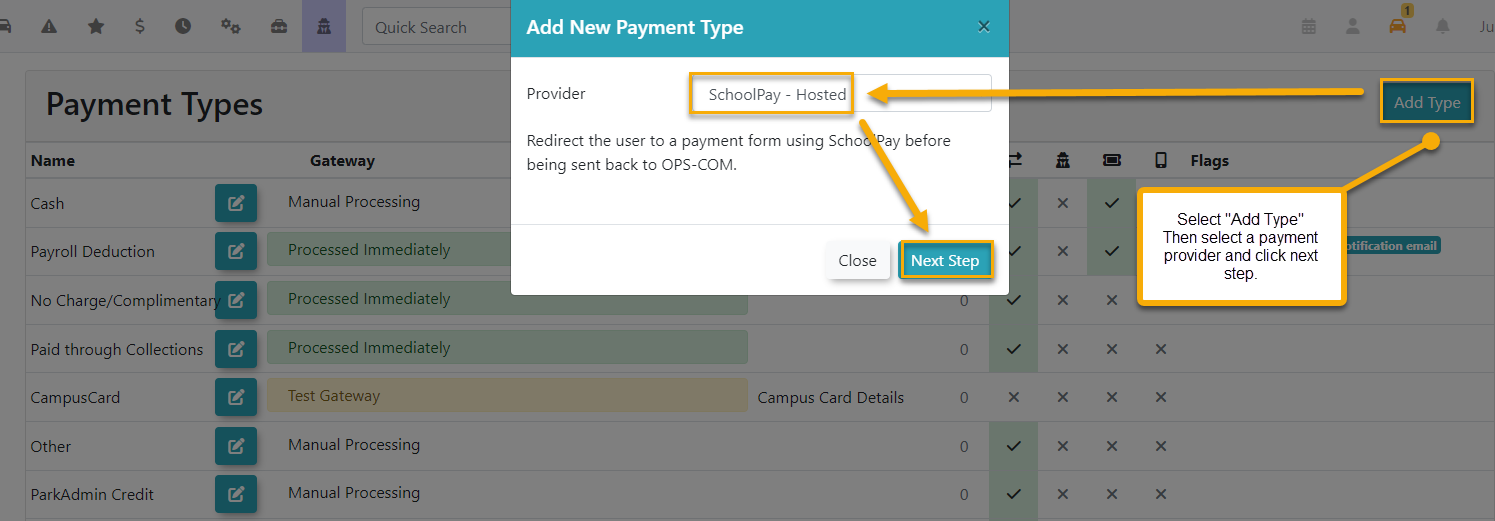
-
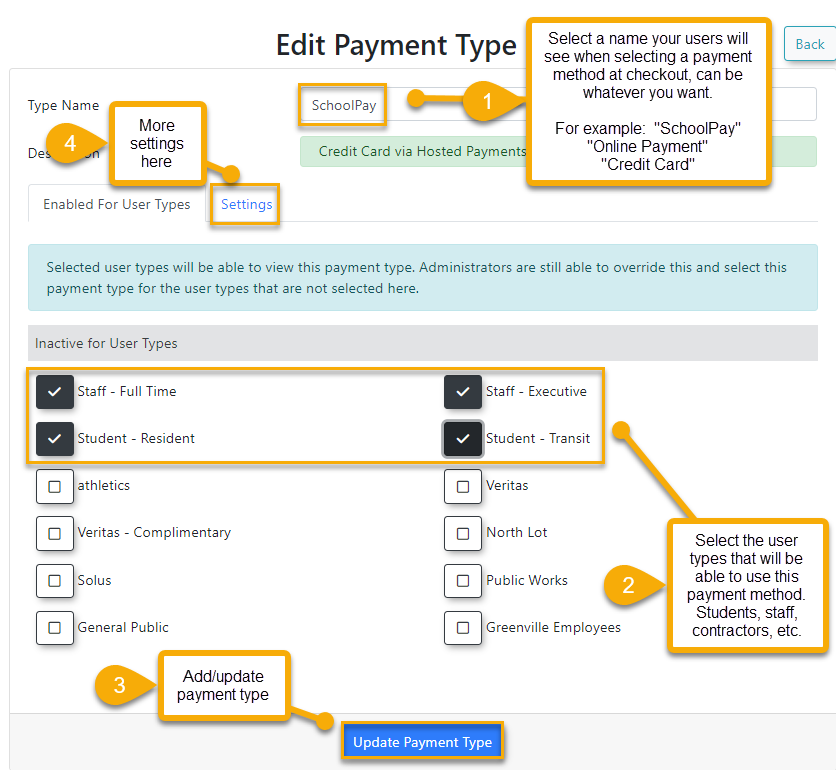
YouEntershouldanowclear,bedescriptivebroughtnametoin the"Edit Payment Type" page: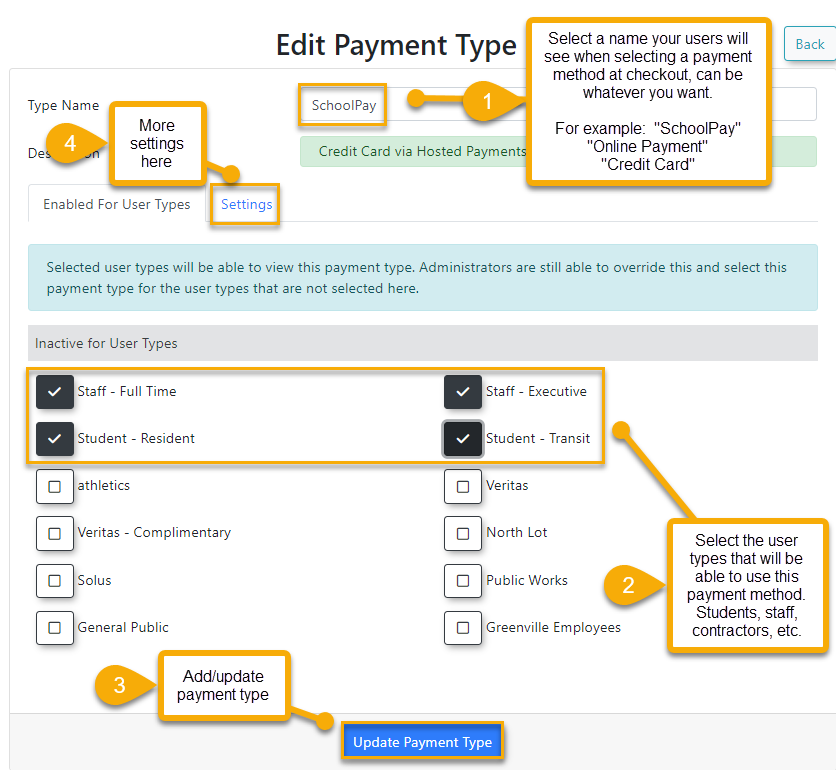
Type
Name:NameThefieldtype(e.g.,name can be whatever you want it to be, though please note this will also be the name displayed to users when using payment checkout and selecting a payment method. You can reference the specific hosted payment provider such as SchoolPay or something more generic such as "Online Credit CardPayment",Payment)."Online -
"CreditSelect
Card",theetc.specificReallyuserit'sgroupsupwho should have access toyou and what you think makes most sense to your site users when making a payment, also might depend on whatthis paymentmethodsmethodyourfromSchoolPaytheaccount supports.Enabled for User Types
:Selectlist. -
Leave the
User Typesyou wish this new Payment Type to be visible to so they can select it during payment checkout. You can change these user types at any timeEdit Payment Type Settings:There are additional required configuration fields in theSettingsarea: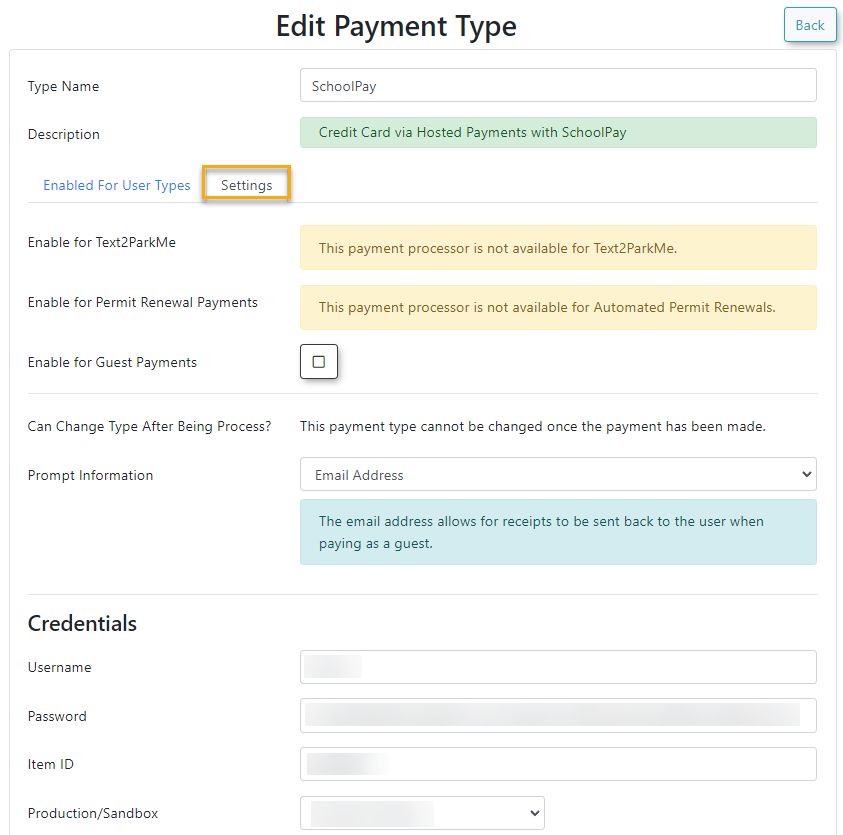
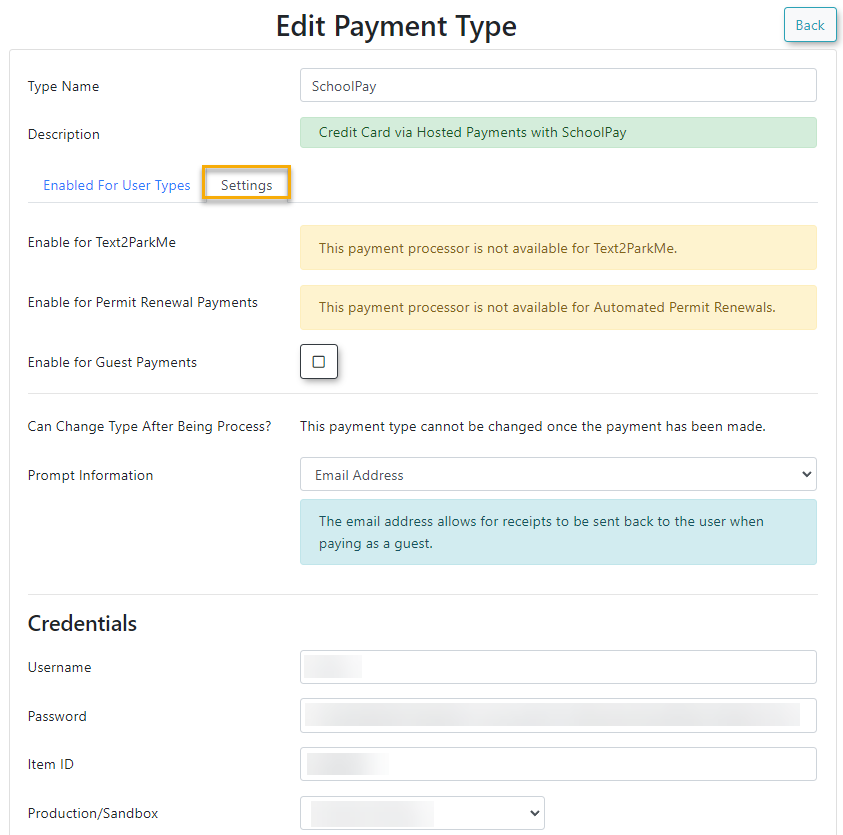
Enable for Text2ParkMe
:Thisandpayment setting isn't currently supported using OPSCOM SchoolPay integration.Enable for Permit Renewal Payments
:Thischeckboxespayment setting isn't currently supported using OPSCOM SchoolPay integration.disabled. -
Enable the Enable for Guest Payments
:checkbox if youaren'tintendusingtothisallowfeatureanonymousleavecheckout on your portal. -
Select Email Address from the
button unchecked.Prompt Information
:Only "Email Address" is supported with SchoolPay Hosted Payments at this time.field.Credentials: -
Enter your Username
:,Obtained from SchoolPay. - Password
:,Obtainedandfrom SchoolPay. - Item ID
:ObtainedintofromtheSchoolPay.respective credential fields. Production/Sandbox:Select whether you are using your
SchoolPayProductionProduction/Liveor Sandbox credentialsorfromSandbox/Testingthecredentials.environmentAdditionally,drop-downalthoughmenu.not required you may find your OPSCOM preview space helpful for testing Sandbox/testing credentials, this way you can keep your production/live OPSCOM data (permits, users, payments, violations, etc) clean/separate during any testing.-
Don'tClickforgetthe Update Payment Type button to saveyourandnewactivate the gateway.
Edit Payment Type User Types:
Using this Feature
Because this is a backend payment typegateway byconfiguration, clickingadministrators do not manually interact with this feature on a daily basis. Once configured, the "UpdateSchoolPay Paymentintegration Type"automatically buttonhandles alongelectronic therouting bottomwhen ofusers theprocess page:

Nothing further needs to be done, however if you are curious whaton the user process looks like when purchasing something in OPSCOM using SchoolPay a number of screenshots are below to show this.portal.
User
The standard user checkout flow screenshots:proceeds as follows:
-
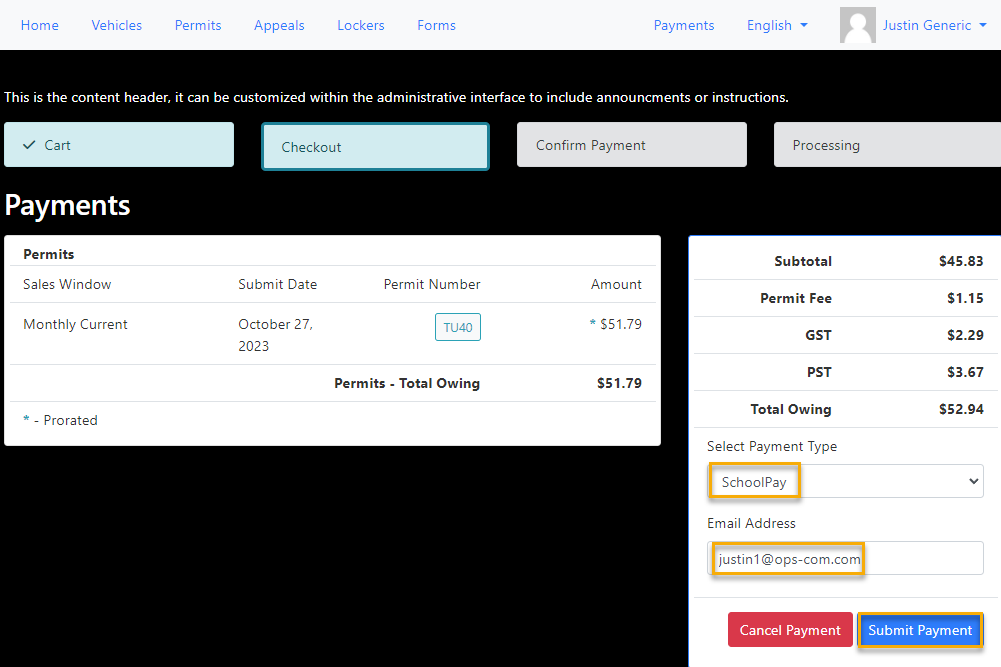
UserSelectselectsthe SchoolPay payment typeinduringOPSCOMtheandOPS-COMsuppliescheckoutanprocess. -
Enter a valid email address
forwhenidentificationpromptedandbyemailthereceipt:system.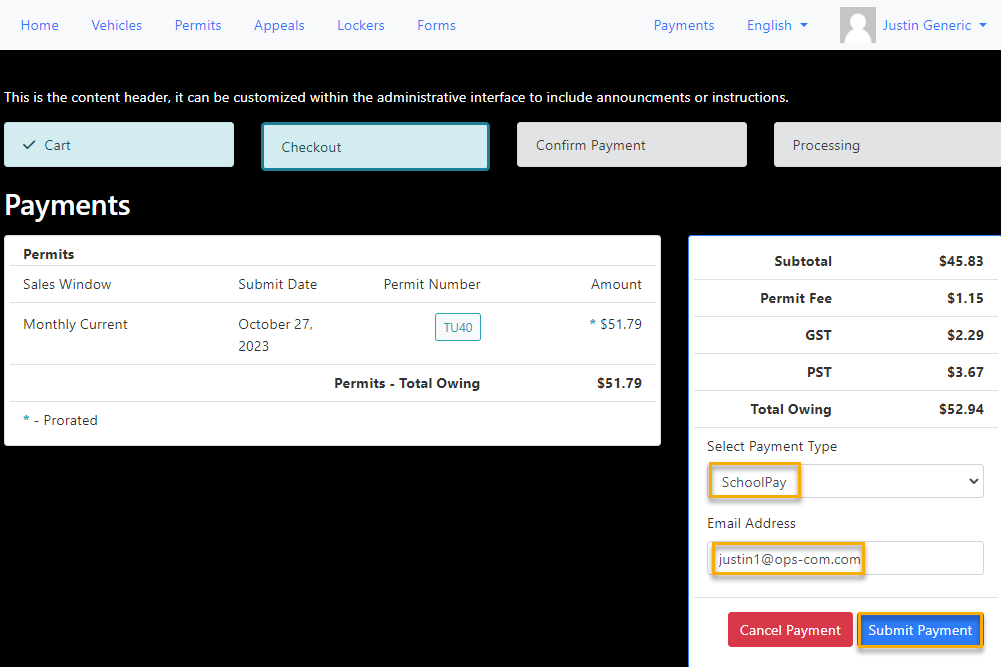
-
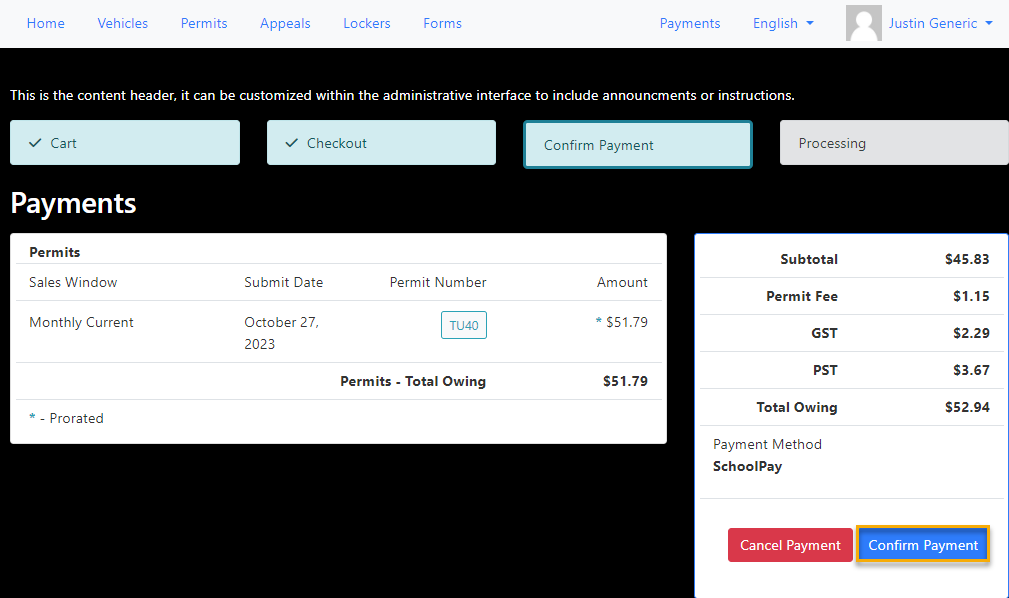
Click
beUsertheconfirmsconfirmationpaymentbuttonintoOPSCOM: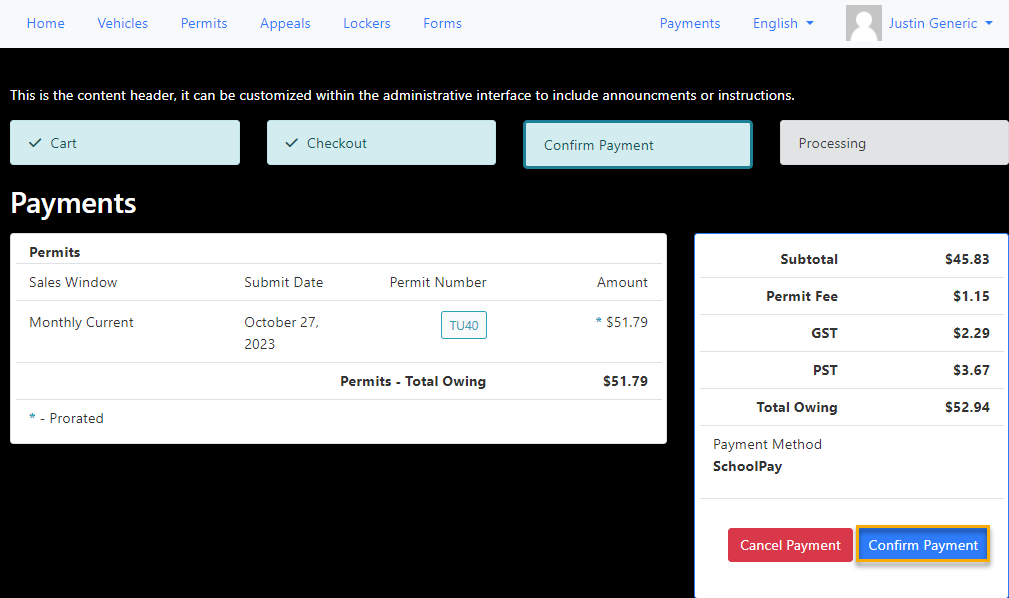
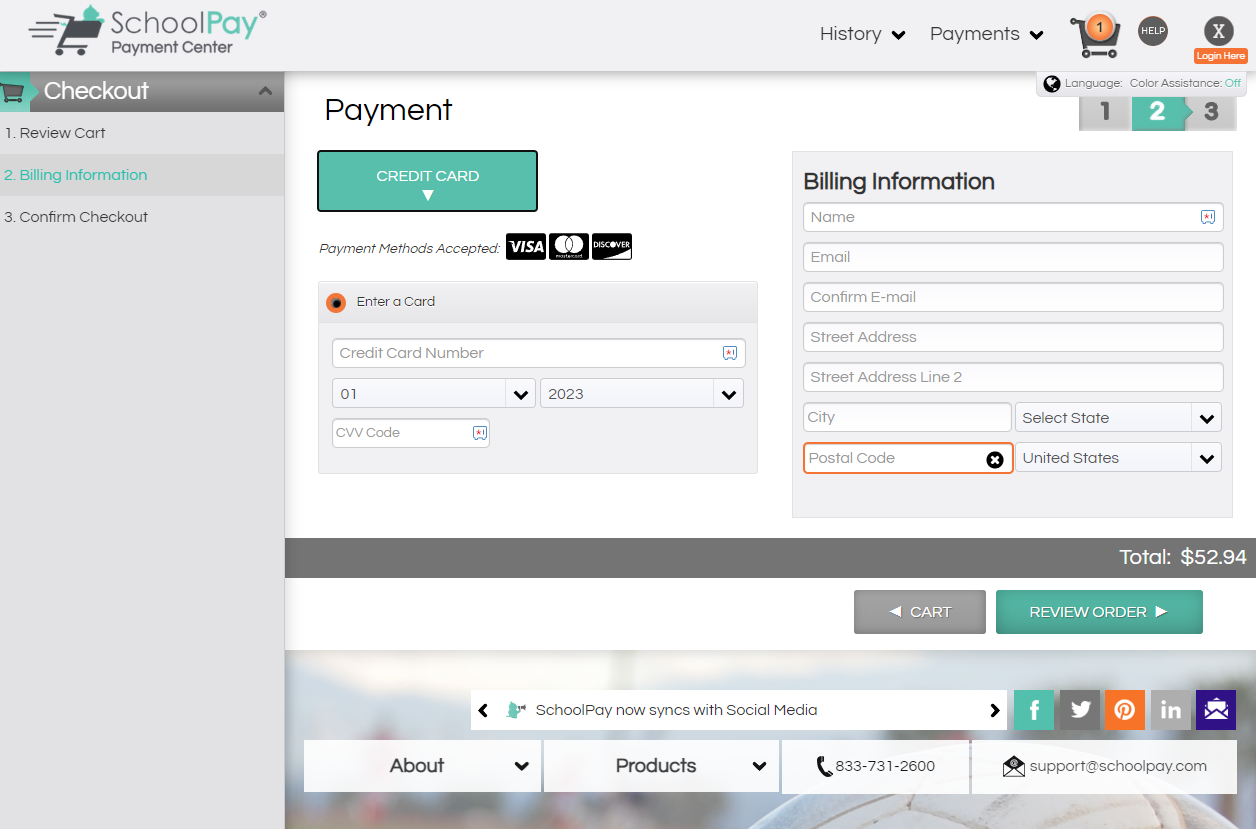
User is thensecurely redirected toSchoolPay'sthesecureexternalsystemSchoolPayforsystem.payment -
Enter the required credit card details
andonprocessing:the SchoolPay interface.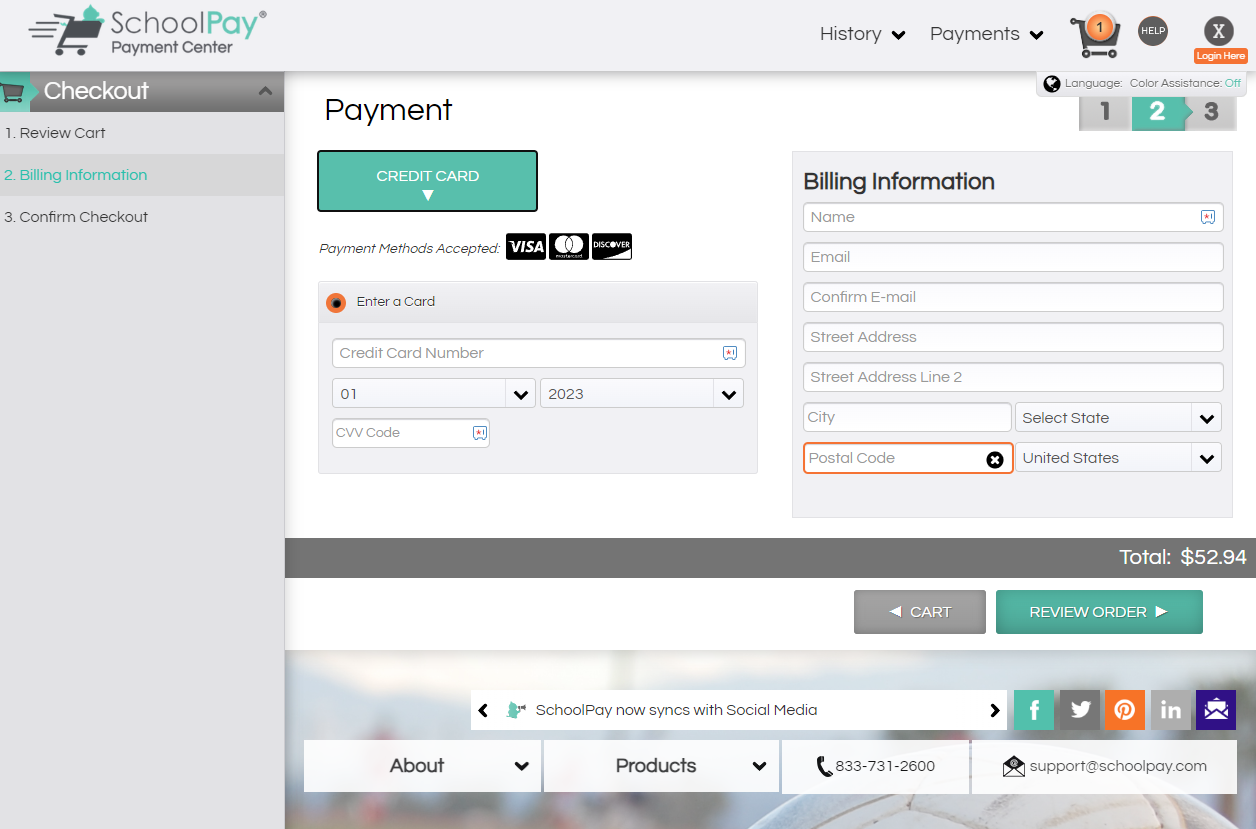
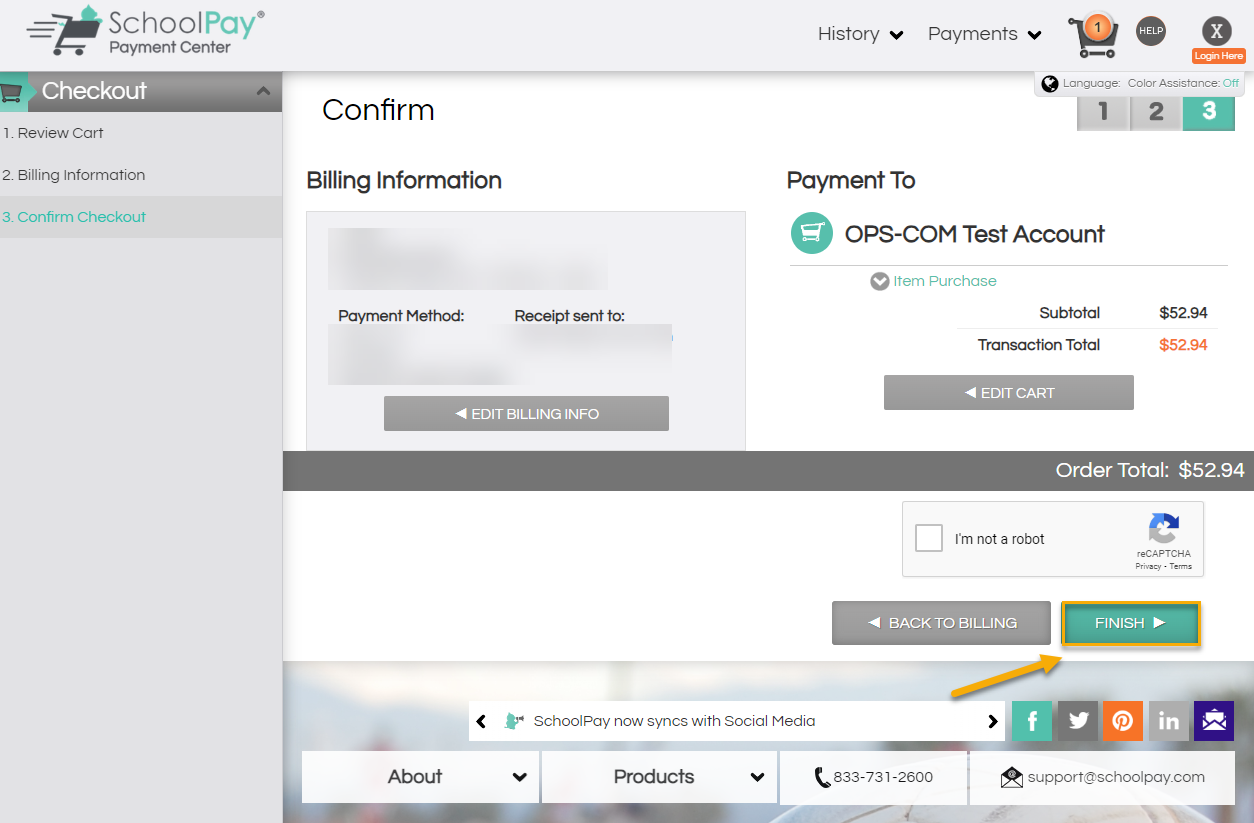
-
UserClickconfirmsFinishpaymenttodetailsprocess the funds andselects "Finish" at which point their payment method is charged for the transaction: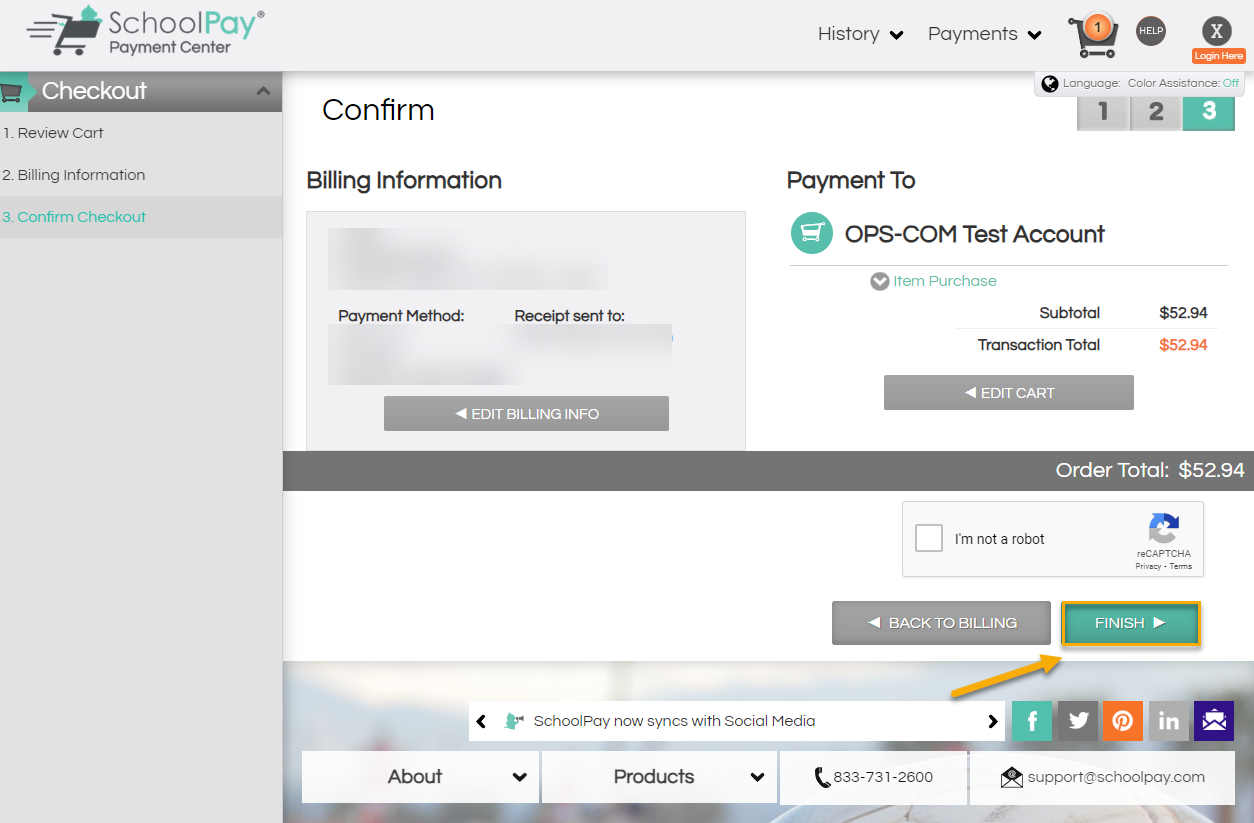
If the payment is successful users will beautomaticallyredirectedredirect back toOPSCOMthecheckoutOPS-COMwithportal.
Visual Cues and Status Indicators
-
Automated Receipts: Upon a successful transaction and redirection back to OPS-COM, the system displays a final payment
confirmationconfirmation:
screen.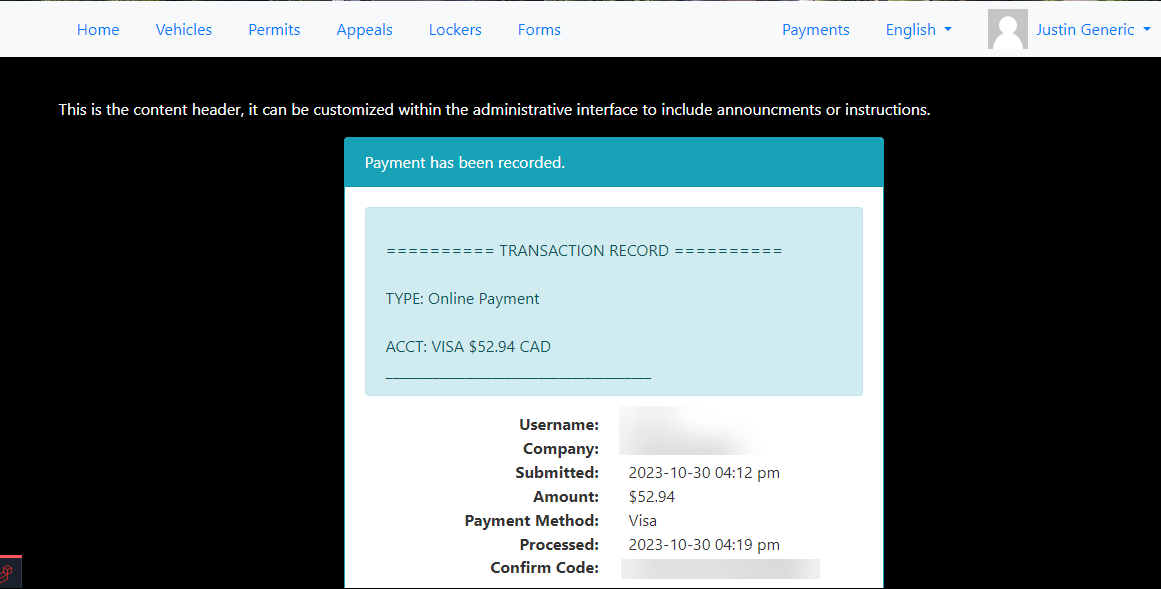
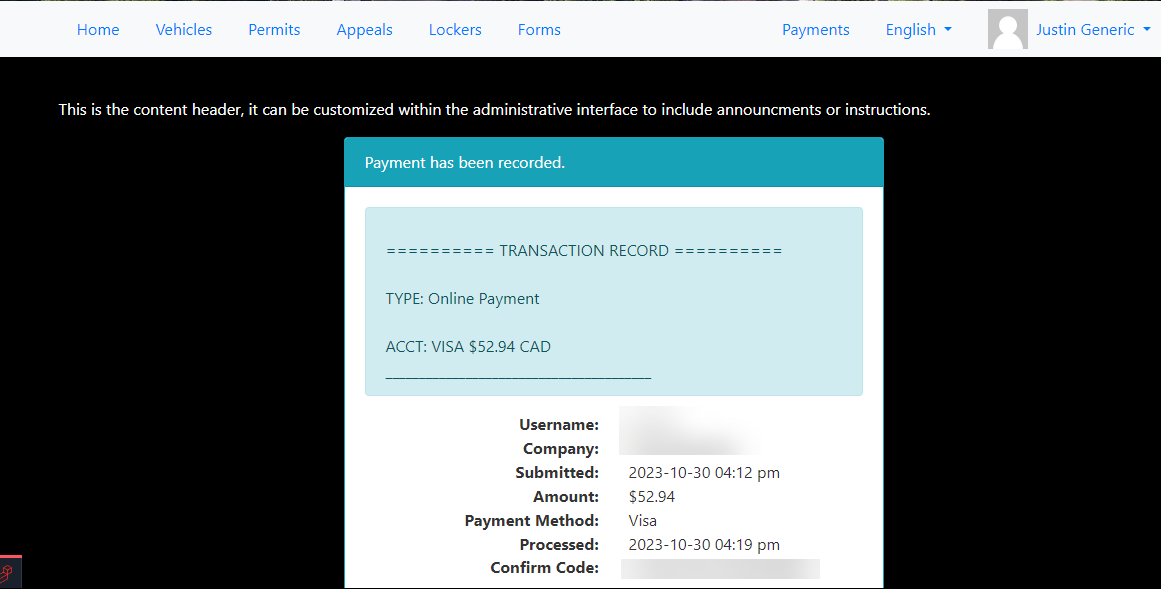
EmailDual email receiptswillarealsoautomaticallybegenerated and sent to the user's supplied email address—one standard receipt from SchoolPay andOPSCOMone itemized receipt from OPS-COM.
Best Practices and Considerations
Unsupported Features: The OPS-COM SchoolPay integration does not currently support the Text2ParkMe or Permit Renewal payment features. Do not enable these specific checkboxes during configuration, as they will cause checkout errors.
-
Testing in Sandbox: Always utilize your OPS-COM preview environment to test your Sandbox credentials before going live. This keeps your live production data—such as active permits, users, and financial records—completely separate and clean during the
usertestingsuppliedphase.email -
User-Friendly Naming: The text you enter into the Type Name field is exactly what your users will see when selecting a payment method during checkout. Choose a clear, recognizable name like "Online Credit Card" or "SchoolPay" to avoid confusion.
-
Check Your Permissions: If you attempt to follow the setup steps but do not see the Setup Payment Types option in your menu, verify your administrative roles. You must have the appropriate system configuration permissions enabled on your account profile to add or edit payment gateways.