
Creating a Violation on the Admin Portal
Entering
Manual Violation Entry in OPS-COM allows administrators to record violations directly into the system via the web interface. This feature is crucial for digitally logging hand-written tickets, or citations created with a laptop instead of a handheld device, ensuring all violation data is centralized for tracking, reporting, and court purposes.
Using this Feature
Offence types can apply to a Vehicle, a Person or both. Refer to this wiki article for information about setting up your Offence Type items.
Enter a Violation for a Vehicle
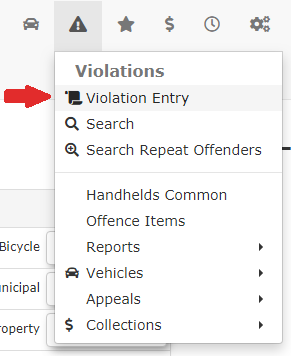
- Hover over
theViolationsicon, and click ViolationEntryEntry..
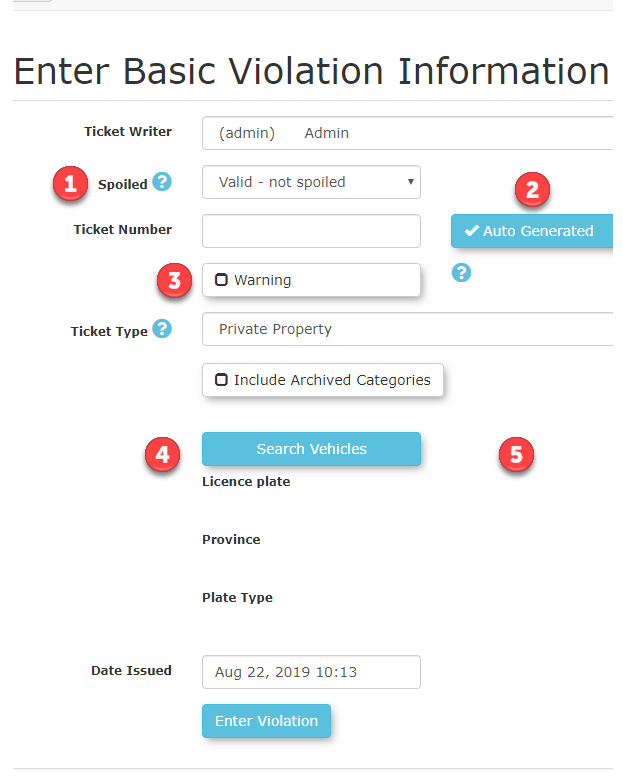
The Enter Basic Violation Information screen
toisprovidesdisplayed. The numberedseveral fieldsareandexplainedoptionsbelow:detail the violation.
- Enter all known information into the provided fields:
#1Ticket Writer - Admin user who is issuing the ticket.- Ticket Number, if Auto Generated is enabled, ticket numbers will be automatically generated by the system.
- Ticket Category from the dropdown list.
- Click the Toggle More Options button to show:
- Spoiled
-: This is used to cancel a manualticket.ticket.ThisEnabling this allows incrementally numbered paper violations to be accountedfor.for
issued#2 - Auto Generated- Ticket numbers can now be Auto Generatedeven ifthistheycheckboxareisnotenabled.(e.g., if a physical ticket was ruined).
#3 -Warning-: All violations can now be issued as a warning by enablingthe 'Warning'this checkbox. Youwillno longer need to pick'Warning'"Warning" as a separate Ticket Type.#4Towing:andif#5there-isVehicleaortowingPerson - Ifcharge youhavewould enter thefeaturesdollarenabledamountyouhere.
canissue - Spoiled
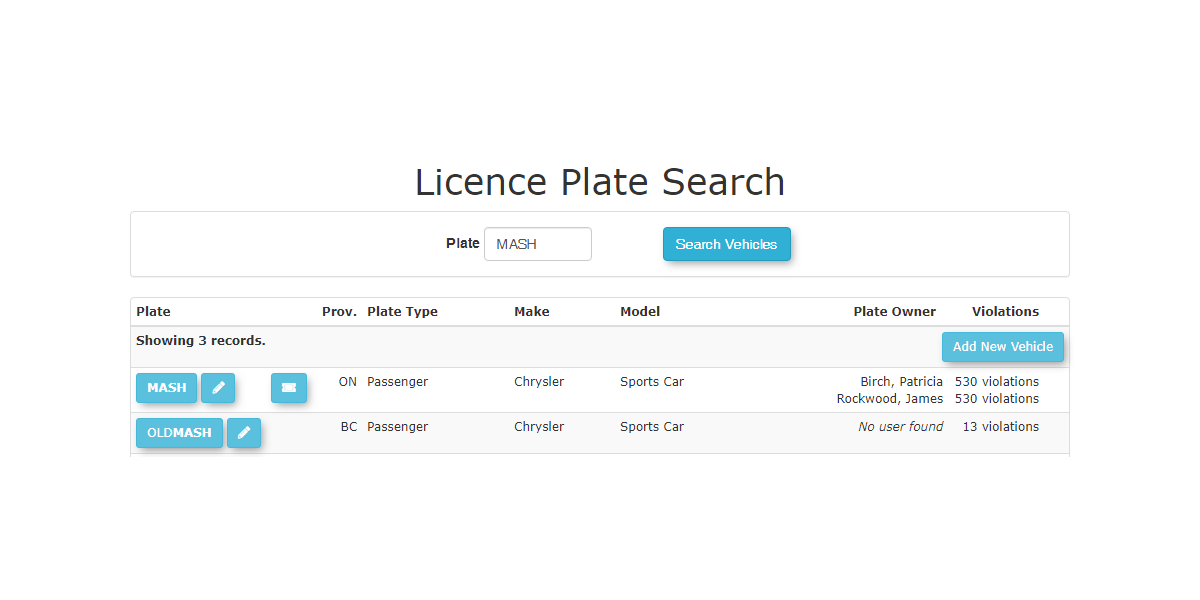
- Search
violation to a Vehicle or a Person.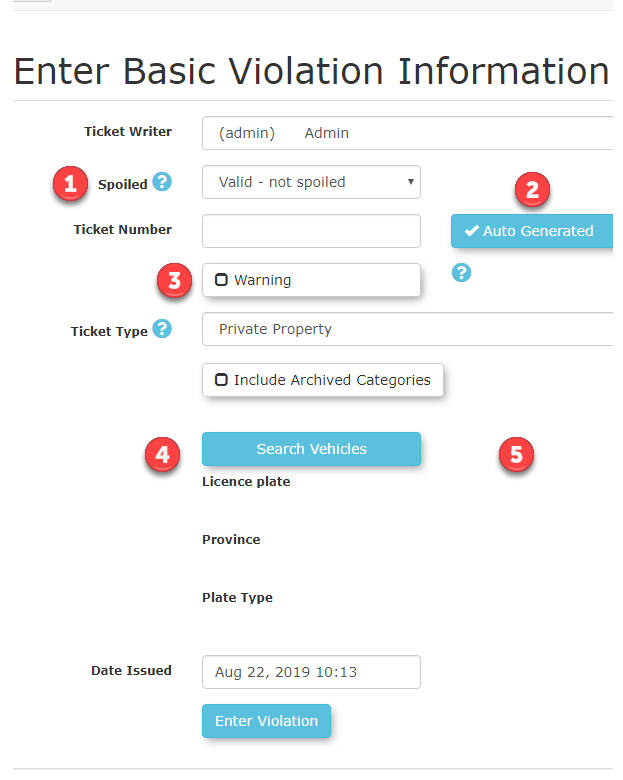
: Click the Search Vehicles button to find vehicle informationEnter all known information in the fields provided.Vehiclesbyusing the license plate or VIN number.You- From the
Searchsearcharea. There are a number of actionsresults, youcan take from this screen.can:If you clickClick the Platenumber,numberyou willto select and associate that vehicle with thevehicle.violation.If you clickClick thePencilEdit
youbuttoncanto edit the vehicle details if needed.If you clickClick the Permityou
cantolook atview thePermitpermit details for the vehicle.If you clickClick the RedFlag,Flagyouiconcanto view Alarms related to this individual.Note,(Thisthis willis onlybeavailable ifyou havethe Alarmsfeaturesfeatureenabled.is enabled).If you clickClick the Red Alertsbutton,buttonyou canto seetheIncident Alerts associated with this individual.Note,(Thisthis willis onlybeavailable if the Incidents feature is turned on).
- If the vehicle does not exist in the system, you will have the
Incidentsoptionfeaturestoturnedaddon.a new vehicle. This is crucial for logging hard-copy or anonymous tickets.
can choose a vehicle or add a new one from - From the
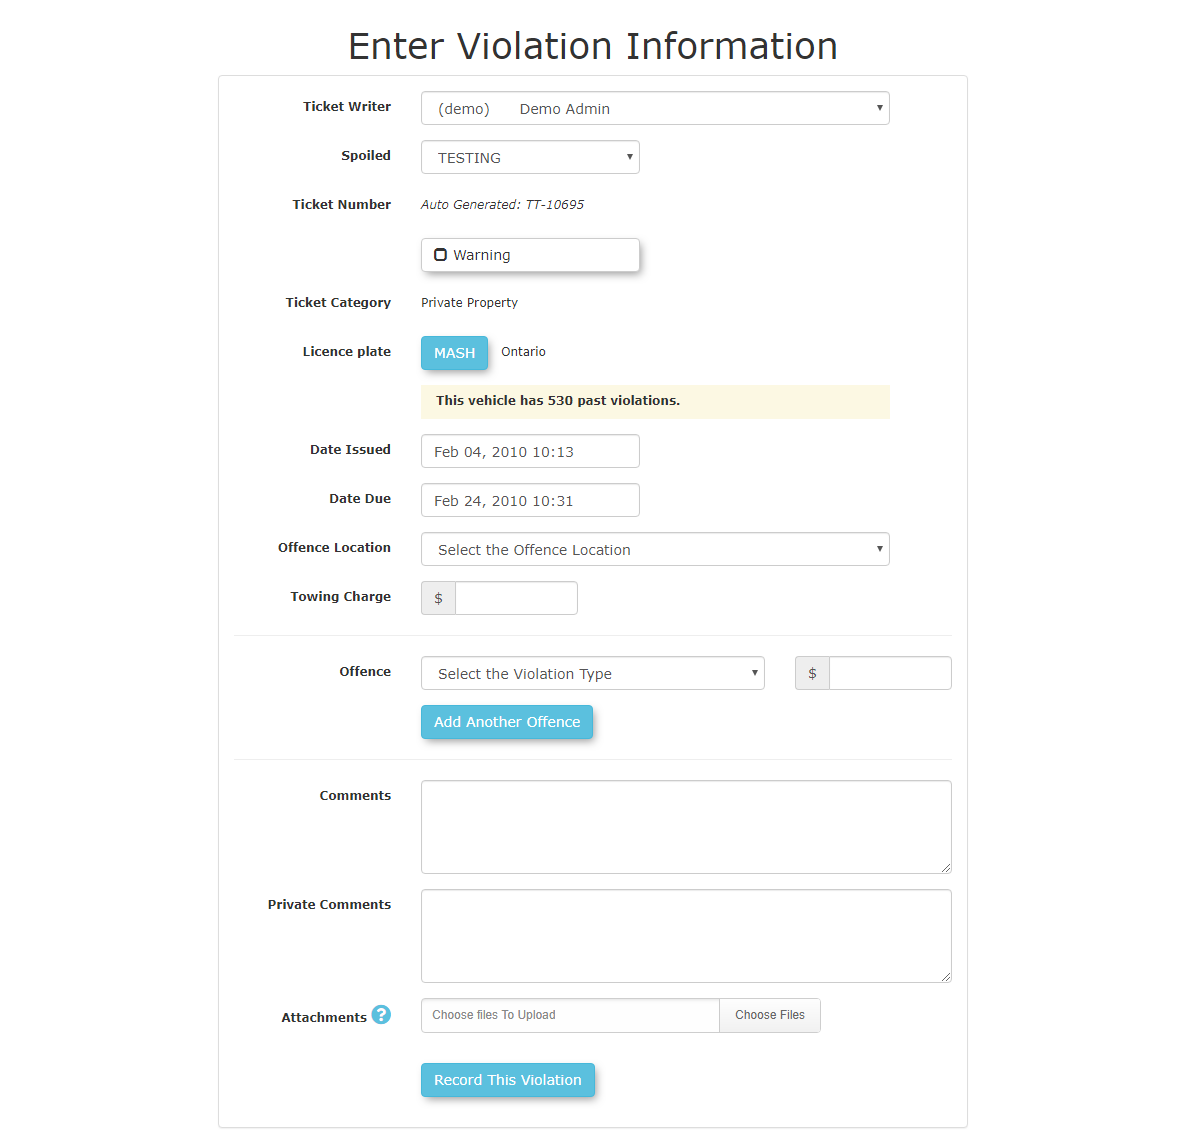
- Enter the
thedropdown list, the Offences you are issuing, the Comments if any can also be added.
- Add any pictures as evidence by using the Attachments button.
- After
you have selectedselecting the correct fieldsclick theEnter Violationbutton to proceed.
vehicle/person,EnteringandConfirmingassociatingViolationaInformationTheEnter Violation Informationscreen is displayed. Allowing the Administrator to enter more details about the Violation.
Clickclick the Record this Violation button. - On
Confirmthe next screen, confirm your violation details by clicking the Record this ViolationInformationbutton,screen is displayed.Verify the details are correct andor click theInformation Correctback buttonto saveon theviolation.
browser
to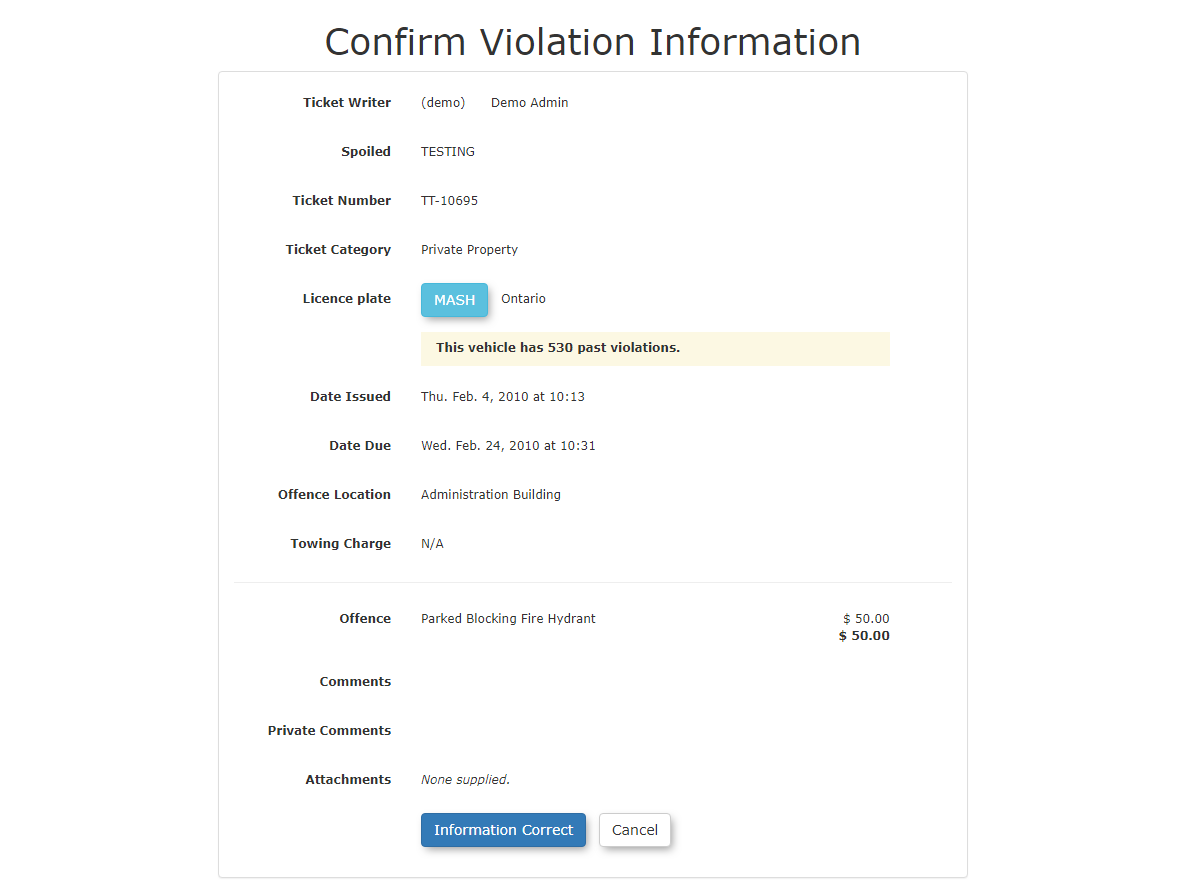
makeViolationchanges. -
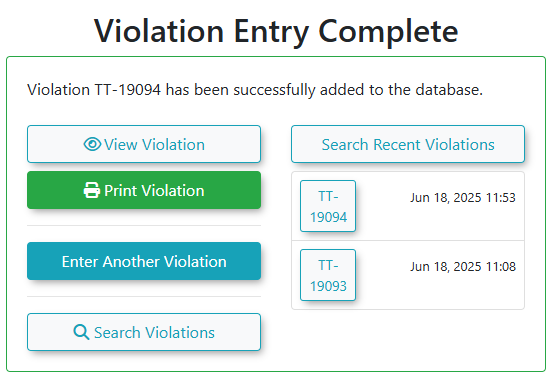
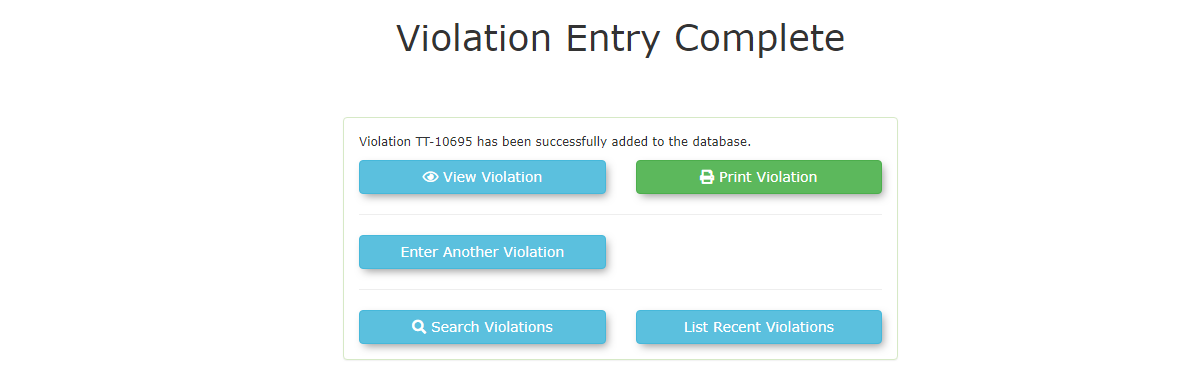
Once you have submitted the
violationviolation, the Violation Entry Complete screen will appear. From here, you have options to:- Print: Print a copy of the violation.
- View: View the newly entered violation's details.
- Search Violations: Navigate to the Violation
EntrySearchCompletepagescreento find other violations. - Search Recent Violations: Recent tickets you have entered will
appearshowwhereup here. - Enter Another violation

Enter a Violation for a Person
- Follow steps 1-3 as above.
- Search Person: Enable the Failed to Identify checkbox if the person refuses to give you
cantheirchooseID and toprint,identifyview,themselves. If you do have User details, click the Search Users button to find the user by Name, Student or Employee number, or Drivers License.- From the search
violations.results,
you can:- Click the Select button associate that user with the violation.
- Click the Pencil icon to edit the user details if needed.
- Click the Permit icon to view the permit details for the vehicle.
- Click the Red Flag icon to view Alarms related to this individual. (This is only available if the Alarms feature is enabled).
- Click the Red Alerts button to see Incident Alerts associated with this individual. (This is only available if the Incidents feature is turned on).
- If the user does not exist in the system, you will have the option to add a new user.
- From the search
- Follow steps 5-9 to record this violation
Some Offence types will require both a vehicle and a person to be added.
Manually Entering Hard Copy or Anonymous Ticket
Tickets
SearchingThe manual violation entry process allows for entering tickets that do not have an associated user profile or are hard-copy tickets.
- By searching for a vehicle that does not yet exist in the
system will allowsystem, youtocan write an anonymous ticket to that plate ortotranscribeharddetails from hard-copied ticketswiththat have nousers.linked user. - The
usersystemcantypicallythenallows users to navigate to the login screen and pay forthesuchtickettickets using OPS-COM Quick Pay/Guest Payments withoutloggingneeding to log in.

Best Practices & Considerations
- Accuracy is Paramount: When manually entering violations, ensure all information (plate, location, date, time, offence, fine) is precisely transcribed from the hard copy or incident details to maintain data integrity for tracking and court purposes.
- Utilize "Spoiled" Option: If you are using pre-numbered paper tickets, consistently use the Spoiled checkbox in OPS-COM for any physical tickets that were not issued, to maintain an accurate audit trail of all ticket numbers.
- Leverage Warning Feature: Use the Warning checkbox to issue non-fine warnings, which can be useful for educating parkers or for first-time offenders.
- Vehicle vs. Person Violations: Understand when to apply a violation to a Vehicle versus a Person based on the nature of the offence and your organizational policies.
- Comprehensive Linking: Ensure all relevant photos and documents from your PC are uploaded and linked to the digital violation record for a complete court-ready package.
- Training: Train staff thoroughly on the manual entry process, especially regarding correct data fields, vehicle/person selection, and the use of "Spoiled" and "Warning" features.