
Pricing and Lot Admin
The Pricing and Lot Admin page allows you to add new lots as well as to edit the price of a permit for the specified lot by editing the text box on the same line as the lot name.
Quick Steps
Quick step for editing lot information.
- Hover over Parking Management then Lot Administration and select Pricing & Lot Admin.
- To view archived lots, click Show Archived.
- To export data, click on the Export button at the far right of each lot line.
- Click on the Lot Name to view and edit lot details.
- In the General Tab you can update the lot name, short name, lot group, access settings, visibility, and more.
- In the Zone & Location Tab you can set the location description, upload an image, and configure the sales window and access settings.
- In the Standard Permits Section you can configure cost, prorated settings, second permit settings, and waiting list settings, along with the lot sales window.
- In the Temporary Parking Tab you can set maximum permits, pricing, permit duration, and QR Codes.
- In the Flex Permits Tab you can add different permit costs and apply them to a time and day of the week.
- In the Lot LPR Settings you can configure free parking time per lot.
- In the Additional Settings Tab you can add a Banner Detail Code.
- Click Update Lot after making all your desired changes on a tab.
Lot Admin Page
Parking Management
- Locate Lot Administration: From the dropdown menu, hover over Lot Administration.
- Navigate to the Pricing & Lot Admin page: In the dropdown, click on Pricing & Lot Admin. This will open the Permit Pricing & Lot Administration screen where you can manage lot details.
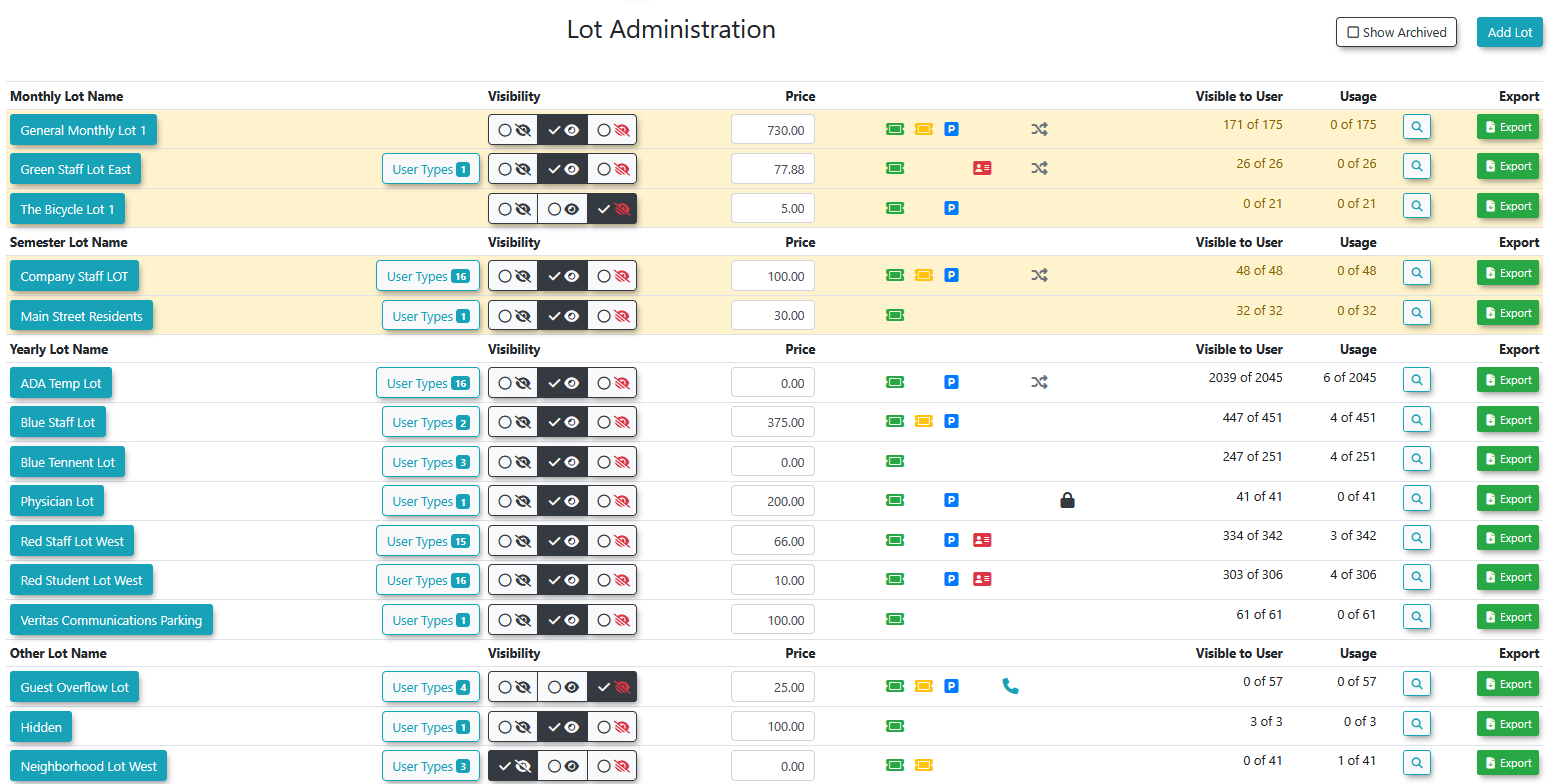
The lot admin page lists all lots that have been created within the system.
Column Details
- Lot Name - the name of the lot, and the type of the lot (Monthly, Semester, Yearly, Other)
- User Types - user types allowed to book the lot
- Visibility - the visibility to user (Not visible, visible, not visible but available)
- Price - standard price of the lot
- Permit types - icons indicating the types of permits enabled on the lot
- Visible to User - how many permits in the lot are available form booking to users
- Usage - number of permits currently booked in the lot
- Search - navigates to the permit search page to view the permits in the lot
- Export - exports the lot info to Excel file
Additional Settings
- Show Archived: Click this button to view or edit archived lots.
- Add Lot - Click this button to add a new lot.
Lot Edit Page
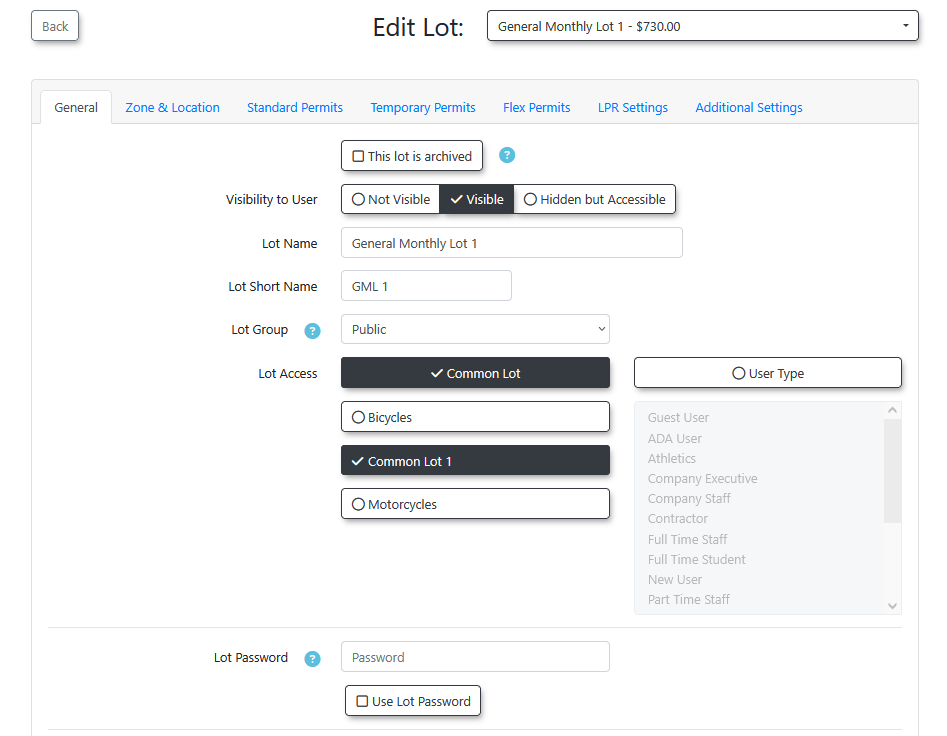
General
- Archive the Lot: Enable This lot is archived to archive a lot.
- Visibility to Users: Enable Visible, Not Visible or Hidden but Accessible.
- Lot Name: Enter the full name for the lot.
- Lot Short Name: Enter an abbreviated name for the lot.
- Lot Access: Choose if the lot is accessible to all user types or specific user types. The two types include: Common Lot: Any user type can park here. The second type is User Type Lot: Restrict access by user type. Hold Ctrl to select multiple types.
Zone & Location
- Location Description: Enter the location description that will appear on the user interface.
- Image: Upload an image that will appear beside the lot, which users can click to enlarge.
- Zone: Configure a zone for this lot. Do this by selecting a zone and days or range within sales window as well as a start and end time.
- Map Detail: Move or Create a Map Marker to the lot location. Once the marker is set, the GPS coordinates will automatically populate.
Standard Permits
- Default Cost: Enter the base cost for permits in the lot.
- Prorated Sales: Choose Enabled, Use Default Setting or Disabled as required.
- Multiple Permits: Enable This lot can be used for a second permit to allow users to purchase multiple permits for the lot.
- Waiting List: Enable Allow the use of waiting list with this lot if you want a waiting list feature when permits are sold out.
- Waitlist Lot Category: Group multiple lots together on the same waiting list.
- Lot Sales Window: Choose the sales window (e.g., Yearly, Monthly).
- Hang Tag Settings: Enable settings for printing hang tags if required.
Temporary Permits
- Temporary Parking Only: Enable This lot is for temporary parking only if the lot is dedicated to temporary parking.
- Max Permits per Day: Set the maximum number of temporary parking permits available.
- Permit Duration: Enable the Allow temp permits up to 30 days option to limit temporary permits to 30 days. Enable the Allow temp permits to be used over 30 days option to allow temporary permits for over 30 days.
- Permit Application to All Vehicles: Enable Allow all vehicles on profile to receive the permit to apply the permit to all vehicles on a user’s profile.
- Daily Cost: Enter the maximum fee for parking beyond 6 hours.
- Hourly Costs: Enter the hourly fee for parking (if applicable). If the lot has a flat rate, leave these fields blank.
- Over 30 Days Monthly Cost: Enter the monthly cost for parking permits beyond 30 days.
- Real-Time Map: Enable Allow this lot to appear on the Real-Time Parking Map to have this lot appear on the Real-Time Map.
- QR Code: View the QR Code for this lot or access the Link to the QR Code. You can Download or Print the QR Code from this page and also add a Logo Image that can be added to the center of the QR Code.
Flex Permits
- Using Flex Permits: In the Flex Permits Tab click the checkbox to Enable Flex Permits.
- Add New: Allows you to add a new Time Slot with Price and choice for Colour coding. Save Changes when complete.
- View & Edit: You can Edit existing Time Slots, Pricing, or Colours individually by clicking the appropriate Edit button or you can use the Time Slot Chart and the Select button to click and drag the time slot information to multiple times and dates at once.
- Use the Clear button to clear all pricing from the chart or Fill to fill the chart with all of the same pricing. Reload will reset the info to your previous setting.
LPR Settings
- Free Parking Time: Set a grace period for patrons to register their plate with a pay-by-plate meter.