
Using the Basic Waitlist Report
The Basic Waitlist Report provides OPS-COM administrators with a centralized view of all waitlistedusers users,currently on waiting lists, organized by parking lot. FromThis thisreport report,is youa cancrucial easilytool for managing demand, enabling easy access to user profiles, managefacilitating comments,communication, and communicatestreamlining withthe usersprocess individuallyof oroffering inpermits bulk.to waitlisted individuals.
Setup & Configuration
Admin Side
Before users can join a waitlist,waitlist ensureor theytheir aredata appears in this report, waitlist functionality must be properly configured forwithin your lots.OPS-COM system.
Admin Side
- Enabling Waitlists for Lots: Instructions for enabling waitlists for specific lots can be found on the Pricing & Lot Admin
pagepage, under the Standard Permits section. Waitlists can be set up for individual lots or configured as groupedlots,waitlistsallowing a single waitlist tothat cover multiple locations. - "Only
SideAllow
: This setting determines whether users willUsersWaiting List after lot is Full" Settingnotsee the option to join aWaitlistwaitlistunlesseven before all permitsare sold outfor a designated lot are sold out, or only once the lot reaches full capacity. This is configured globally or per lot.
User
User Portal
You can configure the option to allow users to see their rank on the wait list or not. To do this, follow the steps below:
Using the Basic Waitlist Report
ClickHover over Permits,hover overWaiting Listsfollowedandbyclick Waitlist Report.- The Waitlist Report screen displays. Administrators can view/edit details about a user waiting to purchase a permit in a specific lot.
-
This screen allows the admin to quickly see:
- The user's Rank on the waiting list
- The date they were added to the waiting list
- The user's name
- Their user type
- Their city
- Phone Number
- Comments
- The lot they are waiting for a permit in
If the record is highlighted in blue, the user does not currently have a permit assigned to them.
If the record is highlighted in yellow, the user does currently have a permit assigned but has not yet purchased it.
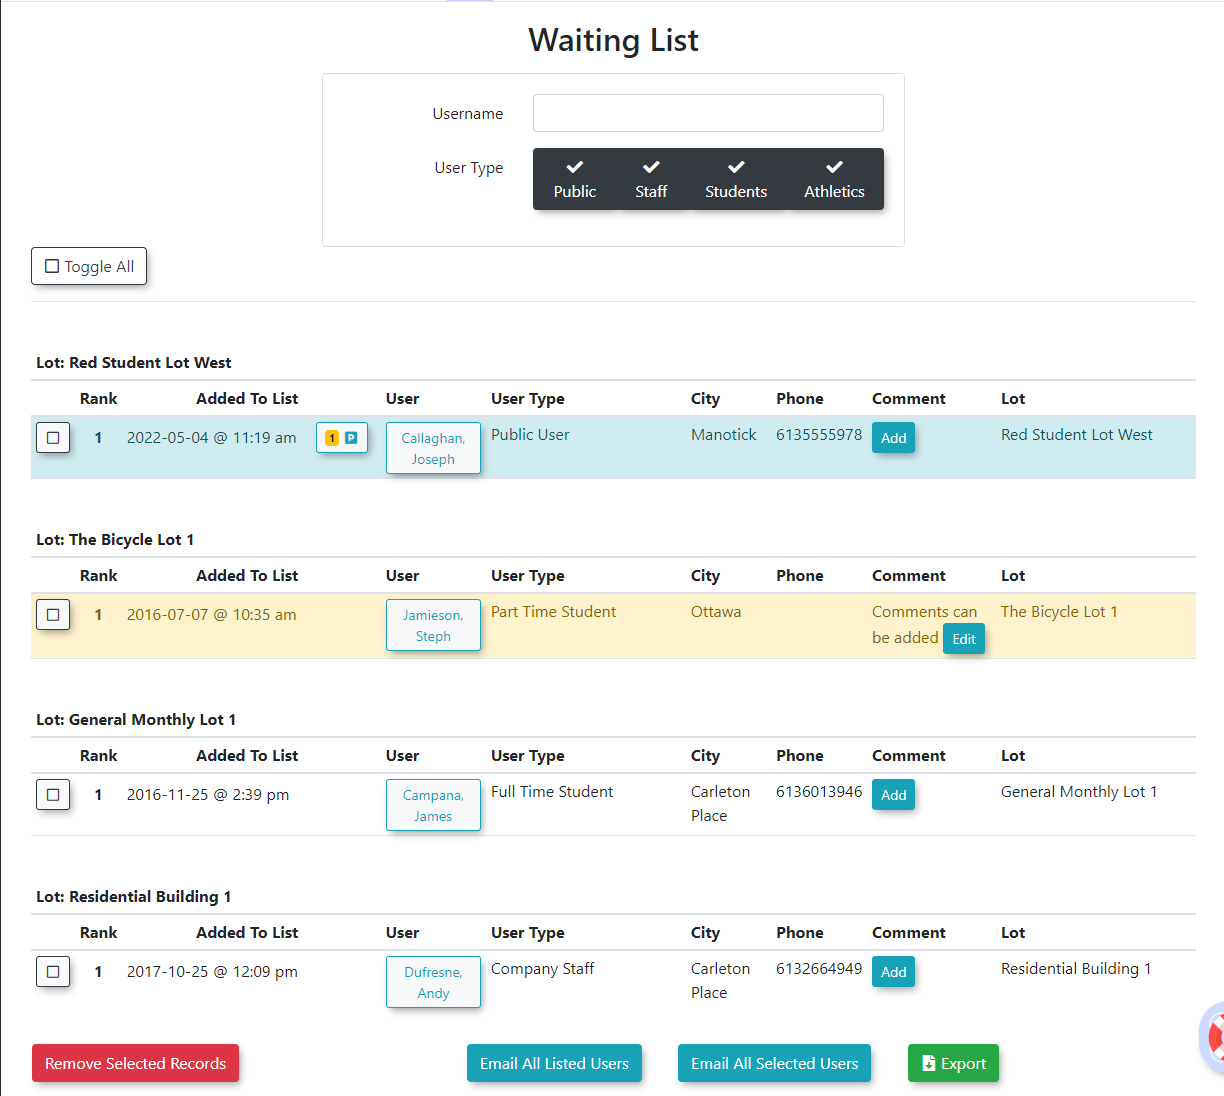
Available Actions & Buttons
- The User Profile icon
icon, - allows administrators to
view/view and edit the user's profile. This is also the primary linkthatadministrators would use if they wanted to sell a permit to the userthatwho is on the waiting list (Clickclick the User Profile icon andclickthen the Parking TabTab)within their profile). - The Add button
buttonallows administrators to add comments specific to the waitlist record. If a comment alreadyexist,exists, an edit link willappearappear, allowing administrators to update the comments on file. - The Toggle Selections button allows administrators to select all
records.recordsEnabledisplayed in thecheckreportboxsimultaneously. You can also make individual record selections by enabling the checkbox to the left oftheeachrecord to make individual record selections.record. - The
Remove Selected From Waiting Listbutton allows administratorsExport toremoveExcelrecordsbuttonfromexports thewaitentirelist.table as an Excel spreadsheet for further analysis or record-keeping.
Best Practices & Considerations
- Develop
Business Rules
: Organizations shoulddevelopestablishaclear businessrulerules for when to remove a user from thewaitingwaitlist,list,such as after a user has been emailed an offer, or after a permit has beenpurchased.successfully purchased and processed. - Proactive Management: Regularly review the Waitlist Report to identify users who are next in line and to manage available permits efficiently.
- Communication: Use the report to facilitate communication with waitlisted users, either individually or in bulk (using the export function for email lists, for example).
- User Experience: If
Show Waiting List Rankis enabled, ensure users understand what their rank means and how it might change.