Setup & Configuration for Admins
All articles related to setting up and configuring OPSCOM are stored here.
- Admin Tools & Data Maintenance
- Data Maintenance Articles
- Using the Database Importer (Beta)
- Importer Field Descriptions
- Create or Refresh a Preview Space
- Resolve Duplicate Options
- History Search
- Purge Old - Explained
- Purging Incidents
- Handheld Devices and Commons
- Managing Recurring and Onetime System Tasks
- Admin Management Tools
- Manage Roles and Permissions
- Manage Administrator Groups
- Manage Admin User Accounts
- IP Filtering for Admin Users
- System Configuration
- Guide to System Settings
- Configuring SAML SSO with OPSCOM
- Troubleshooting - Email Server Communication Errors
- Alarms System Settings
- Defining User Profile Settings
- Account Creation Preferences
- Configuring Multi-Factor Authentication on the User Portal
- Password and Security Settings
- Uploading and Managing Files
- Admin Dashboard Setup (Quick Start)
- Content & Design
- Email Headers and Footers
- Email Templates
- Translations
- User Portal Branding and Setup
- Pages and Content Blocks
- Templates and Design
- Form 11 Shortcodes
- User Information Shortcodes
- User Configuration
- Vehicle Configuration
- Parking Configuration
- Location Configuration
- Violations Configuration
- Ticket Categories
- Ticket Offence Items
- Sort Violations for Quick Access
- Handhelds Devices Settings (Handheld Commons)
- Incidents Configuration
- Managing Incident Categories and Sub-Categories
- Managing Incident Flags
- Managing Ethnic Types
- Managing Incident Relations
- Extended User Profile Options
- Missing Property Types
- Alerts Configuration
- Payments Configuration
- Manage Deposit Types
- Managing Payment Types
- Managing Convenience Fees
- Taxes
- The Invoice Template
- Setup payments with Flex Dollars
- Stripe Payment Provider Setup
- Dispatch Configuration
- Changing the Organization Name Displayed to Parkers
Admin Tools & Data Maintenance
Items on the tools menu control rarely accessed but important setup and configuration tools for OPSCOM. Data Maintenance options are also here.
Data Maintenance Articles
Data maintenance is crucial for ensuring the accuracy, reliability, and optimal performance of any system.
Regular data maintenance helps to:
- Improve Data Accuracy: By identifying and correcting errors, inconsistencies, and redundancies, data maintenance ensures that the information you rely on is trustworthy and precise.
- Enhance System Performance: Clean and well-organized data leads to faster processing, quicker searches, and more efficient operations within the system, preventing slowdowns and crashes.
- Facilitate Informed Decision-Making: Accurate and up-to-date data provides a clear and reliable foundation for analysis, reporting, and strategic planning, leading to better business decisions.
- Ensure Compliance and Security: Maintaining data integrity helps meet regulatory compliance requirements and reduces the risk of security vulnerabilities associated with outdated or corrupted information.
- Reduce Operational Costs: By minimizing errors and improving efficiency, data maintenance helps avoid costly reworks, resource waste, and potential financial losses due to inaccurate information.
The following articles all pertain to Data Maintenance Activities:
-
Preparing to Import your User Data
-
Purge Old Data - Explained
-
Purging Incidents
-
Resolve Duplicate Options
-
Merging Vehicles
-
Merging Users
-
Archive or Disabling a User
-
Archiving and Restoring Permits
Using the Database Importer (Beta)
The Database Importer in OPSCOM provides administrators with a powerful tool to import existing data into the system using CSV files. This functionality is essential for initial data migration, mass updates, or integrating data from external systems, ensuring that your OPSCOM database is populated and maintained efficiently. This tool is currently in BETA.
Setup & Configuration
- Hover over Tools, then click Data Importer - BETA to access the tool.
Permissions Requirements
If the Data Importer page is not visible, the user's account does not have the necessary permissions enabled. To allow a user to import or manage data, the following permissions must be configured:
- Manage tables: This permission allows the user to view the Manage Tables page and utilize the upload functionality for importing data. It does NOT grant the ability to reset tables.
- Reset tables: This permission grants the ability to empty (reset) tables. It does NOT allow the user to see the Manage Tables page unless Manage tables is also enabled.
These permissions can be found under the Systems tab of the permissions management page. Enable them to grant a user access to the Database Importer functionality. For more information on configuring permissions, please refer to the User Roles and Permissions wiki article.
Using this Feature
The Database Importer allows data to be imported into a select number of tables within OPSCOM.
Currently Supported Tables for Import
- UserProfile
- OffenceLocations
- Vehicle
- Permits
- Violations
Importing Data into a Table
Note - There is a limit of 10000 records to be imported in one batch. This includes the header row.
To begin a new import:
- Click the Upload button next to the desired destination table that you wish to import information into.
- A modal window will open, prompting you to select the CSV file. Your imported CSV file can be comma-differentiated or semi-colon-differentiated.
- Once a file has been selected, click Submit to begin the upload process.
- After the CSV file has been successfully uploaded, the Table Import screen will appear.
Converting Fields to Text to Avoid Truncating Leading Zeros - When converting data from Excel to CSV, issues can arise, such as the truncation of leading zeros in numbers (e.g., student IDs, staff numbers). To prevent this, you can force Excel to treat cells as text before converting to CSV as below:
- Open a new sheet in your Excel workbook.
- In cell A1 of the new sheet, type the formula:
="'"&then click on cell A1 of your original spreadsheet. (This formula is: equals sign, double quote, apostrophe, double quote, ampersand, then the cell reference.) - Drag this formula down and across through the same number of rows and columns as your original data. This will replicate your data on the new page, but an apostrophe (
') will be placed in front of all values, forcing Excel to treat them as text. - Save the new sheet as a
.CSVfile. Ensure you only save the new page. This method effectively preserves leading zeros during the CSV conversion.
Column Matching
On the Table Import screen, you will match the columns from your imported CSV file to the corresponding columns in the destination table within OPSCOM.
- This step informs the program where each piece of data from your CSV file belongs in the destination table.
- If your CSV file contained recognized column names, the system will automatically pre-select the appropriate matches.
- For detailed information on each column's purpose, whether it is required or optional, and specific formatting, please refer to the Importer Field Descriptions guide.
Once the columns have been properly matched and you click the Process button, you will be redirected back to the main page while the import is completed in the background.
Post-Import Processing and Settings
After the initial import of data into the base table, some tables run additional processing on the information to establish relationships and apply default settings. These processes run separately from the initial import and are not affected by the duplicate settings chosen for the import.
Status Emails
Over the course of the import process, a total of two emails will be sent to the user who initiated the import:
- The first email is sent after the data from the CSV has been inserted into the temporary table. It records the number of rows that were successfully imported and the rows that failed due to being malformed.
- The second email is sent after the data has been inserted into the base table and post-processing is complete. It contains the number of records that were updated, the number of records inserted, and any relevant information from the post-import processing that occurred.
Table-Specific Post-Processing Details
- Permits:
- If the user association column is matched, the created permit will automatically have a booking created for the associated user via a
PermitJoinrecord. - If the option was selected during import, newly-created permits booked to users will be automatically marked as paid. Otherwise, they will be located in the users' carts, requiring users to complete payment.
- If the user association column is matched, the created permit will automatically have a booking created for the associated user via a
- UserProfile:
- When users are imported, if a
LoginSourceis not provided, it will be automatically set to OPSCOM. - Newly created users are automatically set to enabled.
- When users are imported, if a
- Vehicle:
- If the user association column is matched, the created vehicle will be automatically associated with the user via a
VehicleJoinrecord. - If the alert column is matched, an alert will be created and automatically attached to the associated vehicle via an
AlertCommentsrecord. The vehicle will also be flagged. The list of vehicles being marked with alerts may also be called a hotlist.
- If the user association column is matched, the created vehicle will be automatically associated with the user via a
- Violations:
- Any violations created that do not have an
Issued DateandDue Datewill have one automatically generated for them at the time of import.
- Any violations created that do not have an
- OffenceLocations:
- This table has no specific post-processing.
Order of Operations for Related Imports
Imports that contain related information should generally be done in a specific order, as some tables contain information that references another table. While imports can be done out of order, records may not be associated correctly if their dependencies aren't met. In general, the tables a record requires should be imported before that record's table.
User-Association Settings
Some tables include additional post-processing to associate newly-created records with existing users. For this to work, the unique identifier for the user (UserUUID or Email) must be selected consistently for both the user's primary record and any associated records (Vehicles, Permits). Ensure the same value is selected for both sections during the import setup.
The tables that currently have this user-association option are:
- Vehicles
- Permits
Unique Identifiers & Duplicate Settings
The Unique Identifiers are the columns used to determine if a record's information is unique. If the information in these columns is duplicated in the file or already exists in the system, it will be handled based on your selected Duplicate Settings:
- Ignoring a duplicate: The system will do nothing with the duplicate record.
- Overwrite existing: The information in the new record will replace the existing record with the same unique identifier.
The number of columns that mark a record as unique varies by table:
- UserProfile: Uses one identifier, which can be either UserUUID or Email. If both are supplied, UserUUID takes precedence.
- OffenceLocations: Uses one identifier, which is LocationName.
- Vehicle: Uses one identifier, which is Plate.
- Permits: Uses two primary identifiers: PermitNo and LotNameID. Both are required to make a unique record, meaning identical
PermitNovalues can exist if they have differentLotNameIDvalues. - Violations: Uses one identifier, which is Ticket.
Foreign Lookup Columns
Some data in one table originates from another table and is stored as an ID in the destination table (known as a foreign key).
- Data in these columns should be entered as normal text in your CSV. The system will automatically look for a match in the corresponding lookup table.
- If a matching value is found (e.g., a "Colour" name in the
VehicleColourtable), the system will input the correct ID value into the destination table. - If no matching value is found in the lookup table, the system will enter a
Nullvalue instead.
Below is a list of common foreign lookup columns and their source tables:
Table Reset
In addition to importing data, the Database Importer page also allows for the purging of an entire table's contents.
- Click the Reset button next to the table you wish to empty.
-
A new modal window will open, prompting you to confirm that you wish to delete the contents of the table.
-
Irreversible Action: This action is permanent. Once the data is deleted, it cannot be recovered. Ensure you are absolutely certain before proceeding.
-
-
If you are certain the data should be deleted, type DELETE (in all caps) into the confirmation text field and press the Delete button.
-
The selected table will then be purged of all records.
Related Table Purges
Some tables are closely connected to the records of a related table. Removing the data they contain will also purge the contents of the related table:
- Purging the Vehicle table will also purge the VehicleJoin table.
- Purging the Permits table will also purge the PermitJoin table.
Note: Only the table contents are deleted; the table structure itself remains intact.
Best Practices & Considerations
-
Data Preparation is Key: Ensure your CSV file is meticulously prepared. Accurate data, correct formatting, and adherence to specified column names (if known) will significantly reduce import errors.
-
Backup Before Import: While not explicitly a system feature, it's a best practice to ensure you have recent system backups before performing large-scale imports or table resets.
-
Understand Dependencies: Always review the "Order of Operations" before importing, especially when dealing with related tables like UserProfile, Vehicles, and Permits. Importing out of order can lead to unassociated records.
-
Handle Duplicates Strategically: Choose your "Duplicate Settings" (Ignore or Overwrite) carefully based on whether you intend to add new unique records or update existing ones.
-
Monitor Status Emails: Pay close attention to the status emails sent during the import process. They provide crucial feedback on success rates and potential issues.
Importer Field Descriptions
This article provides a comprehensive guide to the fields used within the OPSCOM Database Importer. For each supported table, you'll find a list of column names, their internal system names, their requirement level (Unique ID, Recommended, Optional), data type, and a detailed description, ensuring you can prepare your CSV files accurately for successful data imports.
Understanding Field Requirements
When preparing your CSV files for import, it's essential to understand the different levels of field requirements:
- Unique ID Fields: These fields are required and are crucial for identifying a record as a unique entity in the system before it's assigned an internal ID. They represent the bare minimum information needed to import a distinct record.
- Recommended Fields: While not technically mandatory for a record to be created, these fields contain information that makes the record a genuinely useful entity within the system. Examples include a user's first and last names or the fine value on a violation. A record can exist without them, but its utility will be limited.
- Optional Fields: These fields are not required, and a record without them can still function as a useful entity. They contain supplemental information that can be filled in later or isn't essential for the basic functionality of the record, such as a vehicle's manufacturing year.
Importer Columns
Below is a detailed breakdown of the columns available for each supported import table, including their internal names, requirement levels, types, and descriptions.
UserProfile Table
|
Column Name |
Internal Name |
Requirement |
Type |
Description |
|---|---|---|---|---|
|
User Unique ID (UUID) |
UserUUID |
Unique ID
|
Standard |
The primary identifier. If UUID is not supplied, email will be used as the key identifier instead.
This value identifies the user as a unique record and it or the email is required to import a record. |
|
Email Address |
|
Unique ID
|
Standard |
The secondary identifier. If UUID is not supplied, email will be used as the key identifier instead.
This value identifies the user as a unique record and it or the UUID is required to import a record. |
|
Username |
username |
Recommended |
Standard |
The username of the user. |
|
First Name |
firstName |
Recommended |
Standard |
The first name of the user. |
|
Middle Name |
middleName |
Optional |
Standard |
The middle name of the user. |
|
Last Name |
lastName |
Recommended |
Standard |
The last name of the user. |
|
Password |
password |
Optional |
Standard |
The password of the user. |
|
User Type |
UserTypeID |
Recommended |
Foreign Key
|
The user type of the user. Attaches to the UserTypes table.
The values supplied by the user in the uploaded file are expected to be values from the TypeName column of the UserTypes table, as these are the values that will be matched against.
The values in the uploaded file must be an exact match to the values in the TypeName column, matching the capitalization, spelling, and spacing exactly, or else it won’t be counted as a match.
The UserTypeID from the UserTypes table matching the name will inserted into the record in the base table. The value will be left blank in the imported record if no matches are found. |
|
Street Address |
street |
Optional |
Standard |
The street address of the user. |
|
City |
city |
Optional |
Standard |
The city of the user. |
|
Province/ State |
prov |
Optional |
Foreign Key
|
The province or state of the user. Attaches to the Provinces table.
The values supplied by the user in the uploaded file are expected to be values from the ProvName column of the Provinces table, as these are the values that will be matched against. These are the long names of the province and not the abbreviation; as in, Ontario and not ON.
The values in the uploaded file must be an exact match to the values in the ProvName column, matching the capitalization, spelling, and spacing exactly, or else it won’t be counted as a match.
The ProvID from the Provinces table matching the name will inserted into the record in the base table. The value will be left blank in the imported record if no matches are found. |
|
Postal Code |
postal |
Optional |
Standard |
The postal or ZIP code of the user. |
|
Cellphone Number |
phonecell |
Optional |
Standard |
The cellphone number of the user. |
|
Employee Number |
employNo |
Optional |
Standard |
The employee number of the user. |
|
Student Number |
studentNo |
Optional |
Standard |
The student number of the user. |
|
Secondary Phone Number |
sPhone |
Optional |
Standard |
The secondary phone number of the user. |
|
Date of Birth |
DOB |
Optional |
Standard |
The date of birth of the user. |
|
Preferred Name |
preferredname |
Optional |
Standard |
The preferred name of the user. |
|
Public Comment |
publicComment |
Optional |
Standard |
The public comment for the user. Visible to the user. |
|
Private Comment |
privateComment |
Optional |
Standard |
The private comment for the user. Not visible to the user. |
|
Login Source |
loginSource |
Optional |
Standard |
The method by which the user logs into the system. If a login source is not supplied for a user, it will be set to OPSCOM by default. |
OffenseLocations Table
For additional information on this table, refer to this wiki article.
|
Column Name |
Internal Name |
Requirement |
Type |
Description |
|---|---|---|---|---|
|
Location Name |
LocationName |
Unique ID
|
Standard |
The name of the location being imported. This value identifies the location as a unique record and is required to import a record. |
|
Writer Visible |
WriterVisible |
Optional |
Standard |
Whether the writer of a violation of a ticket made in the location is visible to the user. |
|
GIS Number |
GisNo |
Optional |
Standard |
The GIS number is a geographic location code and is only used by certain clients. Associated with GIS maps (https://www.gismaps.org/). |
Vehicle Table
|
Column Name |
Internal Name |
Requirement |
Type |
Description |
|---|---|---|---|---|
|
Licence Plate |
Plate |
Unique ID
|
Standard |
The license plate number of the vehicle. This value identifies the vehicle as a unique record and is required to import a record. |
|
Vehicle Year |
Year |
Optional |
Standard |
The year of the vehicle. |
|
Active Vehicle |
active |
Optional |
Standard |
Indicates whether the vehicle is active or not. If not supplied, vehicles will be set to active by default. |
|
Plate Type Name |
PlateTypeID |
Optional |
Foreign Key
|
The plate type of the vehicle. Attaches to the VehiclePlateType table.
The values supplied by the user in the uploaded file are expected to be values from the TypeName column of the VehiclePlateType table, as these are the values that will be matched against.
The values in the uploaded file must be an exact match to the values in the TypeName column, matching the capitalization, spelling, and spacing exactly, or else it won’t be counted as a match.
The TypeID from the VehiclePlateType table matching the name will inserted into the record in the base table. The value will be left blank in the imported record if no matches are found. |
|
Province/ State |
ProvID |
Optional |
Foreign Key
|
The province or state of the user. Attaches to the Provinces table.
The values supplied by the user in the uploaded file are expected to be values from the ProvName column of the Provinces table, as these are the values that will be matched against. These are the long names of the province and not the abbreviation; as in, Ontario and not ON.
The values in the uploaded file must be an exact match to the values in the ProvName column, matching the capitalization, spelling, and spacing exactly, or else it won’t be counted as a match.
The ProvID from the Provinces table matching the name will inserted into the record in the base table. The value will be left blank in the imported record if no matches are found. |
|
Vehicle Make Name |
MakeID |
Optional |
Foreign Key
|
The make of the vehicle. Attaches to the VehicleMake table.
The values supplied by the user in the uploaded file are expected to be values from the MakeName column of the VehicleMake table, as these are the values that will be matched against.
The values in the uploaded file must be an exact match to the values in the MakeName column, matching the capitalization, spelling, and spacing exactly, or else it won’t be counted as a match.
The MakeID from the VehicleMake table matching the name will inserted into the record in the base table. The value will be left blank in the imported record if no matches are found. |
|
Vehicle Type Name |
TypeID |
Optional |
Foreign Key
|
The type of the vehicle. Attaches to the VehicleType table.
The values supplied by the user in the uploaded file are expected to be values from the TypeName column of the VehicleType table, as these are the values that will be matched against.
The values in the uploaded file must be an exact match to the values in the TypeName column, matching the capitalization, spelling, and spacing exactly, or else it won’t be counted as a match.
The TypeID from the VehicleType table matching the name will inserted into the record in the base table.
The value will be left blank in the imported record if no matches are found. |
|
Vehicle Colour Name |
ColourID |
Optional |
Foreign Key
|
The colour of the vehicle. Attaches to the VehicleColours table.
The values supplied by the user in the uploaded file are expected to be values from the ColourName column of the VehicleColours table, as these are the values that will be matched against.
The values in the uploaded file must be an exact match to the values in the ColourName column, matching the capitalization, spelling, and spacing exactly, or else it won’t be counted as a match.
The ColourID from the VehicleColours table matching the name will inserted into the record in the base table. The value will be left blank in the imported record if no matches are found. |
|
VIN Number |
vin |
Optional |
Standard |
The Vehicle Identification Number (VIN) of the vehicle. |
Permits Table
|
Column Name |
Internal Name |
Requirement |
Type |
Description |
|---|---|---|---|---|
|
Permit Number |
PermitNo |
Unique ID
|
Standard |
This field is the first primary identifier. Both it and LotNameID must be provided to create a new permit This value identifies the permit as a unique record and is required to import a record. |
|
Lot Name (Long) |
LotNameID |
Unique ID
|
Foreign Key
|
The long name of the lot associated with the permit. Attaches to the LotNames table.
This field is the second primary identifier. Both it and PermitNo must be provided to create a new permit. This value identifies the permit as a unique record and is required to import a record.
The values supplied by the user in the uploaded file are expected to be values from the LotName column of the LotNames table, as these are the values that will be matched against. These are the long form version of the lot name, and not the lot short name.
The values in the uploaded file must be an exact match to the values in the LotName column, matching the capitalization, spelling, and spacing exactly, or else it won’t be counted as a match.
The LotNameID from the LotNames table matching the name will inserted into the record in the base table. The value will be left blank in the imported record if no matches are found. |
|
Visible |
visible |
Optional |
Standard |
Indicates whether the permit is visible or not. |
|
Permit Status |
status |
Optional |
Standard |
The status of the permit. |
|
Permit State |
StateID |
Optional |
Foreign Key
|
The state of the permit. |
Violations Table
|
Column Name |
Internal Name |
Requirement |
Type |
Description |
|---|---|---|---|---|
|
Ticket Number |
Ticket |
Unique ID
|
Standard |
The unique identifier for the violation.
This value identifies the violation as a unique record and is required to import a record. |
|
Licence Plate |
VehicleID |
Recommended |
Foreign Key
|
The license plate number of the associated vehicle. Attaches to the Vehicle table.
The values supplied by the user in the uploaded file are expected to be values from the Plate column of the Vehicle table, as these are the values that will be matched against.
The values in the uploaded file must be an exact match to the values in the Plate column, matching the capitalization, spelling, and spacing exactly, or else it won’t be counted as a match.
The VehicleID from the Vehicle table matching the name will inserted into the record in the base table. The value will be left blank in the imported record if no matches are found. |
|
Ticket Type Name |
TicketType |
Recommended |
Foreign Key
|
The type of the ticket. Attaches to the TicketCategory table.
The values supplied by the user in the uploaded file are expected to be values from the TicketTypeName column of the TicketCategory table, as these are the values that will be matched against.
The values in the uploaded file must be an exact match to the values in the TicketTypeName column, matching the capitalization, spelling, and spacing exactly, or else it won’t be counted as a match.
The TicketTypeID from the TicketCategory table matching the name will inserted into the record in the base table. The value will be left blank in the imported record if no matches are found. |
|
Fine Amount |
Fine |
Recommended |
Standard |
The amount of fine associated with the ticket. |
|
Towing Amount |
Towing |
Optional |
Standard |
The amount of towing charges associated with the ticket. |
|
Tax Amount |
taxAmount |
Optional |
Standard |
The amount of tax associated with the ticket. |
|
Issued Date |
Issued |
Recommended |
Standard |
The date the ticket was issued. |
|
Due Date |
Due |
Recommended |
Standard |
The due date for payment of the ticket. |
|
Ticket Writer |
Writer |
Optional |
Standard |
The admin who wrote the ticket. |
|
Violation Location Name |
LocationID |
Recommended |
Foreign Key
|
The name of the location where the violation occurred. Attaches to the OffenceLocations table.
The values supplied by the user in the uploaded file are expected to be values from the LocationName column of the OffenceLocations table, as these are the values that will be matched against.
The values in the uploaded file must be an exact match to the values in the LocationName column, matching the capitalization, spelling, and spacing exactly, or else it won’t be counted as a match.
The LocationID from the OffenceLocations table matching the name will inserted into the record in the base table. The value will be left blank in the imported record if no matches are found. |
Best Practices & Considerations
- Exact Matches for Foreign Keys: For all
Foreign Keytype columns, the values in your CSV file must be an exact match (including capitalization, spelling, and spacing) to the correspondingNamecolumn in the referenced OPSCOM table (e.g.,TypeName,ProvName,MakeName,LocationName). Any mismatch will result in a blank orNullvalue in the imported record. - Prioritize Unique ID and Recommended Fields: While optional fields offer additional detail, ensure all Unique ID fields are present and accurate, and Recommended fields are populated for maximum utility of the imported records.
- Pre-Populate Reference Tables: Before importing data that relies on foreign keys (e.g., Vehicles relying on Plate Types or Makes), ensure the corresponding reference tables (VehiclePlateType, VehicleMake, etc.) are already populated in OPSCOM with all the necessary values. This prevents
Nullvalues in your imported data. - Data Consistency: Maintain consistent formatting for dates, phone numbers, and other standard fields within your CSV to avoid import errors.
- Test with Small Batches: For large imports, consider testing with a small batch of records first to verify that your column matching and data formatting are correct before importing the entire dataset.
Create or Refresh a Preview Space
Preview Spaces in OPSCOM provide clients and support staff with a secure, isolated testing environment that mirrors your live production system's data. These spaces are invaluable for testing new features, staging changes, or conducting training without impacting your operational system, ensuring a safe sandbox for development and learning.
Setup & Configuration
Preview spaces are typically created on demand. Your production/live OPSCOM system is used to either create a new preview space or refresh an existing one with current or historical data.
Creating or Refreshing a Preview Space
- Click Tools, then Database to Preview.
From this page, you have two options for refreshing your preview database:
- For Up-to-Date Information:
- Select Backup Production Database.
- Wait for the backup process to complete.
- Click the Refresh Preview Database button.
- For an Older Backup:
- Select the specific date of the backup you wish to restore the preview database to.
- Click the Refresh Preview Database button.
It may take a few minutes to refresh the database. Generally, a database is refreshed in 1-2 minutes, but it can take up to 15 minutes depending on the size of your database. A message will be displayed along the top of the screen notifying you when the database refresh is complete.
Once the preview database has been refreshed, your preview system will automatically be created or updated. You can access the preview system by adding ".preview" before "OPSCOM.com" in your browser's address bar. For example, if your production space is https://tomahawku.OPSCOM.com, your preview space will be https://tomahawku.preview.OPSCOM.com.
Using this Feature
Accessing Your Preview Space
As an OPSCOM client, you can access your preview space directly by simply adding the ".preview." suffix to your subdomain name. For instance, if your production site is located at https://yourorganization.OPSCOM.com, your preview space can be found at https://yourorganization.preview.OPSCOM.com.
Preview Space Banner
To clearly distinguish a preview space from a live production system, all preview spaces are denoted with an amber warning banner displayed prominently at the top of the page.
Locking and Unlocking Database Reset Option
You can now lock and unlock preview and development OPSCOM databases to prevent them from being reset or refreshed accidentally.
- On your preview site, click Tools, then Reset Database.
- Toggle the lock/unlock setting as needed.
- You will be prompted to provide a reason for locking or unlocking the database.
- A history of the previous 10 lock/unlock actions will be displayed below for your reference.
This feature allows you to ensure that if you are actively working on a preview/development system and do NOT wish for your changes to be reset or lost, you can place a lock. This lock notifies others attempting to refresh the database that a reset is not desired.
Best Practices & Considerations
- Testing and Training Benefits: Preview spaces are extremely useful for testing and training purposes. They allow you to work with a copy of your live database, providing real data for exercises without any risk of affecting your production system. The database can be manually reset at any time, allowing you to "erase" training data and start testing scenarios from scratch.
- Daily Data Backups: Production/live data is backed up daily at 2 AM EST and is available to push to the testing environment at any time. This means if you perform a refresh of your preview site, it will pull data captured the night before. This operation is specifically for providing relevant data for testing and preview during training or similar efforts and is separate from normal system backup procedures.
- Automatic Deletion of Inactive Spaces: Preview sites are automatically deleted after 7 days of no login activity.
- If you require a preview site for an extended period, please contact OPSCOM support staff, and an expiry date can be set.
- Email Notifications are Suppressed: No Emails Sent from Preview/Testing - All email notifications that would normally be sent from the server are captured and suppressed in preview/testing environments. Therefore, any email notifications generated within your preview space will not reach clients or external recipients. This is a deliberate security measure to prevent accidental communication from a non-production environment.
Resolve Duplicate Options
The Resolve Duplicates feature in OPSCOM allows administrators to identify and merge duplicates by email, student number, staff number and vehicle (plate) in the system. This is crucial for maintaining data accuracy, preventing operational errors, and ensuring that enforcement and permit management processes are based on clean, unique vehicle data. This article focuses on resolving duplicates by vehicle, however, the concept is the same for other data types.
- Click on Tools, hover over Resolve Duplicates, then click By Vehicle.
Using this Feature
On the Resolve Duplicates By Vehicle page, you will be presented with options to define the criteria for identifying potential duplicate vehicle records.
Duplicate Identification Options
There are two choices to generate a list of potential duplicates:
Strict Duplicate
Purpose: This option generates a list of vehicles where all three primary unique identifiers are identical. This is for finding exact, unambiguous duplicates. Unique identifiers are:
- Plate
- State/Province
- Plate Type
Include Different Plate Types
Purpose: This option generates a list of vehicles where the Plate and State/Province are identical, but the Plate Type may differ. This is particularly useful for identifying potential input errors where a vehicle might have been entered twice with the correct plate and province, but an incorrect or unspecified plate type was initially used.
Example: If a vehicle is a beige BMW sports car with plate ABC123, province Ontario, and an unspecified Plate Type, but there's another record for a beige BMW sports car with plate ABC123, province Ontario, and Plate Type Passenger, it is highly probable that these are the same vehicle entered as a duplicate. Comparing the vehicle description (make, model, color) can help confirm such cases.
Resolving Duplicates
Once a list of potential duplicates is generated based on your chosen criteria:
- Review the list carefully, paying close attention to vehicle descriptions and other details to confirm actual duplicates.
- For each pair of duplicate records you wish to merge, click the Merge button provided next to the entries.
- Clicking Merge will take you to the merge function window, where you can select which information to retain from the duplicate records and then finalize the merge.
Best Practices & Considerations
- Core Vehicle Identification: In OPSCOM, vehicles are uniquely identified by three key pieces of information: License Plate, Province / State, and Plate Type. All three details are essential for a vehicle to be considered unique within the system (e.g., "ABC123" could be a passenger plate and also a commercial plate in the same province, requiring the plate type for distinction).
- Careful Review: Always thoroughly review potential duplicates before merging. Merging incorrect records can lead to data loss or inaccuracies.
- Common Reasons for Duplicates: Be aware of common scenarios that lead to duplicates:
- Mismatched vehicle information (e.g., slight variations in plate number or state entry).
- Incorrectly entered plate numbers or manual data entry errors.
- Orphaned vehicles that are not properly linked to a user profile.
- Orphaned violations that should be associated with a specific vehicle but are linked to a duplicate record.
- Proactive Data Entry (Prevention): The more information included when adding a vehicle to the system, the better. Providing additional details helps the system recognize potential duplicates and reduces errors. In addition to the three key identifiers, it is highly recommended to include:
- Vehicle Colour
- Vehicle Make
- Vehicle Model
- Vehicle Year These details help to clearly identify specific vehicles and ensure they are properly recorded.
- Data Retention: When merging, OPSCOM typically allows you to select which data fields from the duplicate records you wish to preserve. Ensure you retain the most accurate and complete information.
- Regular Maintenance: Periodically run the Resolve Duplicates report to maintain a clean and accurate vehicle database, especially after periods of high user registration or manual data entry. Duplicate vehicles can cause significant confusion, especially when multiple drivers are associated with the same vehicle, impacting permit management and enforcement accuracy.
- User Training: If duplicate entries are a recurring issue, consider reviewing user training or data entry procedures to minimize future occurrences.
History Search
The History Search feature in OPSCOM allows administrators to quickly locate and review historical system activities and events. This tool is invaluable for auditing, troubleshooting, and investigating specific actions related to users, vehicles, or violations, providing a comprehensive log of system interactions.
Using this Feature
1. Click Tools, then History Search. The History Dump page will be displayed.
You can search using a single identifier or a combination of them to narrow down your results.
Available Search Criteria
- Student/Employee Number: Enter the identification number associated with a student or employee.
- Violation Ticket: Enter the specific number of a violation ticket.
- History Description: Enter keywords or phrases from the description of the historical event. This field allows for broad searches based on the recorded action.
Steps to Perform a History Search
- On the History Dump page, enter your desired search criteria into one or more of the available fields (e.g., enter a specific Violation Ticket number, as shown in the example) and click Submit.
- All OPSCOM history records that match your entered search criteria will be displayed.
Best Practices & Considerations
- Combine Criteria for Precision: To achieve more accurate and manageable results, especially in systems with extensive history logs, combine search criteria (e.g., a Student/Employee Number along with a specific History Description keyword).
- Broad vs. Specific Searches: Start with specific criteria if you know exactly what you're looking for. If you're unsure, use broader terms in the History Description field and then refine your search if needed.
- Auditing and Troubleshooting: This tool is excellent for auditing user actions, tracking changes, and troubleshooting issues by reviewing the sequence of events.
- Regular Use: Familiarize yourself with this feature for daily operations, as it can quickly answer questions about past system interactions without needing to navigate through multiple individual records.
Purge Old - Explained
The Purge Old Data feature in OPSCOM allows administrators to remove inactive historical records from the system. This process is essential for maintaining database efficiency, improving system performance, and ensuring that your data remains relevant and manageable by automatically archiving or deleting old, unused information. The only records that will be purged are ones that have not had any activity associated with them for more than 7 years.
Using this Feature
1. Click Tools, then Purge Old Data.
When you click Purge Old Data, the system initiates a process to identify records that meet the purging criteria.
- Upon activation, a progress bar will appear, indicating the number of records being identified for potential purging. The system compiles a list of any user activity and associated record updates that have occurred within the last seven years.
- The compiled "activity list" determines which data to exclude from the purge. The script then proceeds to purge any data that is not on this active list.
- To complete the process and execute the purge, click Purge these records.
An important business rule is that any small update or activity on a record will "restart" its 7-year clock, meaning the record will then be excluded from purging for another seven years from that last activity date.
What Gets Purged?
The following record types will be purged if they have had no activity in the last 7 years:
- User profiles
- Vehicles
- Violations
- Permits
- Appeals
- Temp Permits
- Payments
- Lockers
- Access Cards
- Gate Events
- Refunds
- Waitlist Records
- User History
What Does NOT Get Purged?
The following record types will NOT be purged, regardless of their last updated date, ensuring the retention of critical historical and incident-related information:
- Incident Users
- Contact History
Best Practices & Considerations
- Understand the 7-Year Rule: Remember that any interaction or update restarts the 7-year inactivity clock for a record. This ensures that records with recent activity, even minor, are preserved.
- Performance Benefits: Regularly purging old data can significantly improve system performance by reducing database size and speeding up searches and reports.
- Data Retention Policies: Ensure this purge process aligns with your organization's data retention policies and legal compliance requirements.
- Historical Context: Be aware that while purged records are removed, essential incident and contact history data remains for long-term reference.
- Schedule Appropriately: Consider running this purge during off-peak hours to minimize any potential impact on system users, although the process is designed to be efficient.
Purging Incidents
The ability to purge incidents from OPSCOM allows administrators to permanently remove outdated incident records from the system. This process is critical for maintaining data relevance, complying with data retention policies, and optimizing database performance. This article outlines the two methods for incident purging: individual deletion via incident search and bulk deletion using the Purge Incidents tool.
Setup & Configuration
To enable incident purging capabilities for an administrator, specific permissions must be granted.
- You must add the Delete Incidents permission to the specific administrator roles or individual administrators who require the ability to purge incident records. Consult your system administrator or the User Roles and Permissions wiki article for details on modifying permissions.
Using this Feature
There are two primary methods for purging incidents in OPSCOM: individually through the Incident Search, or in bulk using the Purge Incidents tool.
Method 1: Using the Delete Incident Button (Individual Purge)
This method allows for the deletion of a specific incident after searching for it.
- Search for the incident you wish to purge using the standard Incident Search functionality.
- Once the incident details are displayed, observe the Delete Incident button.
- The Delete Incident button will be available (active) only if the incident record is older than 7 years.
- If the incident is less than 7 years old, the button will appear as "Delete Not Available" and will be greyed out, preventing deletion.
- If the button is active, click the Delete Incident button.
- Follow any subsequent prompts or confirmation messages to finalize the deletion of the incident.
Method 2: Using the Purge Incidents Tool (Bulk Purge)
This tool allows for searching and purging multiple incidents simultaneously based on specified criteria.
- Click Tools, then Purge Incidents.
- The Search for Incidents to Purge screen will be displayed.
- Enter your search criteria into the available fields (e.g., date ranges, incident types, specific IDs).
-
The results displayed will be limited to the oldest 300 records that match your criteria.
Note: When entering a value for "Number of Instances," the search field functions as "greater than or equal to." Therefore, supplying "1" might still display incidents with more than one instance.
-
- Review the displayed list of incidents.
- Enable the Delete checkbox next to each incident you wish to purge.
- Click the Purge Records button.
- A confirmation prompt will display. Click the Delete button within this prompt to confirm the action.
Best Practices & Considerations
- Irreversible Action:
- Warning: Purging incidents is a permanent and irreversible action. Once an incident is purged, its data cannot be recovered. Exercise extreme caution and verify your selections before proceeding.
- 7-Year Retention Rule: Be aware of the system's built-in 7-year data retention policy for incidents. Incidents cannot be purged using the individual button method if they are newer than 7 years. The bulk purge tool will also primarily display older records.
- Permissions Management: Carefully manage the Delete Incidents permission, granting it only to trusted administrators who understand the irreversible nature of the action.
- Audit Trail: While the incident record itself is purged, ensure your organization has an appropriate audit trail or backup strategy if long-term historical access to all incident data is required for compliance or other purposes.
- Pre-Purge Review: Before using the Purge Incidents Tool, it is highly recommended to perform a thorough review of the search results and selected incidents to ensure no critical data is inadvertently removed.
Handheld Devices and Commons
The Handhelds Devices section in OPSCOM allows administrators to manage and configure handheld devices used for enforcement and data collection. This includes registering new devices, pushing messages, and updating device settings, ensuring seamless operation for field personnel and accurate data synchronization.
Refer to this wiki article for more information.
Managing Recurring and Onetime System Tasks
OPSCOM utilizes both recurring and onetime system tasks to automate various back-end processes, such as data synchronization, report generation, or system clean-up. This article guides OPSCOM administrators on how to access, monitor, enable, and disable these critical system tasks, ensuring efficient operation and maintenance of the OPSCOM environment.
Accessing System Tasks
- Click Tools (the Toolbox), then click View System Task Logs.
- On the Scheduled Tasks page, there are two sections, Recurring tasks and Onetime tasks. From this screen we can see stats on when the task has run and how long it took to run. We can also enable or disable tasks from running.
The Scheduled Tasks page is divided into two main sections: Recurring tasks and Onetime tasks. For each task listed, administrators can view its status, statistics, and manage its execution.
Key Information Displayed
- Task Name: The name of the system task.
- Last Run: The timestamp of the last time the task was executed.
- Next Run: The scheduled timestamp for the next execution of the task.
- Average Duration: The average time it takes for the task to complete its execution.
- Enabled Status: Indicates whether the task is currently active and configured to run.
Available Actions & Buttons
- Enabled Checkbox:
- Click the Enabled checkbox next to any task to toggle its status.
- Enable (check the box) a task to allow it to run according to its schedule.
- Disable (uncheck the box) a task to prevent it from running.
- Logs Button:
- Click the Logs button for any task to view a pop-up window.
- This window provides detailed information and historical logs about the task's past executions, including success/failure status and specific output.
Please be aware, there are other settings that may be important to set correctly before enabling any system task.
Best Practices & Considerations
- Monitor Task Logs Regularly: Periodically review the Logs for critical system tasks to ensure they are running successfully and completing without errors. This helps in proactive identification and resolution of potential issues.
- Understand Task Impact: Familiarize yourself with the purpose and function of each system task before enabling or disabling it, as they can affect data integrity, system performance, or automated processes.
- Scheduled Maintenance: Coordinate the scheduling of onetime tasks with periods of low system activity to minimize any potential impact on user experience.
Admin Management Tools
Accessed from the System Configuration menu, this is where you create/edit roles and permission as well as Admin User Accounts.
Manage Roles and Permissions
Roles and Permissions in OPSCOM provide granular control over what administrative users can access and do within the system. This feature allows administrators to define specific responsibilities, enhance security, and ensure that each user has appropriate access levels, streamlining operations and maintaining data integrity.
Using this Feature
- Click System Configuration, then Admin Management, and click Manage Roles.
Creating and Managing Roles
Roles are central to the permissions system, acting as templates for sets of permissions.
- The Manage Administrator Roles page will display. The System Administrator (Primary) role is pre-defined and allows you to create new roles and assign them to other admin users.
- To create a new role, click the Add New Role button at the bottom of the page.
- Enter a descriptive Role Name and a Description for that role.
- The description will appear as a rollover tooltip when you mouse over the Edit Role button for that role.
- Click Save Role to save your new role.

Editing Existing Roles
You can modify the name and description of any role (except the System Administrator role).
- On the Manage Administrator Roles screen, click the Edit Role button next to the role you wish to update.
- Make your desired changes to the Role Name and/or Description.
- Click Save Role to save your edits.
Assigning Permissions to a Role
Once a role is created, you'll define what actions users assigned to that role can perform by setting its permissions.
- On the Manage Administrator Roles screen, click the Permissions button next to the role you want to configure. The Editing Permissions screen will display.
- The top bar displays various icons, mirroring the OPSCOM menu structure. The number next to each icon indicates how many permissions within that category have been selected for the current role.
- Click an icon (e.g., a "Permit" icon, a "Violations" icon) to display the specific permissions available within that category.
- To grant a permission, enable the checkbox next to that permission's name.
- Once you have navigated through each icon and selected all the necessary permissions for the role, click Save Permissions. The role, with its defined permissions, is now created and ready for assignment.
Assigning Roles to Admin Users
After roles are defined, you can assign them to your administrative users.
- Click System Configuration, then Admin Management, and click Edit Admin Users. The Manage Active Administrators page will display.
- Select an existing user you wish to modify, or choose to create a new user.
- On the left side of the screen, add or confirm the User Information (e.g., name, email).
- On the right side, select the role(s) you wish to apply to that user from the available options.
- You can also add a Comment for any relevant notes about the user's role or status.
- Click Update User when you have finished making your changes.
Best Practices & Considerations
- Principle of Least Privilege: Always adhere to the principle of least privilege. Grant users only the permissions absolutely necessary for them to perform their job functions. This minimizes security risks and potential for accidental errors.
- Role-Based Access Control: Utilize roles to manage permissions efficiently. Instead of assigning individual permissions to each user, create roles (e.g., "Enforcement Officer," "Permit Manager," "Finance Admin") and assign users to those roles. This simplifies onboarding, offboarding, and auditing.
- Clear Role Descriptions: Use the role description field to clearly state the purpose of the role and the types of permissions it encompasses. This helps administrators understand what each role is intended for.
- Regular Review: Periodically review your defined roles and user assignments to ensure they remain appropriate as job responsibilities change or staff join/leave your organization.
- Test New Roles: Before deploying a new role to active users, test it with a test administrator account to confirm that the assigned permissions function as expected and do not inadvertently grant too much or too little access.
Manage Administrator Groups
Administrator Groups in OPSCOM allow you to organize administrative users into logical teams or departments. This feature simplifies management by enabling you to apply specific settings, distribute communications, or assign tasks to a collective of administrators rather than managing each user individually, enhancing organizational efficiency and control.
Using this Feature
You'll be directed to the Manage Administrator Groups page, which lists all existing groups. Initially, this page may be empty if no groups have been created yet.
Creating a New Administrator Group
Once saved, your newly created group will appear in the list on the left-hand side of the page.
Working with Groups
After creating groups, you can perform various management actions. While the provided content focuses on creation, typical group management also involves:
Best Practices & Considerations
Manage Admin User Accounts
Creating and managing administrator accounts in OPSCOM is essential for granting system access to staff, defining their responsibilities through roles, and maintaining secure and accurate user records. This article guides OPSCOM administrators through the process of creating new admin accounts, editing existing ones, resetting passwords, and disabling accounts as needed.
Using this Feature
- Hover over System Configuration, click Admin Management, then Edit Admin Users. The Manage Active Administrators screen displays, providing options for both new user creation and existing user modification.
Creating a New Admin Account
- On the Manage Active Administrators screen, select + Create New Admin.
- The screen will display the Create New Administrator form divided into two sections:
- On the left, you will enter the user information for the new administrator (e.g., username, first name, last name, email, and initial password).
- On the right, in the Active Roles form, you will select the admin role(s) this person will be granted. For more information about Roles and Permissions refer to this wiki article.
- Once all information is entered and roles are selected, click Insert New User to add the admin account to the system.
Multi-factor Authentication (MFA) is now required when creating an Admin account. After the account is created, it must first be accessed through the Admin portal before attempting to sign in on a handheld device. During the initial login, a One-Time Password (OTP) will be sent to the email associated with the new Admin account, and you will be prompted to reset the password. For more details, please refer to our MFA wiki article.
Editing an Existing Admin Account
- On the Manage Active Administrators page, select the user you wish to modify.
- You can now change any of the available options for that selected user, including their personal information, roles, and account status.
- Click Update User when you are finished making your changes.
Viewing Login Activity
- For any selected user, you can click the Login Activity button to view a log of when the administrator last logged into the OPSCOM system or a handheld device.
- Additional admin activity has been added on:
- Log out
- New incident creation
- Incident marked as opened
- Incident marked as closed
Resetting an Admin's Password
- Locate the specific administrator's account.
- In the Password field, enter a temporary password. The password is hidden (displayed as asterisks "**********"), but you can simply type over the existing symbols.
- Inform the admin of this temporary password.
- When the admin logs in using the temporary password, they will be prompted to update their password to a more secure, personal one.
Disabling an Admin Account
Admin users cannot be permanently deleted from the system because their accounts are often linked to historical data (e.g., ticket issuance, system changes). If an admin user changes roles or leaves the organization, the best practice is to disable their account.
Important Reporting Note - It is very important to leave the admin user's permissions in place even when disabling their account, as these permissions will still affect historical reporting (e.g., showing which permissions were active at the time certain actions were performed). Once the account is disabled, any existing permissions obviously cannot be actioned by that user, but they remain associated for reporting purposes.
- Hover over the System Configuration menu, click Admin Management, then Edit Admin Users.
- Select the user's account you wish to disable (e.g., "jim_daniels").
- The user's profile will display. Locate the checkbox titled Activate this account and allow system login.
- Uncheck this box to disable the account.
- Click Update User to apply the change.
After disabling, the account will now appear on the Manage Disabled Administrators page, accessed by clicking on View Disabled on the Manage Active Administrators page.
This action can be reversed at any time by editing the user account and re-checking the Activate this account and allow system login checkbox.
Best Practices & Considerations
- Secure Initial Passwords: When creating new accounts or resetting passwords, use strong, temporary passwords and instruct users to change them immediately upon first login.
- Role-Based Access: Always assign appropriate roles to admin users. Avoid giving Primary Administrator access unless absolutely necessary. Granular roles ensure users only have access to the functions they need.
- Prompt Disabling: Disable accounts promptly when an employee's role changes or they leave the organization. This is a critical security measure.
- Audit Login Activity: Regularly review the Login Activity for admin accounts to monitor for unusual patterns or unauthorized access attempts.
- Clear Documentation: Maintain internal records of your admin accounts, their assigned roles, and any specific notes, especially for disabled accounts.
Related Video
IP Filtering for Admin Users
IP Filtering in OPSCOM provides administrators with a robust security layer by restricting user access based on their device's IP (Internet Protocol) address. This feature enhances system security by ensuring that only authorized users from specified networks or devices can log in to OPSCOM, allowing for tailored access control according to individual roles and organizational security policies.
Setup & Configuration
IP filtering configurations are managed within each administrator's user profile in OPSCOM.
What is an IP Address?
An IP address is a unique numerical label assigned to each device connected to an IP network. It typically consists of four groups of numbers (octets), separated by dots (e.g., 192.168.1.1).
- The first two octets generally identify the network your device is on.
- The last two octets further narrow the address down to a specific machine within that network.
- To find your current public IP address, you can visit a website like
whatismyip.netor simply search "What is My IP" in Google.
To Configure IP Filtering in OPSCOM:
- Hover over the System Configuration, then Admin Management, and click Edit Admin Users.
- On the Manage Active Administrators page, select the specific user you wish to edit.
- Locate the Allowed IPs field within the user's profile configuration. This is where you will enter the IP filtering rules.
Using this Feature
The Allowed IPs field in an admin user's profile controls their access to the OPSCOM system. The level of access can be precisely tailored:
Configuration Options for Allowed IP Addresses
Allow Access from Any Network (Least Restrictive)
This is typically used for high-level managers or directors who require access from diverse locations (e.g., while traveling, from a home office, or an internet cafe).
Note: In some cases, networks might be locked down or behind a firewall. Additional configuration on the part of your IT department may be required to allow external access.
- Configuration: Enter a single dot (
.) in the Allowed IP Addresses field. - Result: The user will be able to log in from literally any network location, whether internal or external to your organization's specific network.
Restrict Access to a Specific Network
This is ideal for regular office workers who primarily require access only from their designated office network.
- Configuration: Enter the first two octets of the network's IP address (e.g.,
10.32). - Result: The user can log in from any computer connected to that specific network, but will be restricted from accessing OPSCOM from any other network.
Restrict Access to a Specific Computer (Most Restrictive)
This is suitable for part-time employees or student workers who are designated to use only one particular machine for OPSCOM access.
-
- Configuration: Enter the full IP address of the specific computer (e.g.,
10.32.1.144). - Result: The user can only log in to OPSCOM from that single, specified computer.
- Configuration: Enter the full IP address of the specific computer (e.g.,
Allow Access from Multiple Specific Computers
This is useful in office settings where an employee may use a few designated workstations.
-
- Configuration: Enter the full IP address of each allowed computer, placing each address on a separate line within the Allowed IPs field (e.g.,
10.32.1.144followed by10.32.1.154on the next line). - Result: The user can log in from any of the explicitly listed computers.
- Configuration: Enter the full IP address of each allowed computer, placing each address on a separate line within the Allowed IPs field (e.g.,
Allow Access from Multiple Specific Networks
This is applicable for employees working out of multiple campus locations or different buildings within a municipal organization, each on a distinct local area network.
-
- Configuration: Enter the first two octets of each allowed network, placing each network segment on a separate line within the Allowed IPs field (e.g.,
10.32on one line and10.40on another). - Result: The user can log in from any computer on the specified networks.
- Configuration: Enter the first two octets of each allowed network, placing each network segment on a separate line within the Allowed IPs field (e.g.,
Basic IP Filtering Rules Recap
-
Good Configurations:
.- A single period to match all IP addresses (least restrictive).10.32- A partial IP address to match all computers on a specific network.10.32.1.144- A full IP address to match a specific computer (most restrictive).
-
Invalid Configurations:
10.*- Wildcards (*) like this will not work.OPSCOM.com- Domain names will not work; only numerical IP addresses are supported for filtering.
Best Practices & Considerations
- Security vs. Flexibility: Balance the need for security with the practical access requirements of your administrators. More restrictive settings (full IP) offer higher security but less flexibility.
- Dynamic IPs: Be aware that many internet service providers assign dynamic IP addresses that can change over time. If your administrators access OPSCOM from external locations with dynamic IPs, using a full IP filter will frequently require updates, making the "single dot" setting often more practical for such scenarios.
- Internal Network Changes: If your organization's internal network IP scheme changes, remember to update the Allowed IPs field for all affected administrators.
- IPv6 Consideration: When using IP filtering, it is generally recommended to enter your IPv6 IP address if your network primarily uses IPv6, as IPv4 addresses are becoming less common for external facing services.
- IT Department Collaboration: For complex network setups, especially involving firewalls or VPNs, collaborate with your IT department to ensure proper network configuration aligns with your OPSCOM IP filtering rules.
System Configuration
Guide to System Settings
System Settings in OPSCOM provide administrators with comprehensive control over the core functionalities and behaviors of their application, primarily impacting the administrative side. This centralized configuration area allows for fine-tuning various components, from general system parameters and security protocols to specific module functionalities like parking, violations, and payments, ensuring the system operates according to organizational needs.
- Click System Configuration, then System Settings to access this area.
- Explore the menus. Hovering over any menu item will explain with a tooltip what this setting controls.
- Settings in Blue are read-only to Admins. Only a Tomahawk User can enable/disable this. For help with this contact support@ops-com.com.
Only Admins that have the permission to Manage System Configuration, will see the System Settings. If they have that permission, they can edit any system setting available.
Best Practices & Considerations
- Review All Settings: System settings are granular and cover many aspects of OPSCOM. Regularly review all components to ensure configurations align with your organization's current policies and operational needs.
- Security Settings First: Prioritize the configuration of Security component settings (e.g., password expiry, strength requirements, admin lockouts) to maintain a robust security posture for your admin accounts.
- Email Configuration: Ensure that all relevant email addresses (Default Notification Email, From Email, Appeal Notification Email, Automated Notification Email) are correctly set up to ensure timely system communications and alerts.
- Time Zone Accuracy: Correctly setting your Time zone and Time offset is critical for accurate timestamping of all system events, permits, and violations.
- Impact of Toggles: Be mindful that many settings are simple on/off toggles. Understand the full impact of enabling or disabling a module (e.g., "Enable Violations Module") or a specific feature before making changes.
- Team Collaboration: For settings that require OPSCOM Team access to change, communicate your needs clearly to support staff. For other settings, collaborate with your internal teams (IT, finance, enforcement) to ensure changes meet everyone's requirements.
- Testing Changes: For significant changes, especially those impacting user-side visibility or core workflows, consider testing in a Preview Space, before applying to your live production system.
Configuring SAML SSO with OPSCOM
What is Single Sign-On (SSO)
Single Sign-On (SSO) simplifies user access to OPSCOM by allowing them to authenticate using their existing, managed corporate accounts. This eliminates the need for separate OPSCOM usernames and passwords, enhancing convenience and security. This article details the setup and configuration of SAML-based SSO with OPSCOM, explaining the necessary fields, metadata exchange, and user synchronization. For more general information about SSO and OPSCOM refer to this wiki article.
Prerequisites and Considerations
Implementing SSO with OPSCOM, specifically using SAML (Security Assertion Markup Language), requires coordination between your organization's Identity Provider (IdP) and OPSCOM as the Service Provider (SP).
Your OPSCOM Client Success team will be happy to discuss these options to ensure a smooth and successful setup.
Once the prerequisites are addressed, the SAML setup involves configuring fields for both OPSCOM (as the Service Provider) and your external SAML system (as the Identity Provider).
Configuring SAML Setup
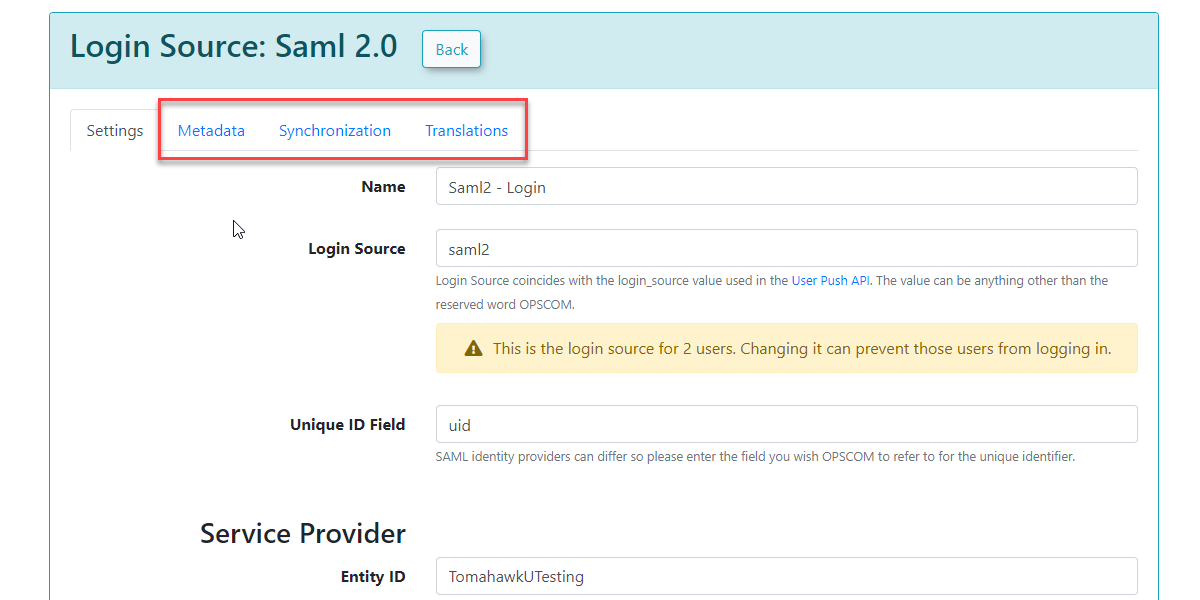
- Hover over System Configuration, Users, and click Login Sources.
- Click the pencil icon to edit your login source you created already as mentioned above. You should already have configured the login source to the point of the Unique ID field.
The settings below must be filled out correctly and saved before you will see the Metadata tab to continue.
When OPSCOM generates your SP metadata, it is available as a live URL — not just a downloadable file. The metadata URL follows this pattern:
https://[your-domain]/auth/saml2/[ENTITY_ID]/metadataWe strongly recommend providing your Identity Provider with this URL rather than a downloaded XML file. When an IdP is configured to pull from a live URL, it will automatically fetch fresh metadata and the integration stays current.
If you upload a static XML file to your IdP instead, be aware that the metadata contains a validUntil timestamp (calculated from the cacheDuration of 7 days from the time it was fetched). An IdP that strictly enforces this value may reject the metadata after that window. In practice, most enterprise IdPs — including Azure AD — do not enforce validUntil on uploaded SP metadata, but it is still better practice to use the live URL wherever possible.
Azure AD note: When configuring the Enterprise Application in Azure, look for the option to enter a Federation Metadata URL rather than uploading a file. This is found in the Basic SAML Configuration section.
Service Provider Fields (Configured in OPSCOM)
These fields define how OPSCOM will interact with your Identity Provider.
Identity Provider Fields (Configured in OPSCOM, Values from Your SAML System):
These fields capture information from your external SAML system (Identity Provider). You will find these values within your SAML system's metadata (e.g., often displayed under Federation → Show Metadata on your SAML installation page).
⚠️ Important — Certificate Mismatch: The IdP x509 Certificate field must contain the certificate issued by your Identity Provider — for example, the certificate embedded in Azure's Federation Metadata XML. Do not copy the SP certificate into this field. Entering the wrong certificate here will cause SAML assertion validation to fail silently, and users will be unable to log in. If in doubt, download your IdP's Federation Metadata XML and extract the certificate from within it.
Once these settings have been completed and saved in OPSCOM, you will gain access to additional tabs: MetaData, Synchronization, and Translations.
Additional Settings Reference
When you open your Login Source configuration, you will see several additional fields below the core SP and IdP sections. The defaults are appropriate for most integrations, but the following are worth understanding:
| Setting | Default | What It Does |
|---|---|---|
| Requested Auth Context | false |
When set to false, OPSCOM does not specify an authentication method in its request to the IdP — the IdP decides. Set to true to require password-based authentication (PasswordProtectedTransport). Leave as false for most Azure AD integrations. |
| Require Name ID Policy | Enabled | Includes a NameIDPolicy element in the SAML request, specifying the Name ID Format. Disable this if your IdP is Microsoft ADFS — ADFS frequently rejects the NameIDPolicy element and returns an InvalidNameIDPolicy error. Azure AD (Entra ID) handles it correctly and this should remain enabled. |
| Require Encrypted Assertions | Disabled | Requires the IdP to encrypt SAML assertions. Only enable if your IdP supports it and your SP certificate and private key are configured. Not required for standard Azure AD integrations. |
| Sign Logout Requests / Responses | Disabled | Requires the SP certificate and private key to be configured. Not required for standard Azure AD integrations. |
Using this Feature
Metadata Tab
The Metadata tab in OPSCOM provides the XML code that you will need to provide to your Service Provider (OPSCOM, in the context of SAML communication from your IdP's perspective). This XML contains all the necessary information for your Identity Provider to communicate correctly with OPSCOM.
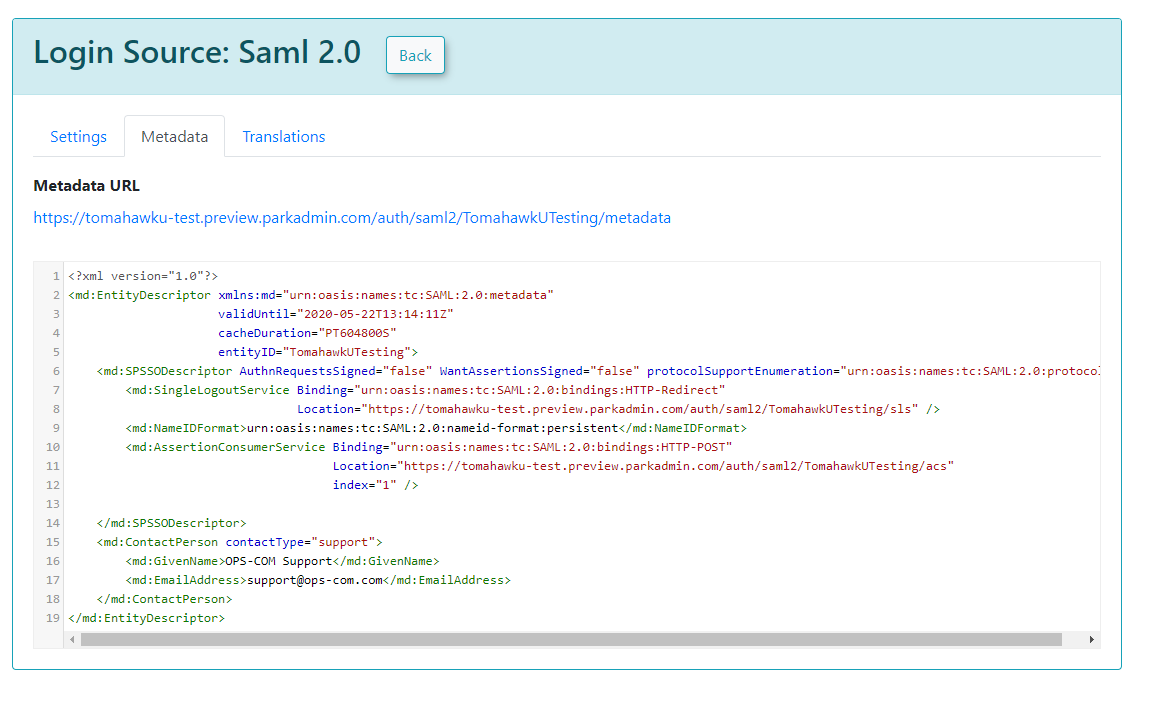
Sample XML File
Sample XML File Explanation: When your external system (e.g., a SimpleSAMLPhp service set up as the identity provider) sends a response back to OPSCOM, it includes an saml:AttributeStatement tag containing several attributes. These attributes are required for OPSCOM to match to a user within its system. The most important field in this attribute section is the value used as the permanently unique identifier for a user. For example, if the XML response shows [uid] => Array ( [0] => 6ddf4027-3397-4e45-8628-0189f60fe91e ), then uid should be entered as the Unique ID Field in your Identity Provider Fields configuration within OPSCOM. If the unique ID is something else, such as SAMaccountName, then that should be used instead.
<?xml version="1.0"?> <samlp:Response xmlns:samlp="urn:oasis:names:tc:SAML:2.0:protocol" xmlns:saml="urn:oasis:names:tc:SAML:2.0:assertion" ID="_aa1963115aa6490e728c7376f4c8849813bbb..."> ... <saml:Assertion xmlns:xsi="http://www.w3.org/2001/XMLSchema-instance" xmlns:xs="http://www.w3.org/2001/XMLSchema" ID="_9efd79bf6425983ee9176f3d33a99d1a9176180..."> ... <saml:Subject> <saml:NameID SPNameQualifier="MinionOpsComStaff" Format="urn:oasis:names:tc:SAML:2.0:nameid-format:transient">_7a426e0be71f14c1f349db00d7d543b6f7dcb52baa</saml:NameID> <saml:SubjectConfirmation Method="urn:oasis:names:tc:SAML:2.0:cm:bearer"> <saml:SubjectConfirmationData NotOnOrAfter="2021-08-24T16:00:41Z" Recipient="https://minion-3.dev.parkadmin.com/auth/saml2/MinionOpsComStaff/acs" InResponseTo="ONELOGIN_bb8a09203c888cf59af4c621a71cfa8f7559c016"/> </saml:SubjectConfirmation> </saml:Subject> <saml:Conditions NotBefore="2021-08-24T15:55:11Z" NotOnOrAfter="2021-08-24T16:00:41Z"> <saml:AudienceRestriction> <saml:Audience>MinionOpsComStaff</saml:Audience> </saml:AudienceRestriction> </saml:Conditions> <saml:AuthnStatement AuthnInstant="2021-08-24T15:34:46Z" SessionNotOnOrAfter="2021-08-24T23:34:46Z" SessionIndex="_a7a68666092117d24aab8adecf1b0830622855b85..."> <saml:AuthnContext> <saml:AuthnContextClassRef>urn:oasis:names:tc:SAML:2.0:ac:classes:PasswordProtectedTransport</saml:AuthnContextClassRef> </saml:AuthnContext> </saml:AuthnStatement> <saml:AttributeStatement> <saml:Attribute Name="uid" NameFormat="urn:oasis:names:tc:SAML:2.0:attrname-format:basic"> <saml:AttributeValue xsi:type="xs:string">6ddf4027-3397-4e45-8628-0189f60fe91e</saml:AttributeValue> </saml:Attribute> <saml:Attribute Name="full name" NameFormat="urn:oasis:names:tc:SAML:2.0:attrname-format:basic"> <saml:AttributeValue xsi:type="xs:string">Sarah Knowles</saml:AttributeValue> </saml:Attribute> <saml:Attribute Name="email" NameFormat="urn:oasis:names:tc:SAML:2.0:attrname-format:basic"> <saml:AttributeValue xsi:type="xs:string">sknowles@tomahawk.ca</saml:AttributeValue> </saml:Attribute> </saml:AttributeStatement> </saml:Assertion> </samlp:Response> |
⚠️ Do not rename your Login Source after users have been associated to it. The Login Source value is stored against every user record created via SSO. If you change it, those users will no longer be matched to this login source on their next login attempt, effectively locking them out. If a rename is ever necessary, contact OPSCOM Support to arrange a coordinated update of all affected user records.
Synchronization Tab
The Synchronization tab allows you to configure how user information is managed between your SSO system and OPSCOM.
After you have provided the information in each field, click Save Changes.
Your users will then begin to be created or updated automatically upon their SSO login attempts. If any of the supplied fields are incorrect or don't match, the corresponding information will be blank in OPSCOM when the user logs in, or it will remain unchanged if the user already existed.
What to enter in the field mapping boxes: Each field mapping box accepts the attribute name exactly as your Identity Provider sends it in the SAML assertion. These names vary between IdP systems. The sample values shown (such as
full name,uid) are from a SimpleSAMLphp test installation and will be different for other identity providers.
For Azure AD (Microsoft Entra ID), the attribute names depend on how the claims were configured in the Enterprise Application. Azure uses two formats:
- Short-name format (if you created custom claims): e.g.,
first_name,last_name,emailaddress- Full URI format (Azure defaults): e.g.,
http://schemas.xmlsoap.org/ws/2005/05/identity/claims/givennameTo confirm exactly what your Azure AD tenant is sending, use the Test button on the Single sign-on page of your Azure Enterprise Application. The test result displays every claim name and value as it will arrive at OPSCOM.
⚠️ Azure AD does not send a combined "full name" attribute by default. If you map the First Name field to a full name or displayName attribute, the user's entire display name (e.g., "Sarah Knowles") will be stuffed into the first name field. Map First Name and Last Name to separate attributes (givenname / surname, or first_name / last_name if configured as custom claims in Azure).
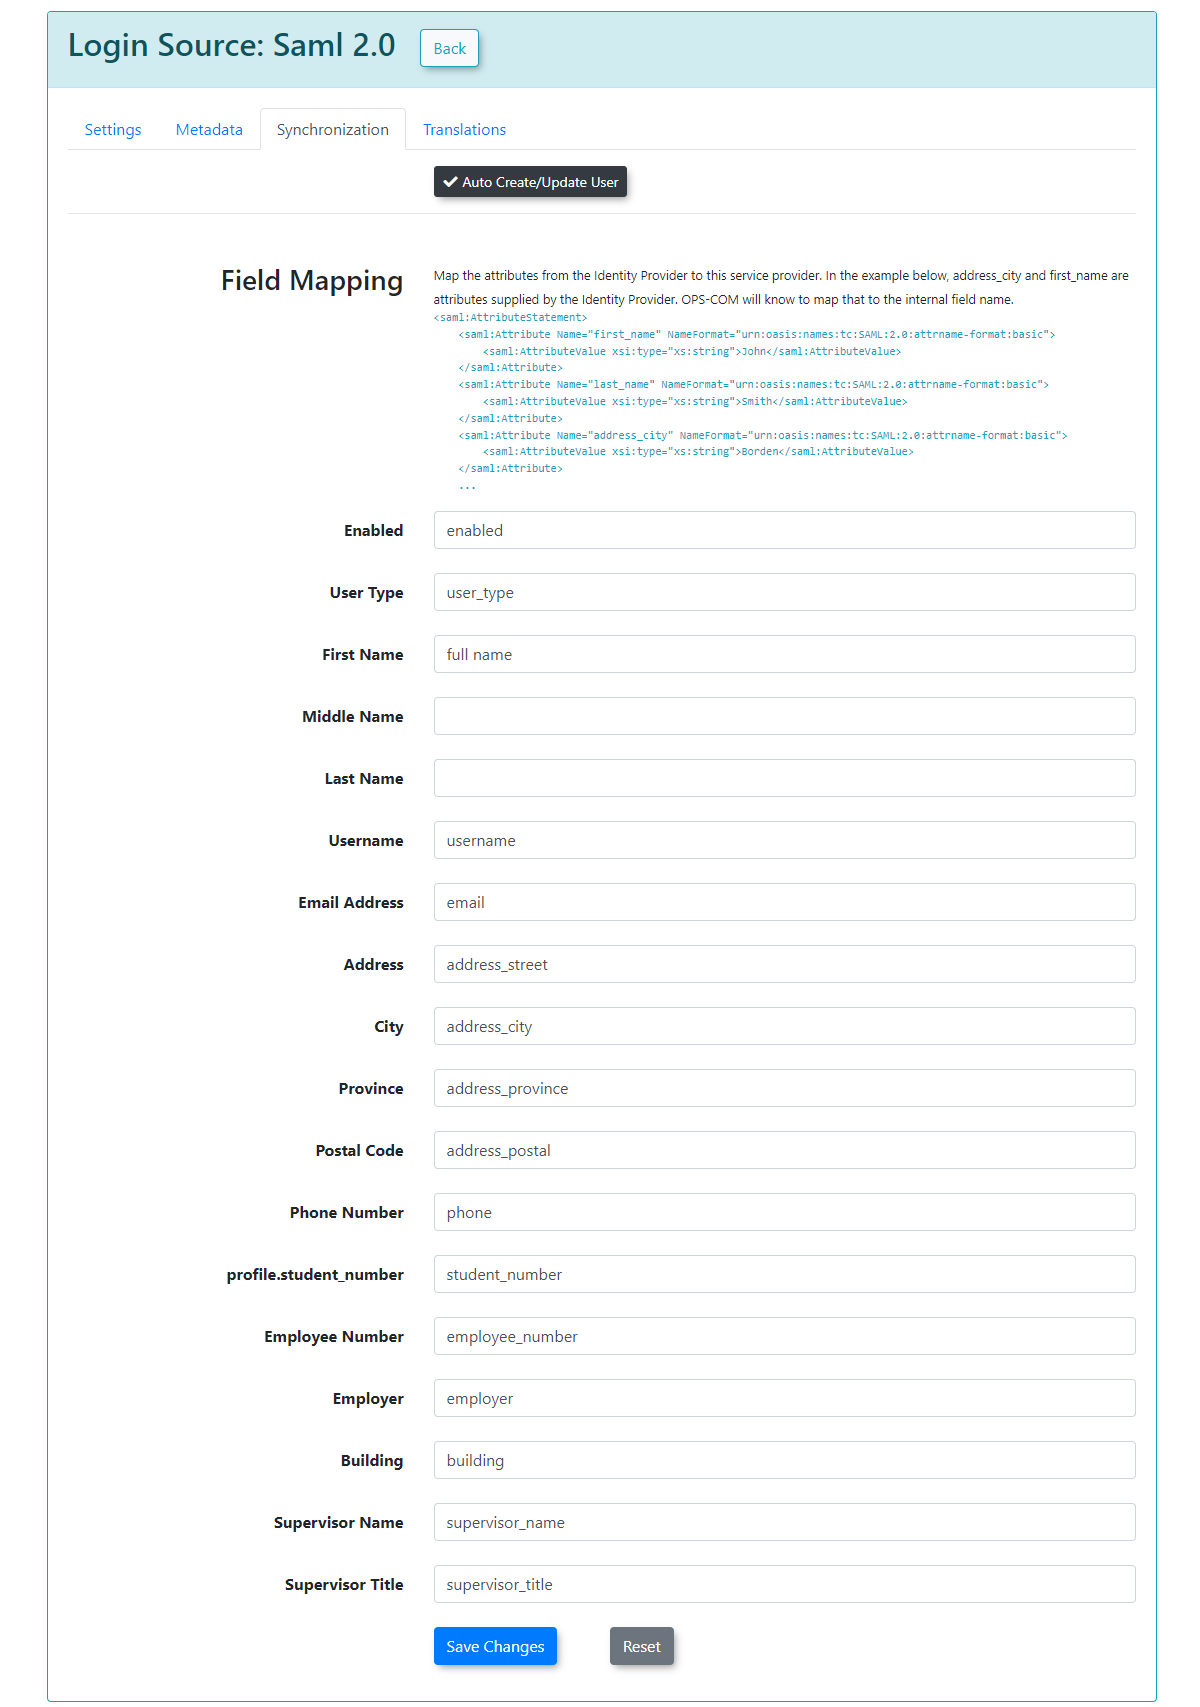
The exact sample values from our test system may differ from your actual SAML system attributes.
Translations Tab
The Translations tab allows you to customize the text displayed on your login button from the user side. You can create as many different translations as are available in your system (e.g., English and French). This ensures that the SSO login experience is localized for your users.
Error Handling: CommonPproblems and Their Causes
- User cannot log in / "user not found" — The Unique ID Field in OPSCOM does not match the attribute name being sent by the IdP, or the user has not been assigned to the application in the IdP.
- Assertion validation failure — The IdP x509 Certificate field contains the wrong certificate (often the SP cert copied in by mistake).
InvalidNameIDPolicy error — Disable the "Require Name ID Policy" toggle (common with ADFS IdPs). - Incorrect user data on auto-created accounts — A field mapping value doesn't match the attribute name the IdP is actually sending. Use your IdP's test/debug tool to see the exact claim names in the assertion.
- Login source mismatch — The Login Source value was changed after users were created. Contact OPSCOM Support.
- OPSCOM's SSO debug log (when enabled) will display the full incoming user array, which makes attribute name mismatches straightforward to identify.
Best Practices & Considerations
Troubleshooting - Email Server Communication Errors
Communication errors in OPSCOM, often manifested as "Communication Error" messages to users, typically occur when essential email "From" or "Reply-to" addresses are not correctly configured in the system settings. This article helps OPSCOM administrators identify and resolve such errors, ensuring that system-generated emails (like password reset confirmations) are sent successfully.
Identifying a Communication Error
Communication errors are usually a symptom of missing or incorrect email configurations within the system settings.
A common example of a communication error occurs when a user attempts to submit the Forgot Password form on the user-side login page. An error message similar to the following may be displayed:
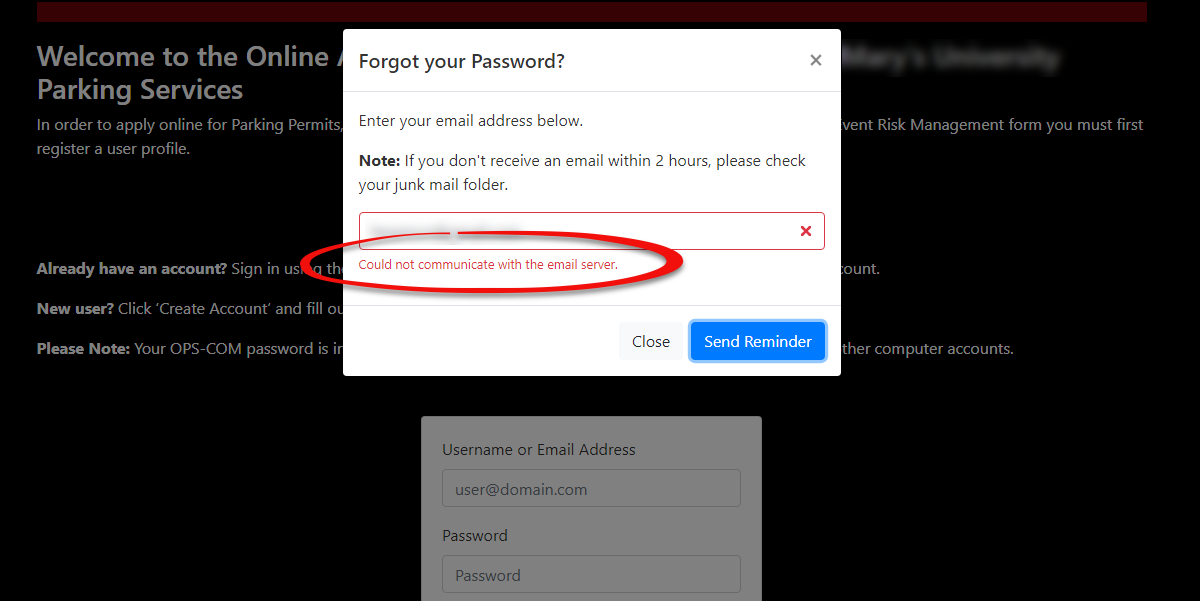
This error indicates that the system is attempting to send an email but lacks a defined "From" or "Reply-to" address from which to send it.
Fixing Communication Errors
- Click System Configuration, then System Settings.
- On the General System Settings tab, locate the Reply-to Admin Email Address field.
- Enter a valid and active email address into this field. This address will serve as the system's "From" address for various automated communications.
- Save your changes.
Once you have updated the email address, this communication issue should be resolved. You can test by re-attempting the action that previously triggered the error (e.g., submitting the Forgot Password form).
Best Practices & Considerations
- Crucial Email Fields: The Reply-to Admin Email Address (and other "From Email" settings found in System Settings) are critical for all system-generated email communications. Ensure they are always populated with a valid, monitored email address.
- Troubleshooting: If the issue persists after updating the Reply-to Admin Email Address, it may indicate a more complex underlying problem.
- Contact Support: If the issue is still not resolved after completing these fields, please contact support@ops-com.com for further assistance. Provide details of the error message and the steps you have already taken.
- Monitoring System Notifications: Regularly check the email address configured as the "Default Notification Email" in System Settings to catch any internal system alerts about failed communications.
Alarms System Settings
Setting up Alarms in OPSCOM
There are 3 different alarms you can setup in OPSCOM.
Defining User Profile Settings
User Profile Settings in OPSCOM enable administrators to customize the information collected from users on their profile forms. By controlling the visibility and requirement status of various fields, you can tailor the user experience to your organizational needs, ensure necessary data is captured, and streamline the registration process.
User profile item settings are configured within the System Settings area of OPSCOM.
- Click System Configuration, then System Settings.
- On the Manage System Settings screen, click User Profile.
Using this Feature
On the User Profile settings page, items in the list can be set to one of three states, controlling their appearance and requirement on the user-side profile form:
Note: The system will not allow the user to save their profile if any required information is missing.
The state selected for each field is highlighted in black, with a checkmark indicating the active selection.
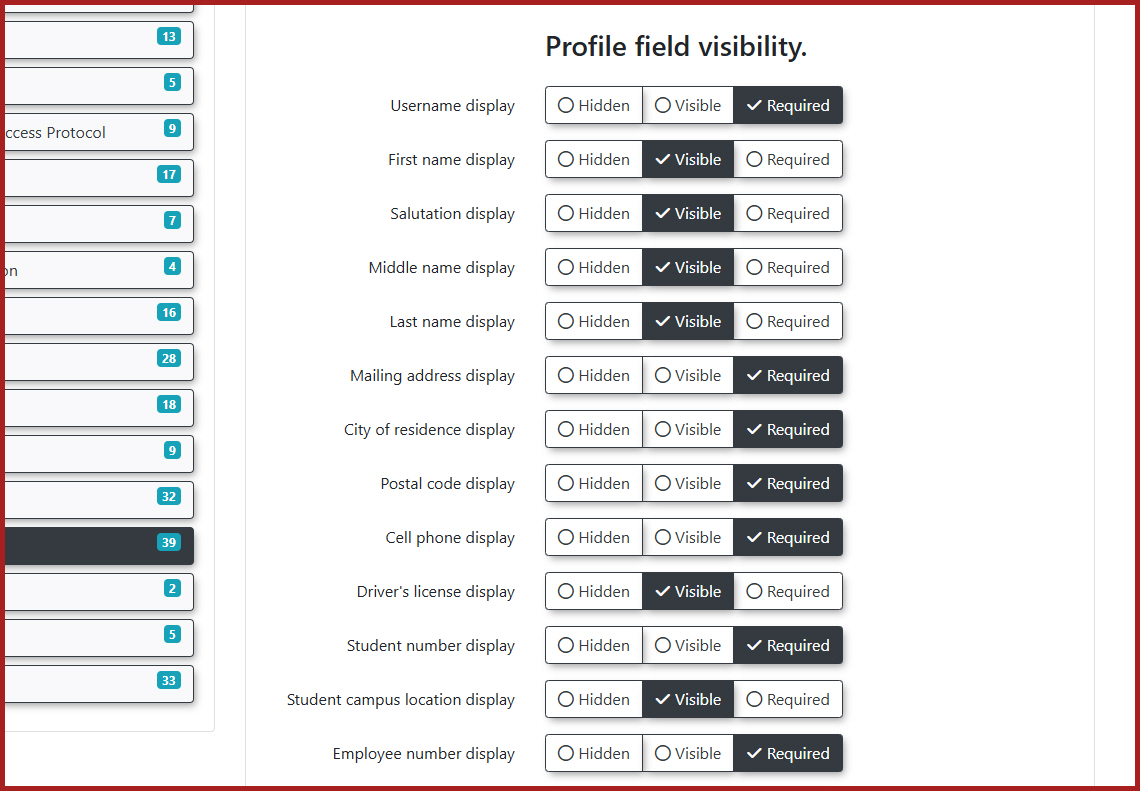
View the corresponding profile fields here.
Customizing Profile Sections
- User Name: A User Name is essential as it's one of the unique identifiers for system access. While a bare minimum typically includes Username, First Name, and Last Name, any of these items can be toggled on/off based on your needs.
-
Note: One scenario where you might hide Username is if an external source (such as LDAP) is supplying the username.
- Enabling Username Edits: By default, the username field is not editable by administrators. To enable this functionality, you must contact support@ops-com.comcom to request changes to the Allow Username Edits setting located within the User Profile settings list. Once activated by the OPSCOM Team, administrators will have the ability to edit usernames directly.
-
- Address Information: This section is critical if you plan to mail permits or other correspondence to end-users.
To ensure students provide both their Mailing Address and Active Local Address enable the Require Both Addresses for Students setting in System Settings>User Profile. Once students fill these out, admins can view both locations under the Active Addresses section of the User Profile - complete with Map icons for quick Google Maps viewing.
Note: To ensure these are visible on the Admin side, don't forget to also enable the Using Student Second Address setting.
- Phone Information: Allows for the collection of various phone numbers.
- License Information: This field specifically refers to Driver's License number (not plate number). You may opt to record this information, especially if you are connected with local law enforcement.
- Student Information: Fields relevant to student identification (e.g., Student Number, Max/Min Student Number Digits).
- Employee Information: Fields relevant to employee identification (e.g., Employee Number, Max Employee Number Digits).
Considerations for Text2ParkMe Users
If your organization is using Text2ParkMe, a second tab will be available on this page. This tab allows you to configure additional details, including credit card information, that end-users can enter.
Important: If any credit card information is entered by the user, it automatically switches all other credit card information fields to "required" for that transaction.
Best Practices & Considerations
- Balance Data Collection and User Experience: While it's important to collect necessary data, avoid making too many fields "Required" as this can create friction and deter users from completing their profiles. Prioritize truly essential information.
- Understand System Overrides: Even if you hide everything possible, the system might still require certain fundamental pieces of information (e.g., core identifiers like Username or Email) and will override your settings to ensure basic functionality.
- Review Hidden Fields Periodically: Ensure that fields marked "Hidden" truly remain irrelevant to your current processes. Organizational needs can change, making previously hidden data suddenly important.
- Tailor to User Types: Consider which information is truly necessary for different user types (e.g., students versus employees) and configure accordingly.
- Impact on Mailing/Enforcement: If you rely on mailing permits or recording specific ID numbers for enforcement, ensure the corresponding profile fields are set to "Required" or at least "Visible."
- The Allow Username Edits setting can only be toggled by the OPSCOM Support team. If you require the ability to edit usernames, please contact OPSCOM support to request this change.
Account Creation Preferences
OPSCOM allows administrators to configure user account creation preferences, choosing between immediate auto-login or requiring email verification upon registration. Understanding and setting this preference is crucial for managing your user base effectively, balancing user convenience with security and data integrity needs.
Please refer to the Registering as a User article for the user-side documentation.
Setup & Configuration
Account creation preferences are configured within the User Profile settings under System Settings.
- Hover over System Configuration, then System Settings, and click the User Profile tab.
- Toggle the Auto Login After Register setting, which controls the account creation flow.
Using this Feature
The Auto Login After Register setting has two states, each with distinct implications for user experience and system security:
Immediate Login (Auto Login After Register: ON)
- Configuration: Toggle the Auto Login After Register setting to ON.
- Behavior: This method allows users to instantly access their account immediately upon completing registration, without requiring them to verify their email address.
- Reasons to Use:
- Limited Email Access: Ideal for scenarios where users might not have immediate access to their email, such as in kiosk setups or for individuals without constant mobile email access.
- Reduced Friction: Provides a smoother, quicker onboarding experience, especially if your target audience is less tech-savvy or if you aim to minimize any barriers to entry.
Email Verification (Auto Login After Register: OFF)
- Configuration: Toggle the Auto Login After Register setting to OFF.
- Behavior: This method requires users to click a unique verification link sent to their registered email address before they can fully access their account.
- Reasons to Use:
- Verifying Legitimate Users: This is generally the preferred method as it immediately confirms that the registration originates from a real user with a valid email address, significantly reducing bot registrations or fake accounts.
- Account Security and Recovery: Email verification establishes a reliable communication channel crucial for secure password resets, account recovery procedures, and sending important notifications, thereby enhancing overall account security.
- Maintaining Data Integrity: By ensuring valid email addresses from the outset, you improve the quality and accuracy of your user data in the system.
Best Practices & Considerations
- Balance Security and Convenience: Carefully weigh the trade-offs between user convenience (immediate login) and enhanced security/data integrity (email verification) based on your organization's risk tolerance and user base.
- Communication: Clearly inform users about the account creation process, especially if email verification is required. Provide instructions on checking spam folders for verification emails.
- Email Deliverability: If using email verification, ensure your system's email sending configurations are robust to guarantee that verification emails are delivered promptly and reliably.
- Target Audience Analysis: Consider the technical literacy and typical access methods of your target audience when deciding on the preferred setting.
- Compliance: Some data privacy regulations may implicitly favor email verification as it contributes to better data quality and user consent verification.
Configuring Multi-Factor Authentication on the User Portal
Multi-Factor Authentication (MFA) adds a crucial second layer of security to user accounts in OPSCOM, significantly enhancing protection against unauthorized access. Currently, the primary method implemented is the use of one-time passwords (OTPs) sent via email. This article outlines how administrators can configure MFA at the system level and how users interact with this enhanced security feature on their portal.
Setup & Configuration
Implementing MFA involves administrator-side configuration within System Settings and customizing the associated email template.
Admin Side Configuration
One-time passwords will not be available on the user portal until enabled within System Settings.
- Hover over System Configuration and click System Settings.
- On the User Profile tab, click Enable Multi-Factor Authentication.
If this setting is not available for you to change, please have your primary Admin contact support@ops-com.com to have it turned on.
This is a ternary setting, meaning it has three different states, allowing for flexible control over MFA implementation:
Email Template Configuration
The content of the one-time password email sent to users is defined within a dedicated email template.
- Hover over System Configuration, Content & Designs and click Email Templates.
- Locate and edit the One-Time Password Email Template.
Here, administrators can define the message and branding of the email. In addition to general user-specific shortcodes, this template includes specific shortcodes for OTP details:
[one_time_password]: Inserts the randomly generated one-time password.[one_time_password value="issued_at"]: Inserts the time the one-time password was generated.[one_time_password value="expires_at"]: Inserts the time the one-time password expires.
One-time passwords always expire after 15 minutes. This cannot be changed.

Using this Feature
User-Side MFA Management
Users can enable and manage their one-time password settings from their security page (formerly the passwords page). Refer to this wiki article to see the steps involved.
The state of the user's one-time password verification is stored in the local storage of their session data. If the local storage is cleared (e.g., clearing browser cache), they will have to enter another one-time password. The MFA verification does not persist across different web browsers or devices, meaning the user will have to enter a new one-time password if they try to log in using another browser or device.
Best Practices & Considerations
- Security Enhancement: MFA significantly reduces the risk of unauthorized access, even if primary login credentials are compromised. It is highly recommended for all users.
- Gradual Rollout (Visible vs. Required): When introducing MFA, consider starting with the Visible setting to allow users to opt-in voluntarily. Once accustomed, transition to Required for all users if your security policy mandates it.
- Clear Communication: Inform users about the MFA requirement, how to set it up, and how to log in using OTPs. Provide clear instructions and troubleshooting tips.
- Email Deliverability: Ensure that your system's email settings are correctly configured and that OTP emails are not being blocked by spam filters. Users need to receive these emails promptly to log in.
- Template Customization: Customize the OTP email template to include your organization's branding and any specific instructions for your users.
- User Training: Consider providing brief training or a guide for users on how to manage their MFA settings and log in with OTPs.
- OTP Expiry: Remind users that OTPs are time-sensitive (15 minutes) and that generating a new one invalidates previous ones.
Password and Security Settings
The Security Settings in OPSCOM provide administrators with critical tools to enforce robust password policies and manage login security for all administrative accounts. Properly configuring these settings is essential for protecting sensitive system data, preventing unauthorized access, and complying with organizational security standards.
Security settings are managed within the System Settings area of OPSCOM.
- Hover over System Configuration, and click System Settings.
- Click Security. The Manage System Settings window will open, displaying all available security configurations.
Using this Feature
The Security component within System Settings allows administrators to configure various aspects of password management and account lockout policies.
Password Security Settings
-
Salted Password Hashing:
- Purpose: This setting adds an essential layer of security to stored passwords. Hashing is a one-way, irreversible process that converts a user's password into a unique, short hash value. "Salting" introduces a random string into this process, ensuring that even if two users have the same password, their stored hash values will be different. This prevents "lookup" (reverse engineering) of the original password, meaning forgotten passwords must be reset, not retrieved. This significantly limits an administrator's ability to view employee passwords and closes a critical security vulnerability.
Note: Once Hash and Salt is enabled, it should not be turned off.
-
Require Password Update:
- Purpose: When activated, this setting forces users to change their passwords upon their next login.
- Use Case: Ideal for ensuring compliance with regular password changes or after a password reset by an administrator.
-
Toggle Password Expiry:
- Purpose: By default, passwords in OPSCOM do not expire. For enhanced security, it is best practice to mandate regular password changes. This setting enables the use of password expiry.
- Configuration: Toggle this setting On.
- Password Expiry in days: Enter the number of days after which an administrator's password will expire, aligning with your organization's security policy (e.g., 90 days).
-
Enable Password History:
- Purpose: When toggled On, OPSCOM will remember passwords previously used by an administrator. The system will then prevent the reuse of those passwords for a specified period.
- Configuration: Set How long to remember old passwords (in days) to define the duration for which old passwords are not allowed to be reused.
Password Strength Requirements
These settings allow you to enforce complexity rules for administrator passwords.
- Minimum Password Length: Sets the minimum number of characters required for a password.
- Enable password strength requirements: Toggles on or off the following specific complexity requirements:
- Numerical Characters: Sets the minimum number of numbers required in the password.
- Lower Case Characters: Sets the minimum number of lowercase characters required in the password.
- Upper Case Characters: Sets the minimum number of uppercase characters required in the password.
- Non-Alpha Numeric: Sets the minimum number of non-alphanumeric (special) characters required in the password (e.g.,
!, &, #,etc.).
Admin Account Lockout Settings
These settings provide an additional layer of security by locking an administrator out of their account after repeated incorrect password attempts.
- Enable Admin Lockouts: Toggles on or off the account lockout feature.
- Lockout after X Attempts: Sets the number of failed login attempts with an incorrect password before the system will lock out the administrator.
- Login attempt timeframe: Sets the timeframe (in minutes) during which incorrect login attempts are counted. For example, if an administrator fails 3 times within a 5-minute period, their account will be locked out.
- Lock the admin out for X minutes: Sets the duration (in minutes) that the administrator's account will remain locked. For example, setting it to
120 minuteswould mean the administrator is locked out for 2 hours before another login attempt is permitted.
Best Practices & Considerations
- Robust Security Policy: Always implement a robust security policy that combines strong password requirements (length, complexity), password expiry, and lockout mechanisms.
- Enable Hashing: Ensure Salted Password Hashing is always enabled for maximum password security.
- Regular Password Expiry: Enforce regular password expiry (e.g., every 90 days) to mitigate the risk of compromised credentials.
- Meaningful Lockout Settings: Configure lockout settings to balance security with user convenience. Too aggressive settings can lead to frequent lockouts, while too lenient settings can be a security risk.
- Communication: Inform administrators about the security policies in place, including password strength requirements, expiry rules, and lockout procedures. This helps them comply and understand why they might be locked out.
- Admins can see, only OPSCOM Team can change: Several security settings (e.g., Hash and Salt, Require Password Update, Toggle Password Expiry, Enable Password History, Enable password strength requirements, Enable Admin Lockouts) are visible to administrators but can only be changed by the OPSCOM Team. For modifications to these specific settings, contact OPSCOM Support.
Uploading and Managing Files
The Manage Files section in your OPSCOM Admin site provides a centralized repository for all files used across your OPSCOM instance, primarily images for your user and admin dashboards. This feature allows administrators to easily upload, view, organize, and manipulate these files, ensuring consistent branding and visual content throughout your system.
Using this Feature
The Manage Files page offers different ways to view and interact with your uploaded files.
- To access this, click System Configuration, then Manage Files.
Viewing Files
Files can be viewed in two primary modes:
- Grid Mode: Displays a visual preview (thumbnail) of each image, which is useful for quickly identifying content.
- Table Mode: Provides a detailed list view, showing file names and other relevant information.
Managing Existing Files
By right-clicking on an image or file, a contextual menu will appear, giving you several options:
- Download: Save a copy of the file to your local device.
- Rename: Change the name of the file.
- Delete: Permanently remove the file from the system.
To crop an image (i.e., resize or adjust its visible dimensions to focus on a specific area), first View the image. Then, click the Cropping icon to begin selecting the desired area of the image.
Adding Files to the Repository
To add new files to this repository, click on the Upload tool. An Upload files interface will appear, prompting you to Select files, then Submit. The file will then be uploaded to your site's file storage.
Note: Once an image is uploaded, it cannot be moved to a different folder. To maintain proper organization, ensure that you upload the image directly into the intended destination folder.
Adding Images to a Page (Referencing Uploaded Files)
To display an image you've uploaded onto an OPSCOM page (e.g., a page header or a custom content area):
- Click Insert in the text editor toolbar.
- Select Image from the dropdown menu.
- In the Insert/edit image window, click the search folder icon next to the source field to open the Filemanager.
- In the Filemanager, locate and double-click the image you wish to insert.
- The image will be added to the page at the location of your cursor.
Best Practices & Considerations
- Organize Files: If you have many files, consider creating sub-folders within the file manager to keep your assets organized and easy to find. Be sure to upload files directly into the appropriate folder, as uploaded files cannot be moved once added.
- Descriptive File Names: Use clear and descriptive file names (e.g.,
company-logo-header.pnginstead ofimage1.png) to simplify identification and referencing. - Optimize Image Sizes: Before uploading, optimize large images for web use. Smaller file sizes will improve page load times for both admin and user interfaces.
- Backup Critical Assets: While OPSCOM manages these files, consider maintaining local backups of critical branding assets (logos, banners) as a best practice.
- Path Accuracy: When linking images to pages, ensure the URL path is exactly correct, including capitalization, as file paths are often case-sensitive.
Admin Dashboard Setup (Quick Start)
The OPSCOM Dashboard is a fully customizable, widget-based analytics dashboard built into the admin portal. Each user can create multiple personal dashboards, arrange widgets freely on a drag-and-drop grid, and configure each widget individually to show exactly the data they need. Dashboards and widgets automatically refresh on a configurable schedule and are fully responsive down to mobile widths.
Setup & Configuration
Configuring dashboard layouts requires specific administrative permissions.
Dashboard layouts and widget configuration are now fully documented in our feature guide. For detailed instructions on available widgets, customization, and layout options, see the Using the OPSCOM Dashboard & Widgets article.
Content & Design
Email Headers and Footers
Email Headers and Footers in OPSCOM allow administrators to define and manage reusable layout components for system-generated emails. By customizing these elements, you can ensure consistent branding, provide essential contact information, and apply uniform styling across all your automated email communications, creating a professional and cohesive user experience.
Using this Feature
Email Headers & Footers are managed through a dedicated section within System Configuration.
- Hover over System Configuration, then Contents & Design, and click Email Headers & Footers.
The Email Template Layout List page displays the various sections of your email layouts (e.g., Header, Footer, Style). From here, you can select and edit the individual components that make up your email layouts.
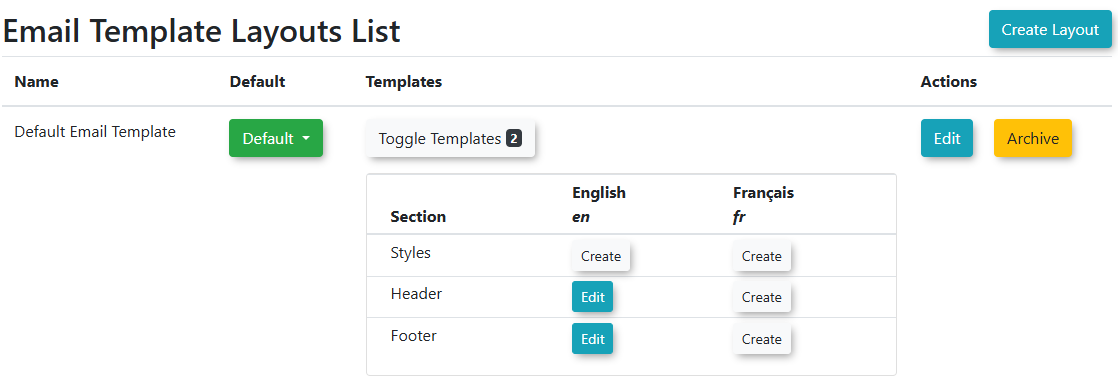
Editing Email Layout Templates
- Click Toggle Templates. Locate the corresponding Section you wish to edit (e.g., "Header" "Footer" or "Style").
- Click the Edit button for that section.
- Within the editor, you can:
- Add or modify text.
- Insert images (e.g., your organization's logo).
- Include inline styles directly within the HTML to control appearance (e.g., colors, fonts, spacing).
- Click Save Changes. You will see a message that your changes have been saved.
- You can also archive your template by clicking the Archive Template button in the Top Right.
- Click the Back button to edit other sections.
Best Practices & Considerations
- Consistent Branding: Use email headers and footers to consistently display your organization's logo, branding colors, and contact information across all automated emails.
- Essential Information: Ensure your footer contains crucial information such as your organization's name, website, and a general contact email or phone number.
- Mobile Responsiveness: When adding content and styling, consider how your headers and footers will appear on mobile devices. Use responsive design principles or simple layouts for best compatibility.
- Inline Styling: While the editor allows inline styles, for more complex or sitewide styling changes, coordinating with OPSCOM Support for custom CSS in the "Style" template might be beneficial.
- Testing Changes: After making any modifications to headers, footers, or styles, always test the email templates that use these layouts. Send a test email to yourself to ensure everything renders correctly in various email clients.
- Global Impact: Remember that changes made to these layout templates will affect all email templates that are configured to use them.
Email Templates
Email Templates in OPSCOM allow administrators to customize the content and appearance of automated emails sent by the system. By leveraging available shortcodes and a smart editor, you can create dynamic, informative, and engaging messages for various notifications, ensuring clear and consistent communication with users.
Using this Feature
Default Email Templates
To access and manage your default email templates:
- Hover over System Configuration, then Contents & Design, and click Email Templates.
- All the default email templates available in the system will be displayed.
The Email Templates interface allows you to edit existing templates, utilize dynamic shortcodes, and configure various fields to tailor your messages.
Editing Default Email Templates
- Locate the template you wish to edit in the list.
- Click the Edit button next to it.
- You will be taken to a dedicated editor interface where you can make changes to the email template.
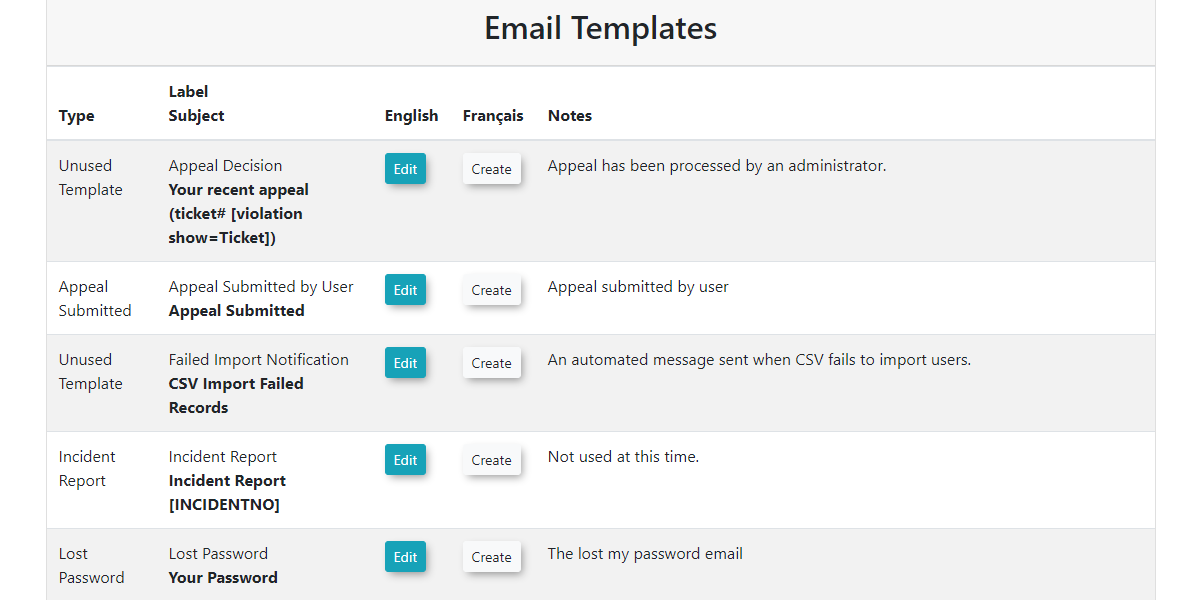
Creating Templates for Other Languages
If you have other languages installed, you can click the Create button to create templates for these languages.
Email Template Fields - What do they do?
When editing an email template, you will configure the following fields:
- Label: This field is how you will identify your email template within the system's list.
- Type: This is a non-adjustable value that indicates the specific purpose or trigger for this email template (e.g., "Appeal Submitted," "Password Reset").
- Language: This field contains options to select the language for the template, typically supporting options like French or English.
- Layout: This allows you to select a pre-defined layout that surrounds your message. Layouts include your email header, footer, and overall styling. You can create or adjust email template layouts under System Configuration, then Contents & Design, and click Email Headers & Footers.
- Subject: This is the text that will appear as the subject line of the email message.
- HTML Content: Here you will write the main body of the message. This section supports rich text formatting, the insertion of images, and the use of shortcodes to create visually appealing and dynamic emails.
- Text Content: This section is a simple text editor for the message itself. It does not support shortcodes or any formatting. This plain text version is often used as a fallback for email clients that do not render HTML.
Using Shortcodes
Each email template has a set of available shortcodes that you can use to dynamically insert specific information into your message.
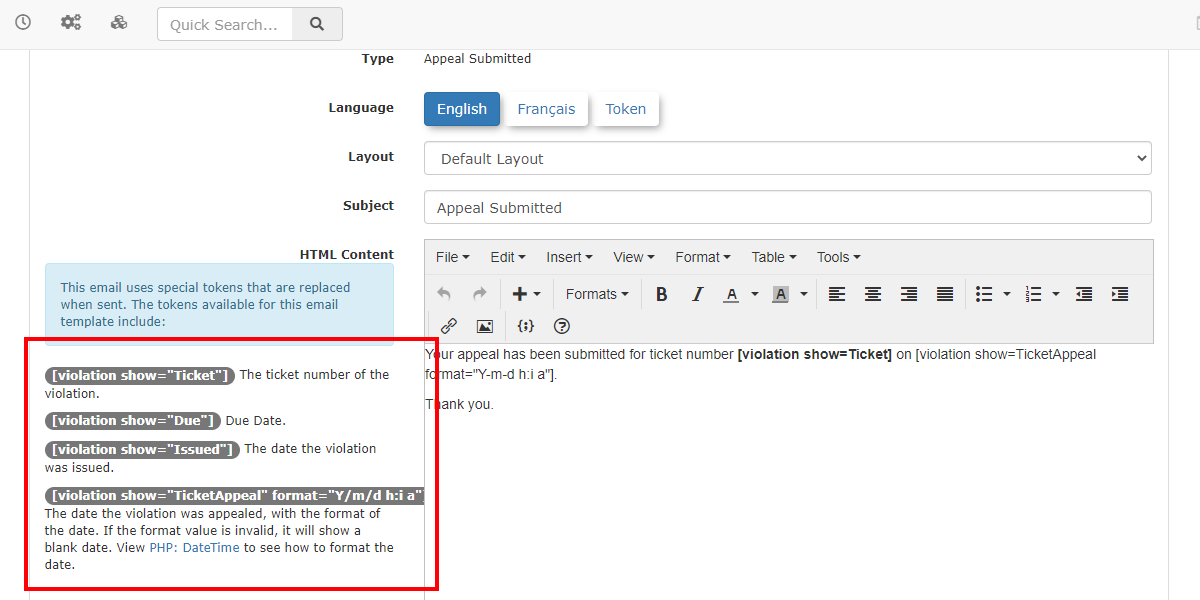
- The shortcode tokens are typically displayed on the left side of the template editor.
- For example, the email template for "Appeal Submitted by User" might offer shortcodes to automatically include details like
[ticket_appealed_date]or[ticket_number], allowing you to craft messages without manually knowing these specifics. - You can insert these shortcodes into the smart editor on the right side. The system will automatically replace the shortcode with the appropriate information when the email is sent to the desired user.
- The smart editor also provides formatting capabilities, allowing you to add images, format text, and arrange your messages much like a word processor.
Custom Email Templates
Administrators can create and store frequently used emails that are not tied to specific system triggers. These templates can be used to automatically populate the email body when manually drafting a message to a user.
Creating a Custom Template
-
Click the Create button.
-
Enter a descriptive Label. Custom templates are assigned an internal type code beginning with
custom. -
Compose the message using the HTML Content and Text Content fields.
-
Click Save.
Using Custom Templates in Compose Email
When drafting a manual email to a user via the Compose Email page:
-
Use the Load Template section to view all available custom templates.
-
Select a template to automatically populate the email contents.
-
The Compose Email interface will highlight any required fields that must be completed before you can click the Send Email button.
Tip: Unlike system-defined templates, custom templates include a Delete button, allowing you to remove them when they are no longer needed.
Best Practices & Considerations
- Utilize Shortcodes Fully: Maximize the use of available shortcodes to make your emails dynamic, personalized, and informative, reducing manual effort and potential errors.
- Consistent Branding: Use email layouts (Email Headers & Footers) to maintain consistent branding (logos, colors, contact info) across all your system-generated emails.
- Clear Subject Lines: Craft clear and concise subject lines so users can immediately understand the purpose of the email.
- Review Both HTML and Text Content: Always ensure both the HTML Content and Text Content sections are populated and convey the message clearly. This provides compatibility for all email clients.
- Test Templates: After making changes to an email template, send a test email to yourself or a test account to verify that all shortcodes are rendering correctly, formatting is as expected, and the message is clear.
- Language-Specific Templates: If your system supports multiple languages, ensure you create and maintain separate templates for each language.
- Verify Custom Templates: When using the Load Template feature, remember that custom templates show for all users regardless of the selected language; ensure the correct version is chosen.
Translations
Where are Translations Supported
Currently, translations are only supported on the user side, however, they are managed and set up on the admin side, by admins that have the correct permissions set up to work with languages.
- Translations that are in red, are translations on the adminside which are not yet supported. Since they are not supported you will see them come up in English only until the adminside is supported.
- Translation that are in black, are translations that are on the userside that can currently be changed.
Navigating to Translations
To begin reviewing, editing or creating your translations/languages, you will need to navigate to System Config → Content & Designs → Translations.
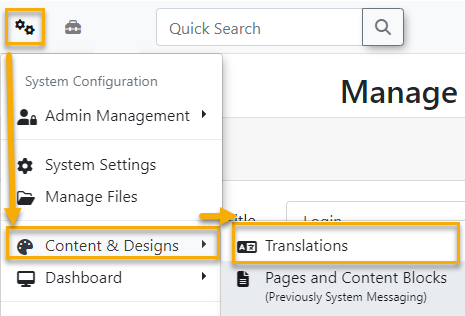
This will take you to the Installed Languages page where you can begin managing your current languages.
Adding New Languages
To begin adding your own languages simply click Add Language on the Installed Languages page which will bring up a new modal to add a label and locale.
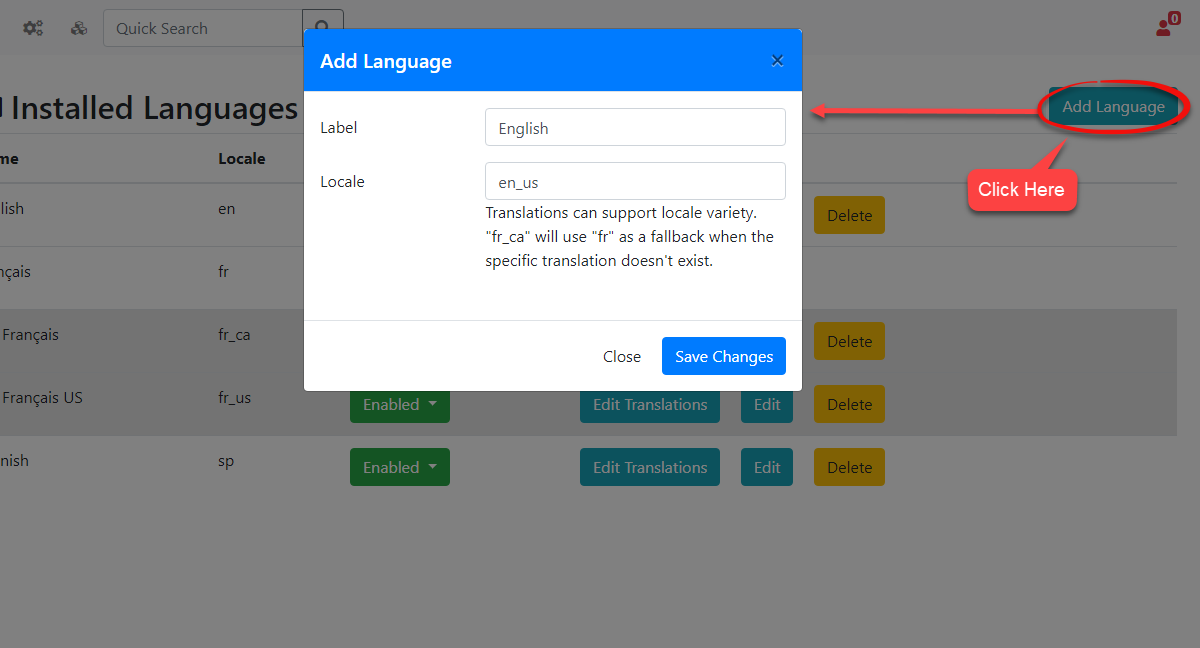
When you are finished click Save Changes and your new language will be instantly added to the list. Once the language has been added, your users can begin using it on the user-side assuming you have the language enabled.
The locales are used when we want to create sub-languages, while the label is used to identify our translations throughout the site.
Adding Sub Languages and How do They Work
Sub-languages are created by using a locale that currently exists with an underscore '_' followed by the sub-language that you want to set up.
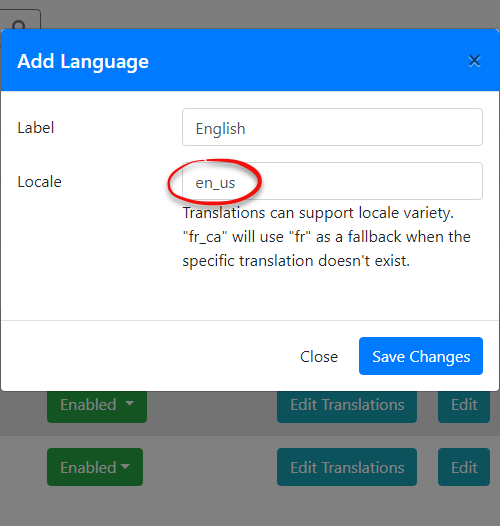
For example, you can support multiple variations of the English language for your users. In the image below I have created a sub-language for American English using the locale en_us.
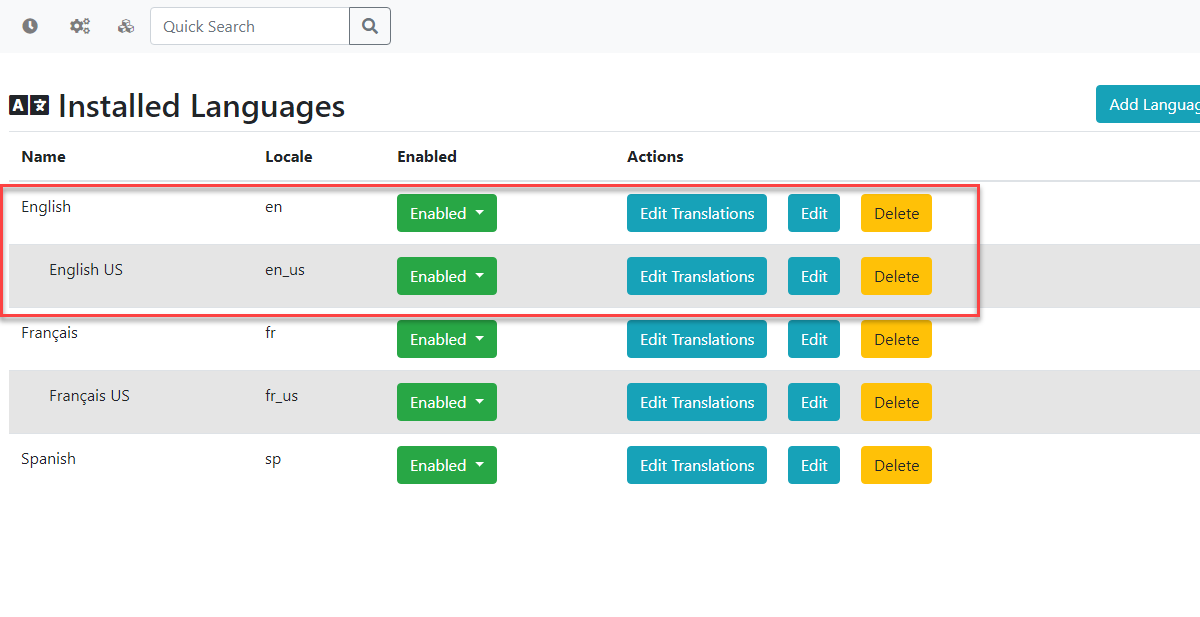
When you create a new sub-language, it will automatically use the translations that have been set up on the main language, which is the locale on the left side of the underscore, such as en_us. You will need to create the main language first before creating any sub-languages, otherwise the sub-language will always default to English instead of the main language you may have intended to use.
Installing Languages
Installing a language will create a new language template with the translations we have set up for it as well as the Name and Locale we have created for you. You can then click Edit Translations to adjust the preset translations to your liking. If there is not a language already in the system that can be installed you will need to add a new language and setup the translations yourself. Currently, we only support the ability to install French and English.
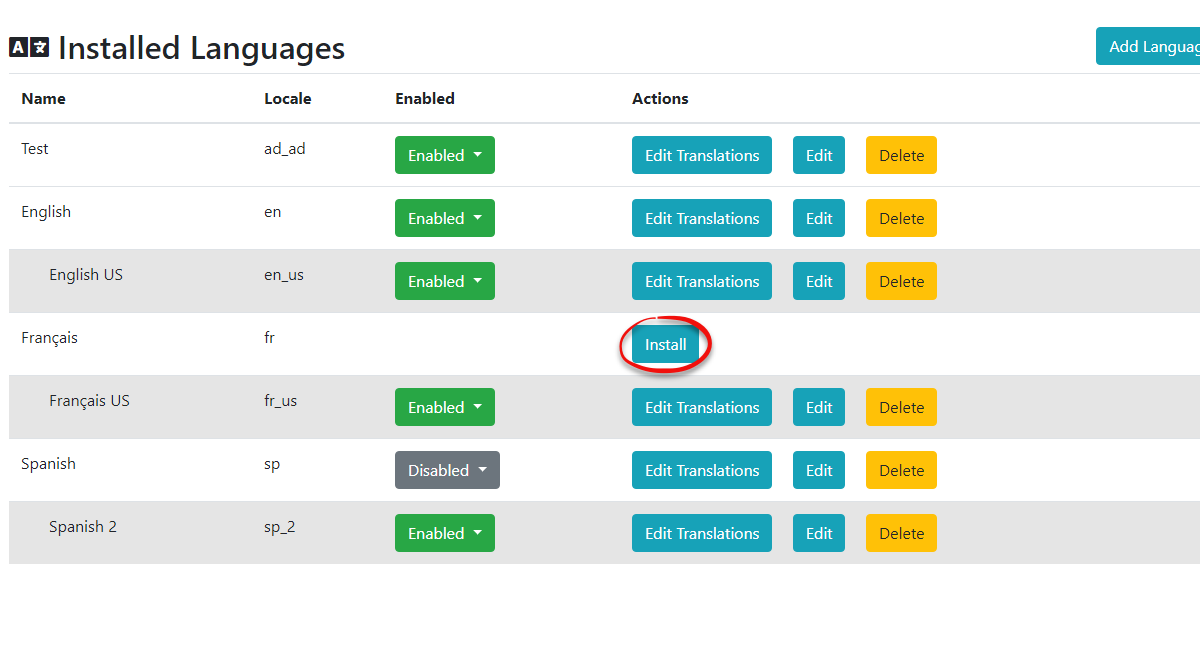
Disabling or Enabling Translations
We can choose to disable particular languages that we don't want to be selectable from the user side. To do this we can toggle the visibly of our languages under the Enabled column on the Installed Languages Page.
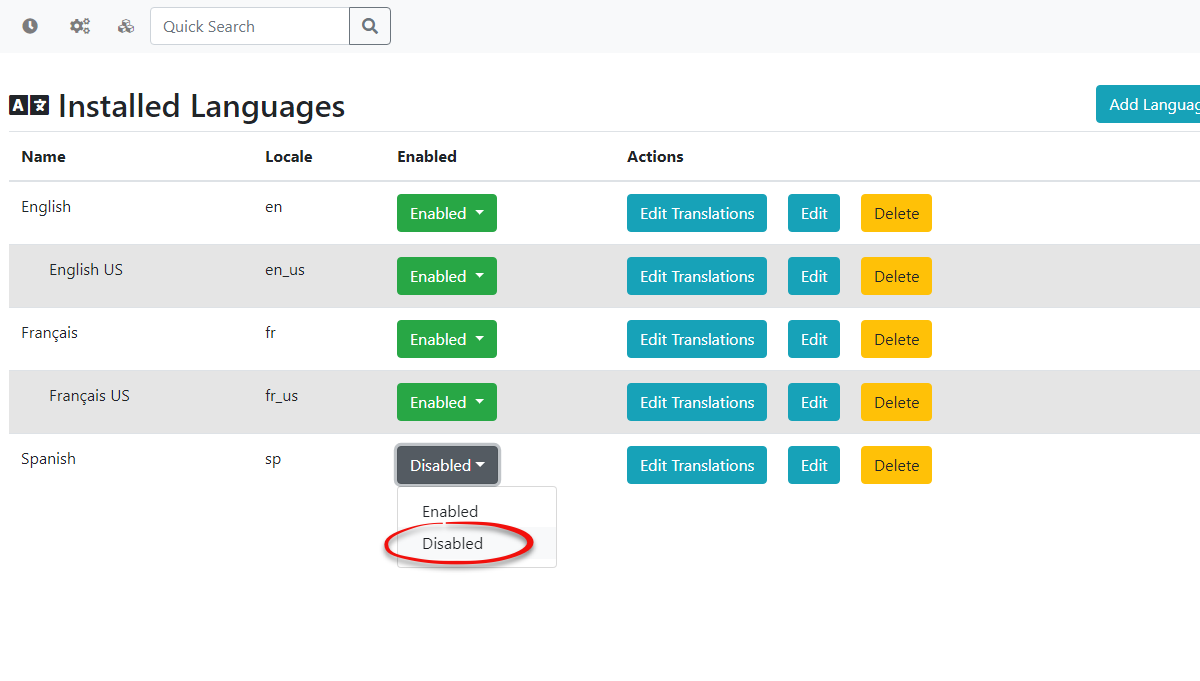
Once a language is toggled as Disabled it can no longer be selected by the users of your site as seen in the example image below.
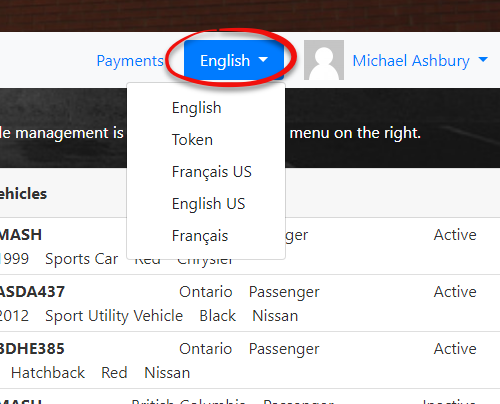
Searching Language Translations
You can search for all translations that relate to a specific component in the system using the search bar at the top right of the Edit Translations page. For example, we can search for permits to find all permit related translations.
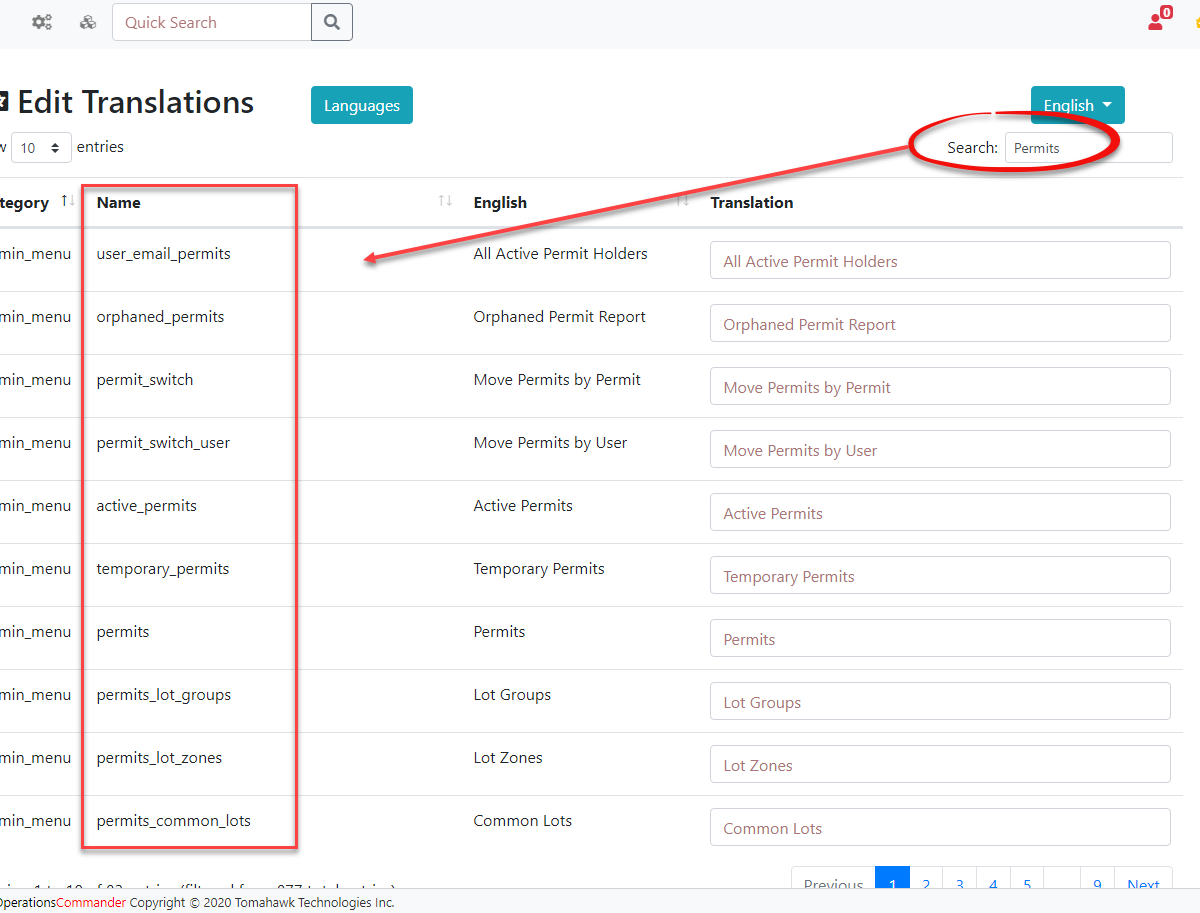
We can also go onto the user side and use the Token language, which will show all of the Names found on the Edit Translations page, under the Name column, (See the image above) to find where that translation exists so it can be changed. This can't be seen by logging is as the user from the user side but requires an admin to go to the profile of a user and click the Login as User button from the admin side. This is to ensure that your regular users don't see the token language option.
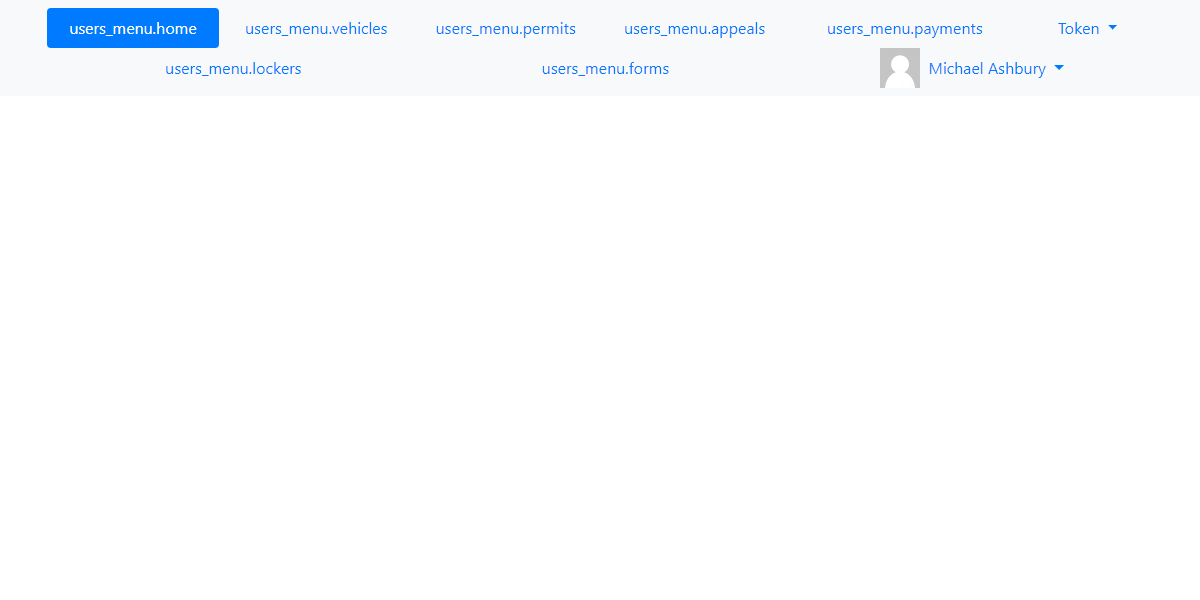
The token language finds the tokens used so you can better search where the translations are being used on the user side.
Edit Translations
To begin editing language translations you have to make your changes and then click away from the input field. Once you do this you will see that the translation gets highlighted in yellow indicating that a change has been made. The number of affected records will also display at the bottom of the translations page.
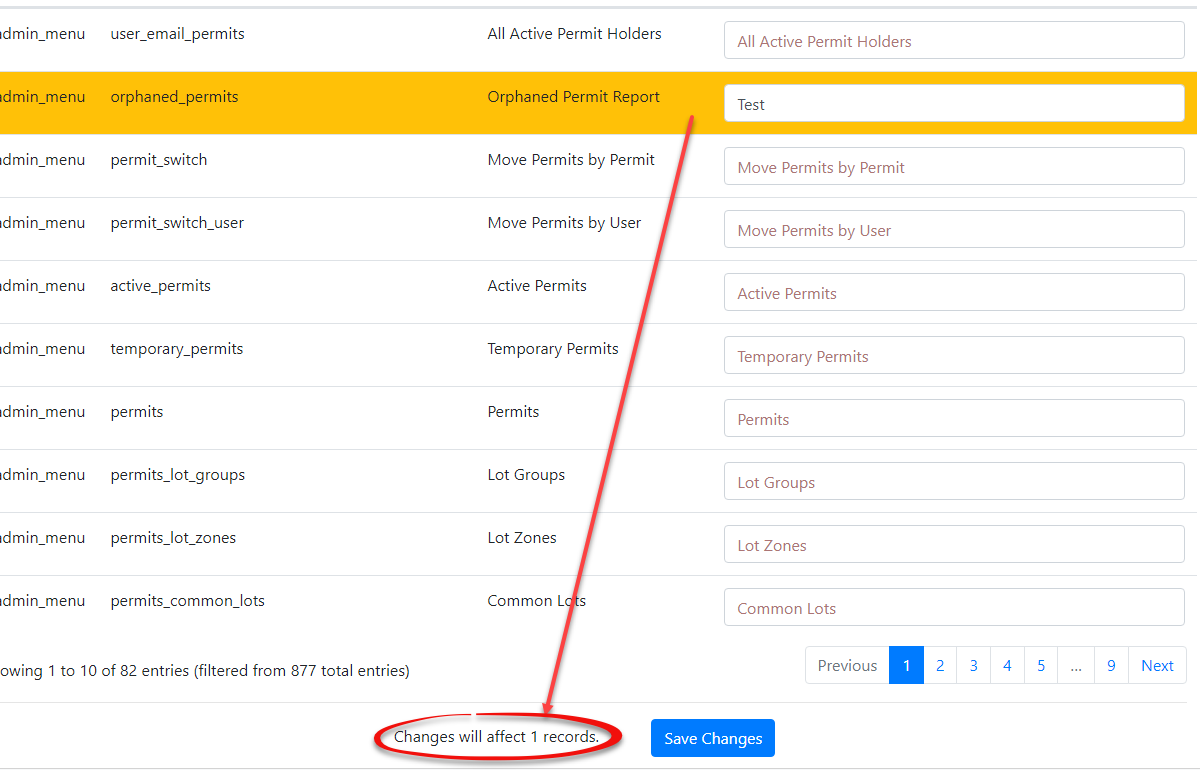
When you are finished making your changes click Save Changes for the update to take effect.
Delete Languages
To delete languages, you can click the delete button next to the language you want to remove. Keep in mind that if you remove the base English and French language it can be re-installed. However, if you delete a language that we do not provide you, then this data will be lost and you will need to contact support for assistance with recovering these translations.
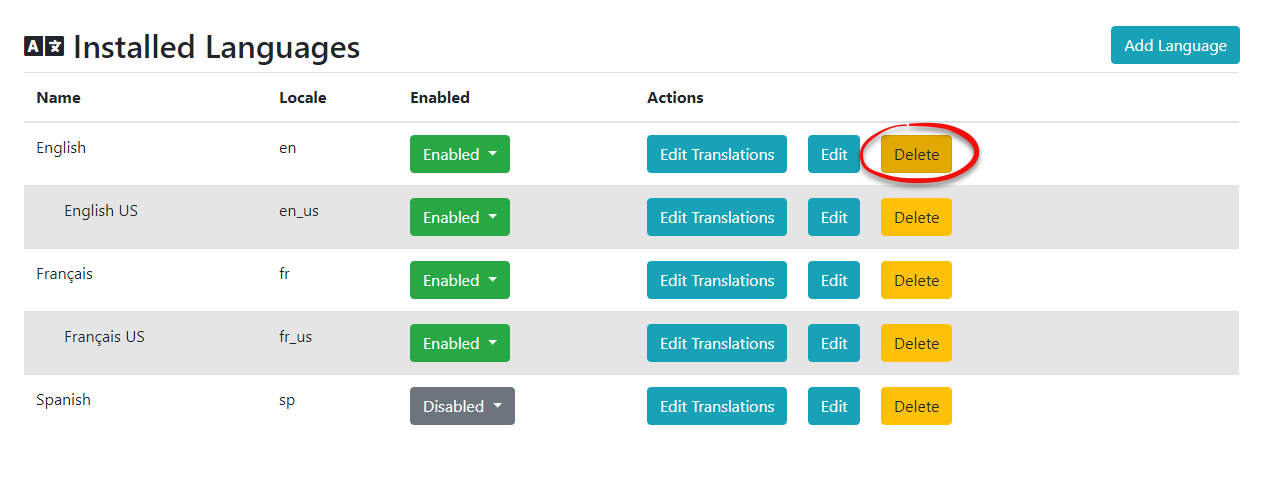
Keep in mind that deleting a language will not delete any of the sub-languages you may have created. For example, if I were to delete English, the English US language would still remain with all of its translations.
Creating Templates and Messaging for New Languages
It's important to note that when you create a new language it will not rely on the default templates and system messaging that you have setup for your previous languages. For example, if I use the new French American language I created, and go onto the user side where languages are supported, then I will see a blank template as well as blank messages.
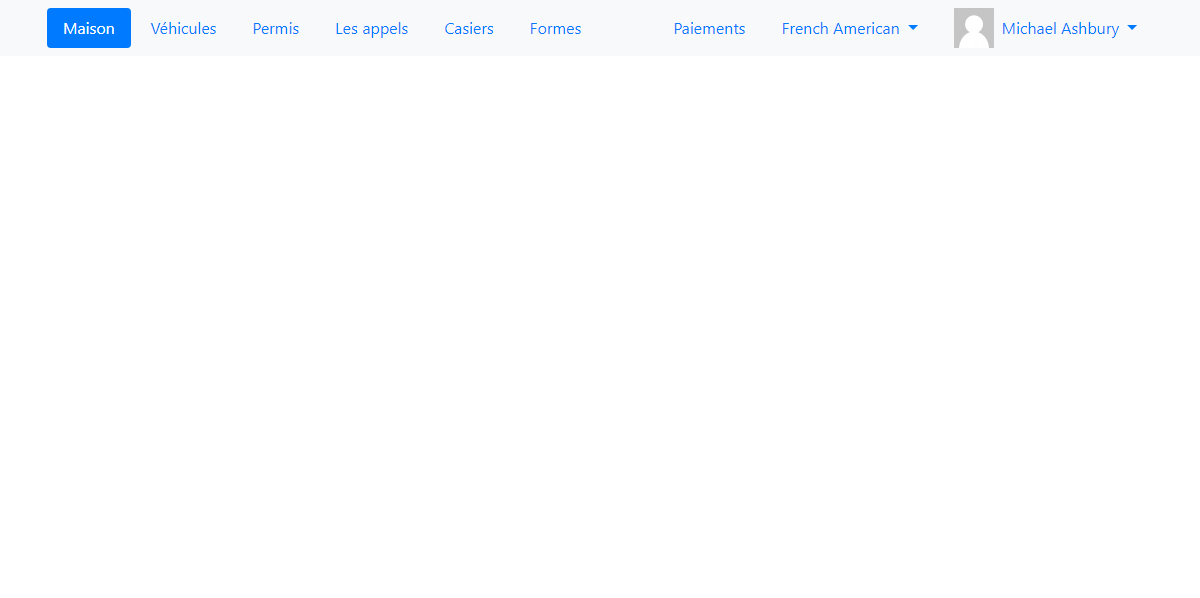
Adding Templates
To add a new template for your languages that you create you will need to go into Templates & Design followed by Toggle Templates for the templates that are currently being used. From there you will have the option to click the Create button to add the new template. If you just want your new language to use the same template, from a language that is already in the system, just go into Edit and copy the text over into your new language, after clicking the Create button.
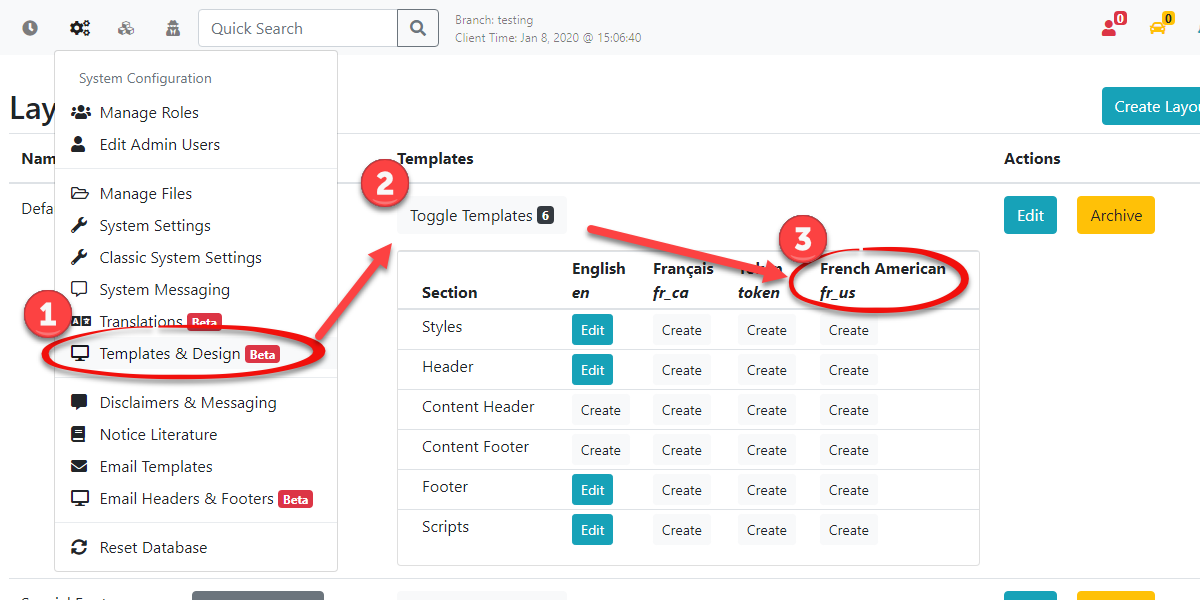
Adding System Messages
System messaging will work a bit differently than templates as you will need to go into each individual message and click the Edit button next to that message.
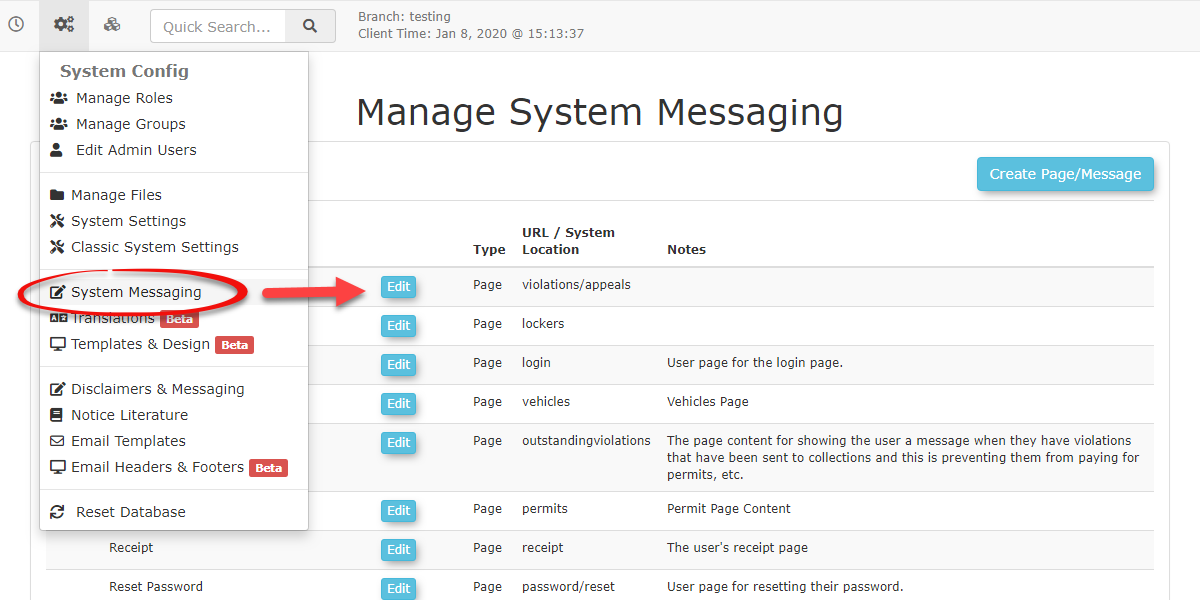
From there you should be able to select your new language.
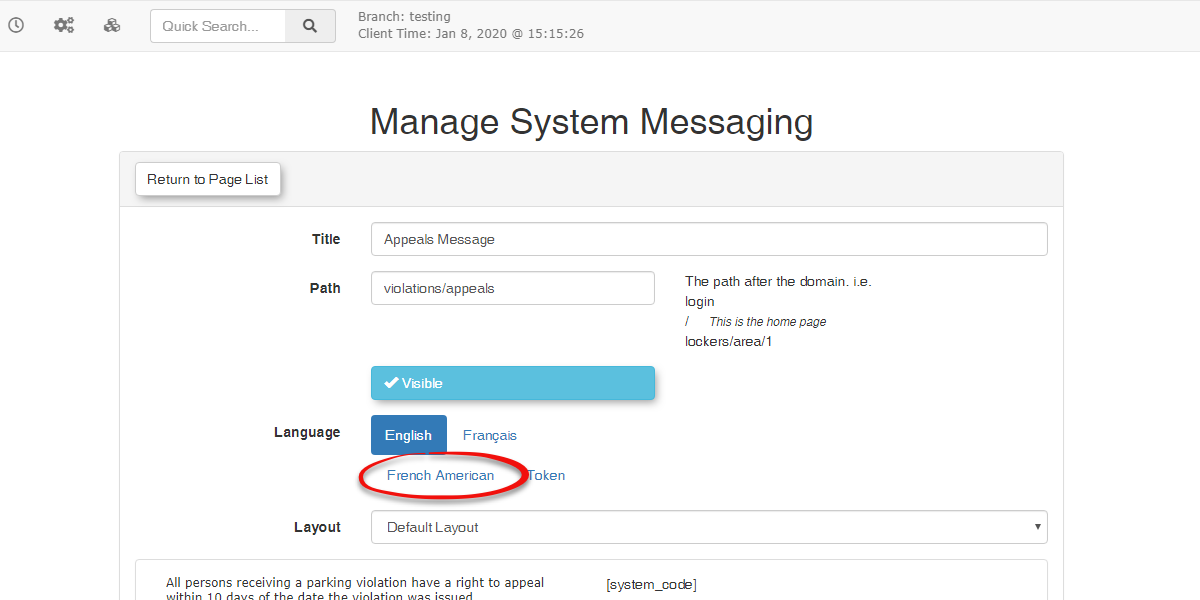
If you want multiple messages to display for all your languages you will need to create a new system message and type out the translations for that language template.
Changing Terminology Using the Translator
There is another use for the translation tool that may not be obvious at first. Since the translator is essentially a list of code terms and a corresponding list of what is actually displayed on any page not only can you edit the various languages but for each language you can also edit the display term to fit a local "version" of the term. A perfect example of this is in some areas one might refer to receiving a "ticket" as receiving a "citation". It is entirely possible to replace any spot in the interface where the term ticket is used with the term citation.
To do so go into the language editor and search for the term you wish to localize. In our example simply enter ticket in the search bar and hit return. A list of all translatable instances of the word ticket will appear. Click the box where the term is editable and type in your preferred term. In this case we are changing Manage Ticket Categories to Manage Citation Categories. Once you save the changes you have made the displayed text associated with Manage Ticket Categories will display as Manage Citation Categories throughout the system. You may edit the remaining instances of the word Ticket that are in the list before saving to change the term in bulk for all entries listed.

User Portal Branding and Setup
OPSCOM administrators can define global default branding for the User Portal. By configuring the Default Site Logo and Default Site Header, you can ensure consistent branding and visual presentation across your OPSCOM User environment.
Setup & Configuration
Default images are configured within the Global component of the System Settings.
- Hover over System Configuration, and click System Settings.
- Click the Global settings tab. Within the Global Setting section, you will find two key areas where you can configure images:
- Default Site Logo
- Default Site Header
Setting the Default Logo
- Next to the Default Site Logo setting, click on Select Image.
- You will be taken to the Manage Files section (your file repository).
- Browse your computer or search for the image you wish to use as your default site logo.
- Select the desired image.
Setting the Default Header Image
- Similarly, next to the Default Site Header setting, click on Select Image.
- Follow steps 3-4 above.
Once the images are selected, their file names or previews will appear in the respective configuration settings fields. Remember to Save Settings to apply these selections.
Observing the Changes
These default images serve as fallbacks and will appear in various places throughout the OPSCOM system if no specific logo or header is set in other areas (such as the Contents and Designs section).
Common places where these default images are utilized include:
- The User Portal (e.g., your public-facing permit purchasing site).
- The phone interface utilized in features like Real-Time Parking.
- Mobile apps, Text2ParkMe, and QR code interfaces
Best Practices & Considerations
- Branding Consistency: Use high-quality, appropriately sized images that reflect your organization's branding for both the logo and header.
- Optimization: Ensure image files are optimized for web use (e.g., compressed, appropriate resolution) to ensure fast loading times on all interfaces.
- Global Impact: Remember that these are default settings. If you have specific headers or logos configured in other sections of the system (like individual email templates or specific public pages), those specific configurations will override these global defaults.
- Accessibility: Consider the visual accessibility of your chosen images, especially for text overlays or contrast, if applicable to your header design.
Pages and Content Blocks
Accessing System Messaging
To access and manage your System Messaging navigate to the gears icon ![]() and click on Content & Designs -> Pages and Content Blocks.
and click on Content & Designs -> Pages and Content Blocks.
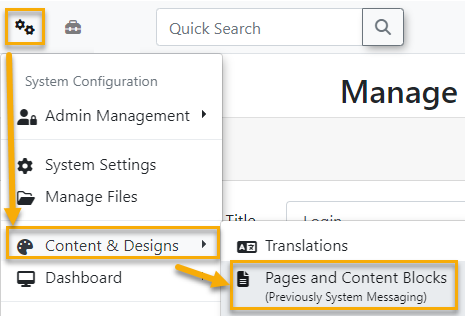
Creating Pages
Pages display the visual content found throughout your application. You can edit the contents of your page or post a System Message by using the Disclaimer Shortcode on the Page you want it to show up on. Shortcodes also make it convenient to add interactive content to your pages. For more information on Shortcodes scroll to the bottom of this page.
- To create a Page click the Create Page/Message button at the top right of the Manage System Messaging screen. It doesn't matter what tab you're on when you do this as you will specify the Page Type when you go to create the page.

- Once you click this button OPSCOM will take you to a different section where you can set the properties and content of the page. Below is a detailed description of the options available to you when creating new Pages.
| Page Attributes | Short Description |
|---|---|
| Title | The Title of the page you wish to create, which will be the name displayed on the user navigation bar. |
| Path |
The path after the domain. i.e. login/ → This is the home page Changing this to lockers/area/1 will display login/lockers/area/1 as the URL for that page. |
| Visibility | You can toggle the visibility of your pages which will make it so your users can't see the page anymore, but you can still edit it. |
| Language | Use this to select between two language options for a specific page. Tomahawk currently supports English and French. |
| Layout | You can select the layout of your page here. Usually, you will have the Default Layout selected. |
| Content | Your content will be the text on the page you are currently editing. You can also use Shortcodes here to display a body of material or feature. For example, a user login form could be displayed on your homepage. |
Important: Make sure you select Page under the drop-down menu next to Page Type and not Message. Below we will go into detail on how to create a Page field by field. The images below give you a good visual example of what field is being explained, if there is a certain field you are unsure about you can easily find the picture and read from there.
-
Start by giving your page a Title and specify how you would like the URL at the top of your page to be displayed.

- Adjust the visibility of your page by toggling the Visible button on/off. The Page will still be editable in the System Messaging section but it will not be visible to your users who are on your Page or System Message.
| Toggle On(Visible Page) | Toggled Off(Invisible Page) |
|---|---|
|
|
|

- Toggling the Page as invisible will show it under the Messages tab like seen in the image below to signify it cannot be seen by your users.
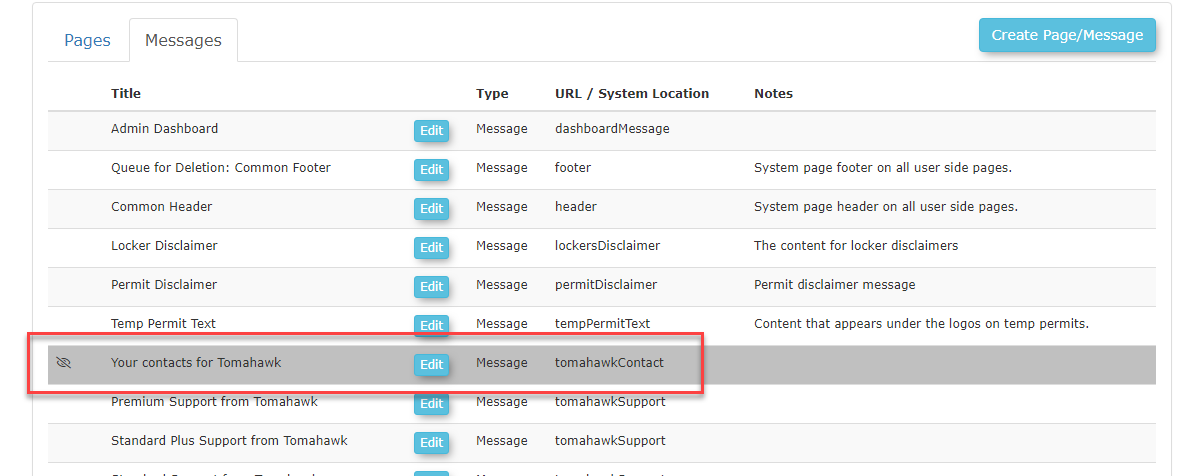
- Select the default Language and Layout of your page. If you are not sure which template to use you can leave it as the Default Layout.

- Provide the content of your page in the editor found under the page settings. This content will be the main content of your Pages; you can use Templates & Design to edit the other sections of your pages such as the Header-Content and Footer-Content.
- OPSCOM uses Shortcodes to display a section of interactive or static content like a user login, permits, etc.

Content Placement
Depending on where you place your content it can appear differently. OPSCOM's smart editor reads content top to bottom, left to right. Meaning that placing a user login Shortcode before your content will look dramatically different than if you placed the Shortcode last. You can see a few visual examples of how this works below.
For Example: Shortcodes Before Content

As you can see this displays our lot information before our content.
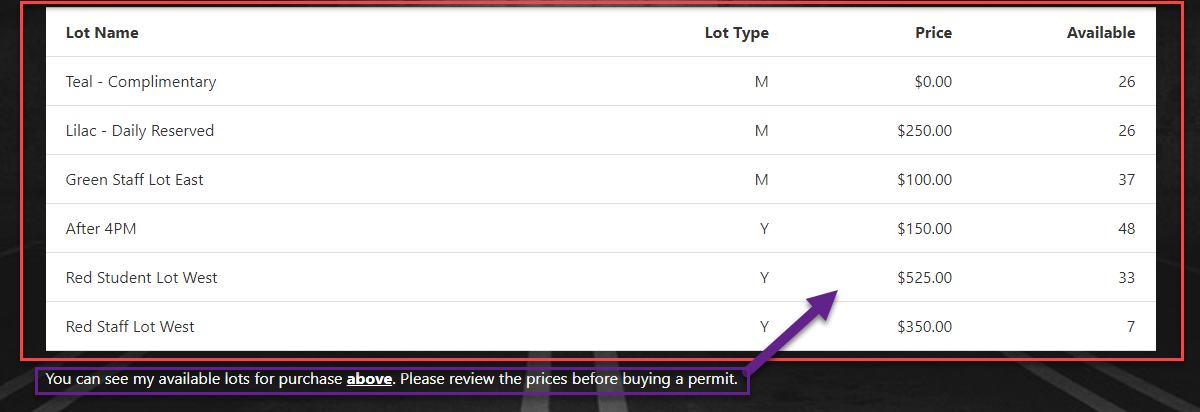
For Example: Shortcodes After Content

As you can see this placed the Shortcode after the lot information

Editing Pages
Keep in mind that the URL / System Location next to the page is the area in OPSCOM that you are updating. Therefore, if you wished to update the permit screen, you want to edit the page with a System Location of /permits.
You can edit your pages attributes such as the Title, Path, Visibility, Language, Layout, and Content after it has already been created.
- To Edit a page, simply click on the Edit button next to the page Title you want to edit. As seen in the image below we are going to select and edit the Appeals Message page.

- You can now make any changes to the Pages content or attributes that you like.
See Creating Pages near the top of the page if you are not sure what a specific field does. From here we can edit the format of the text such as the colour, background color, etc..

- If you have not made any changes to the page you are Editing, you may go back to the Page List by clicking Return to Page List at the top of the screen. Clicking this button will discard all changes recently made.

- Once you have finished editing the page, click Save Messaging for your changes to take effect.

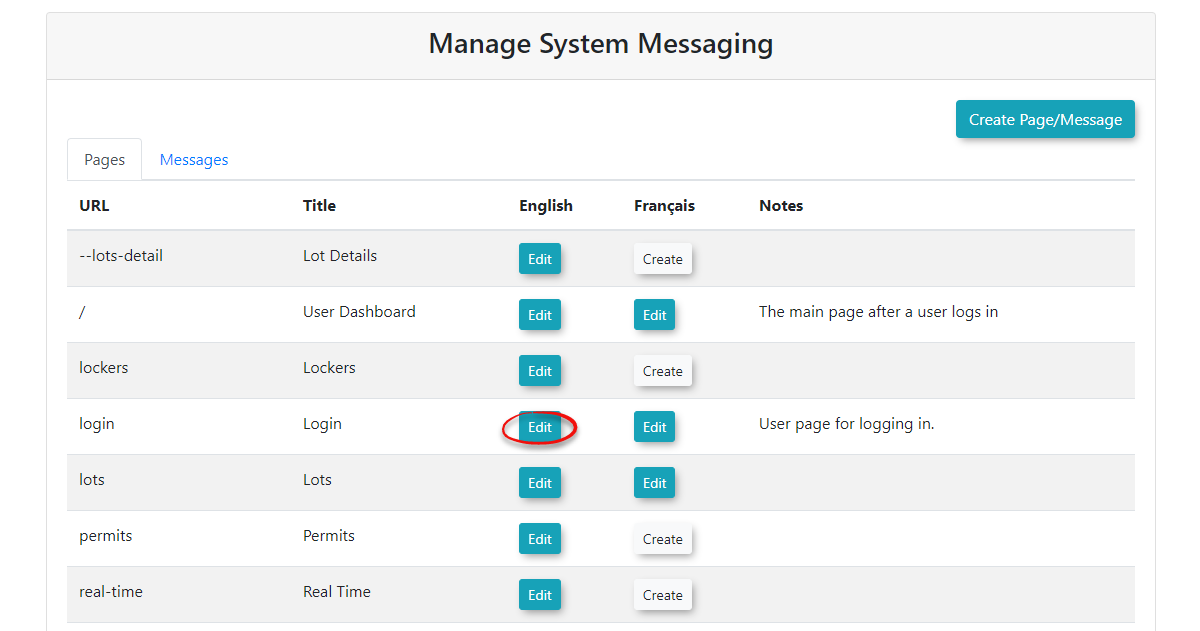
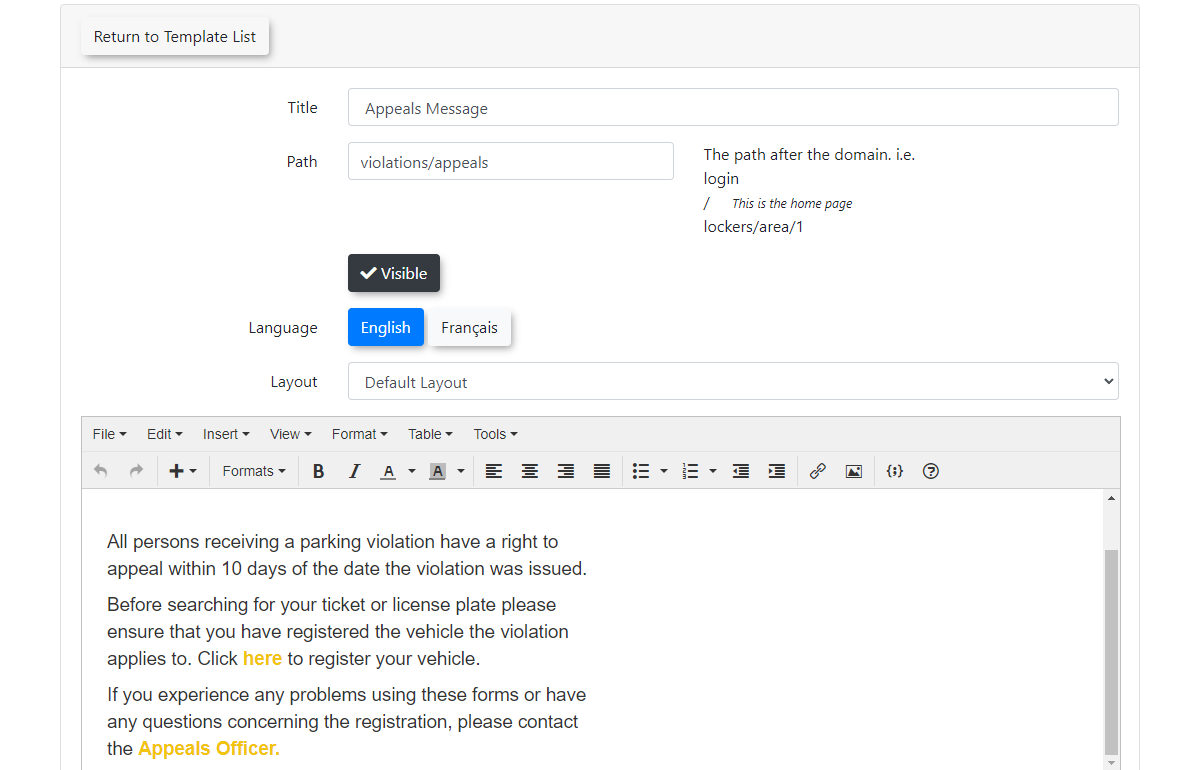
Creating System Messages
Important: Users will be brought back to the Users page if users do not agree with a System Message. Meaning, we use System Messaging as a convenient way to offer agreements and disclaimers before users make purchases of permits or lockers.
System Messages and How they work with Pages
System Messages and Pages work together using Disclaimer Shortcode's. When you create a System Message, you give that message a unique Identifier. System message identifiers may be used in junction with Disclaimer Shortcodes to display your System Messages onto Pages. The idea may be daunting at first, but once you get a better understanding of how these features work together, it will make more sense.
Visual Example
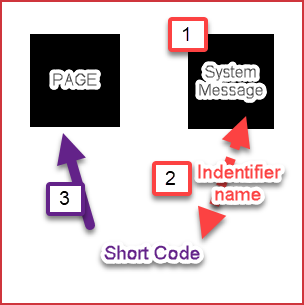
System Messages provide you with a convenient way to add alert messages to your pages that pop-up when a user clicks the page. You may create System Messages to be displayed on specific Pages using Disclaimer Shortcode's.
| Message Attributes | Description |
|---|---|
| Title | The title that will be displayed across the top of the System Message when users navigate to that page. |
| Identifier | The identifier is used to know which page you want to display the message by using Shortcodes. |
| Visibility | This section toggles the visibility of your page which will make it so your users may not see the page, but you can still edit it. |
| Language | Select between two language options for a specific page. Tomahawk current supports English and French. |
| Content | Content is what will display on the actual page. You may use Shortcodes here to view predefined static or interactive content. For example, a user login form could be displayed on your homepage. |
- To create a System Message merely click the Create Page / Message button on the top right of the Manage System Messaging screen.

- Make sure to select the Page Type from the drop-down menu and change this to Message. It is essential that you do not select Page when creating a System Message.


- Create a Title for the message.
- Give the message a unique Identifier so it can be accessed on your Pages using Disclaimer Shortcodes. Shortcodes are codes used to link our Pages and System Messages together.
- Once an Identifier is created, It is essential to note that you may not use it anymore or you will get an error message.
-
You may modify the visibility of your System Message by toggling the Visible button on or off.
Toggle On(Visible) Toggled Off(Invisible) 

- Toggling a System Message as invisible ensures your users won't see it. Although, you can still edit and view the System Message on the admin side, but it will be displayed as seen in the image below.

- Select which Language you would like your content to be in. OPSCOM currently supports two languages which are English and French.
- Edit the contents of your System Message in the editor found below the messages fields. This is the content that your users will see and will allow you to edit and format the way the text looks.
Once finished, click Save Messaging.
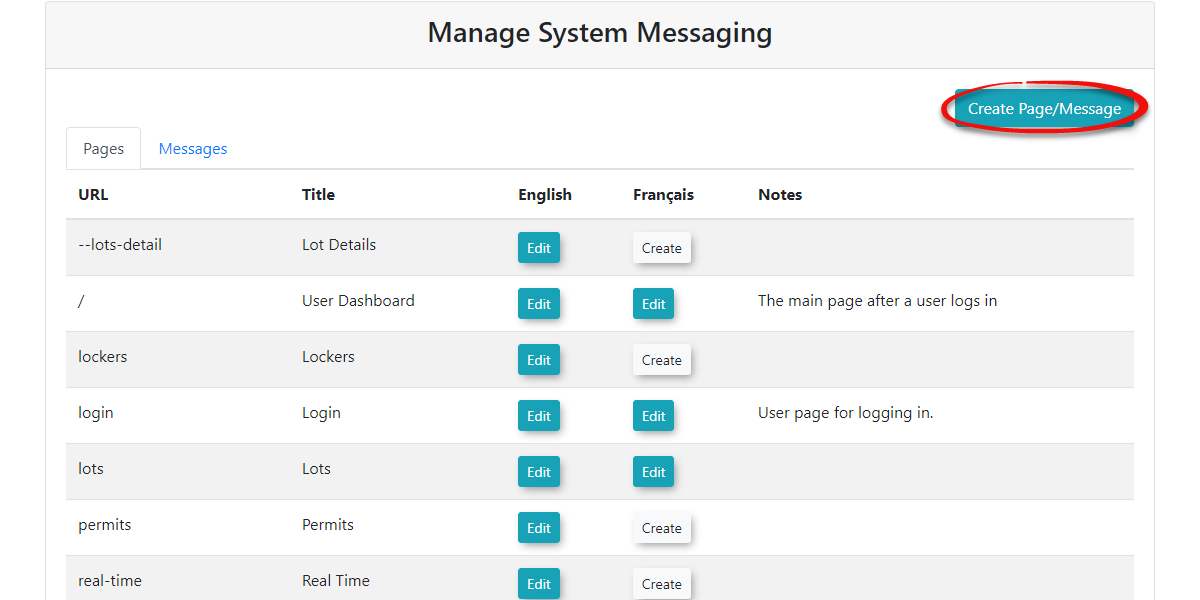
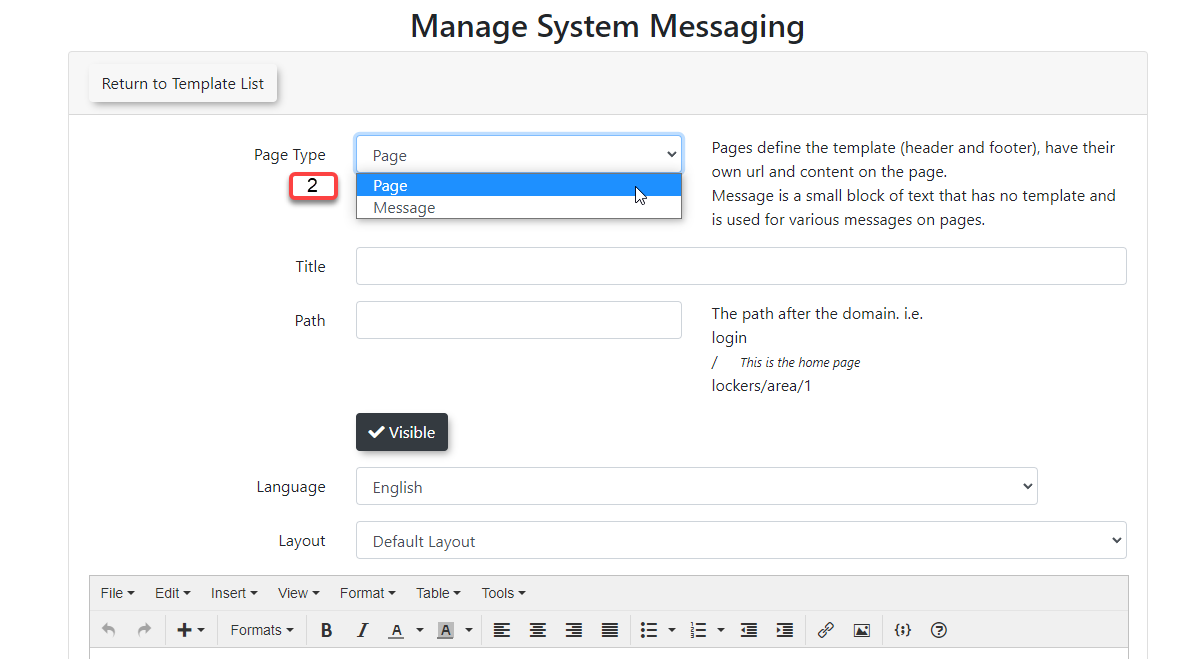
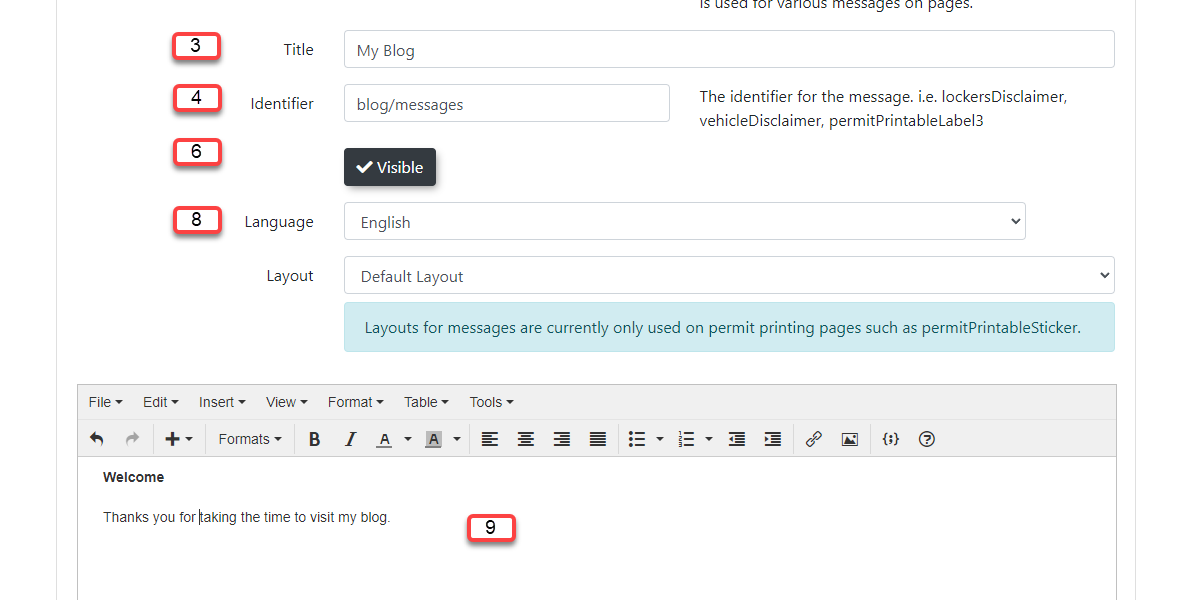


Warning: Clicking Return to Template List before Save Messaging will discard all the changes you just made, meaning that the System Message will not get created or your changes will not occur.
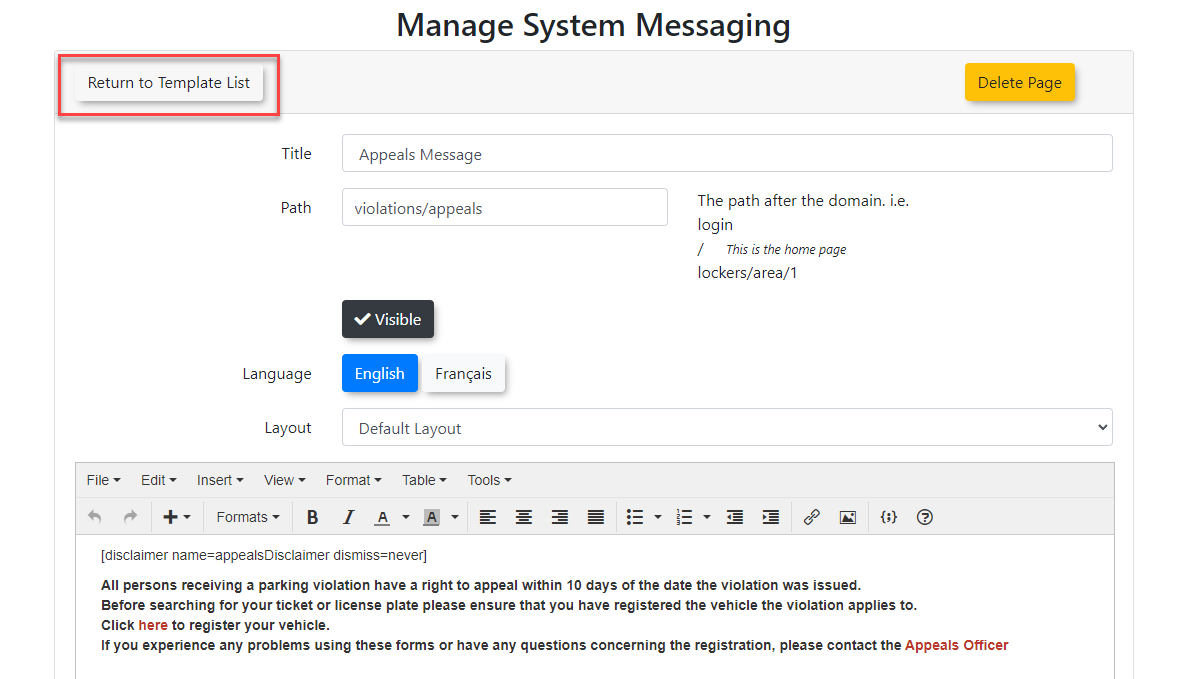
Editing System Messages
You can manage your System Messages Title, Identifier, Visibility, Language, as well as modify the content to include text, images, or Shortcodes.
- To Edit your System Messages click the Messages tab under the Manage System Messaging page.
- Select the Edit button next to the System Message you wish to edit. For this example, we will be editing the Admin Dashboard.

-
You will now be able to adjust the message your users will see using the System Messaging editor. Below are the fields in which you can use to edit the System Message.
Message Attributes Description Title The title that will be displayed across the top of the System Message when users navigate to that page. Identifier The identifier is used to know which page you want to display the message by using Shortcodes. Visibility This section toggles the visibility of your page which will make it so your users may not see the page, but you can still edit it. Language Select between two language options for a specific page. OPSCOM currently supports English and French. Content Content is what will display on the actual page. You may use Shortcodes here to view predefined static or interactive content. For example, a user login form could be displayed on your homepage. 
- You may use the Title field to change the Title of the System Message.
- You may use the Identifier field to change text used to display a System Message to a Page, but this will require you to modify all Disclaimer Shortcodes using the old unique Identifier for the message you are replacing.
-
You may click Save Messaging when you are finished making your changes.
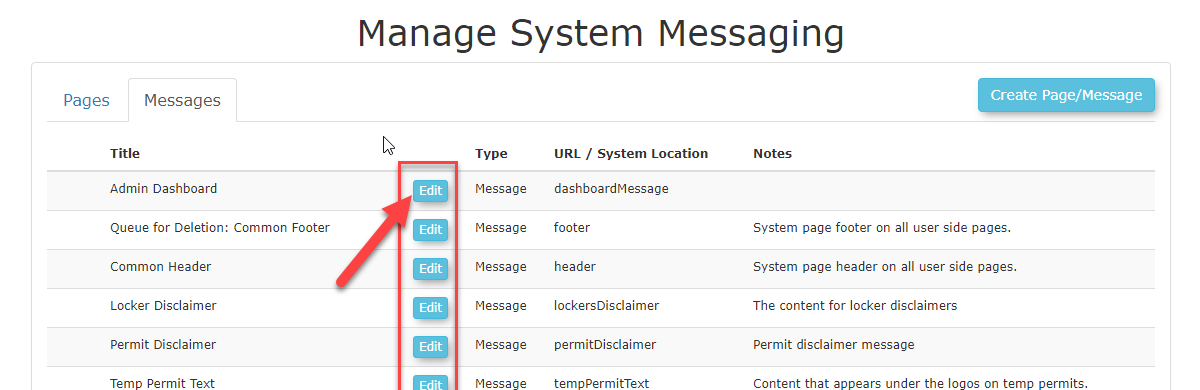
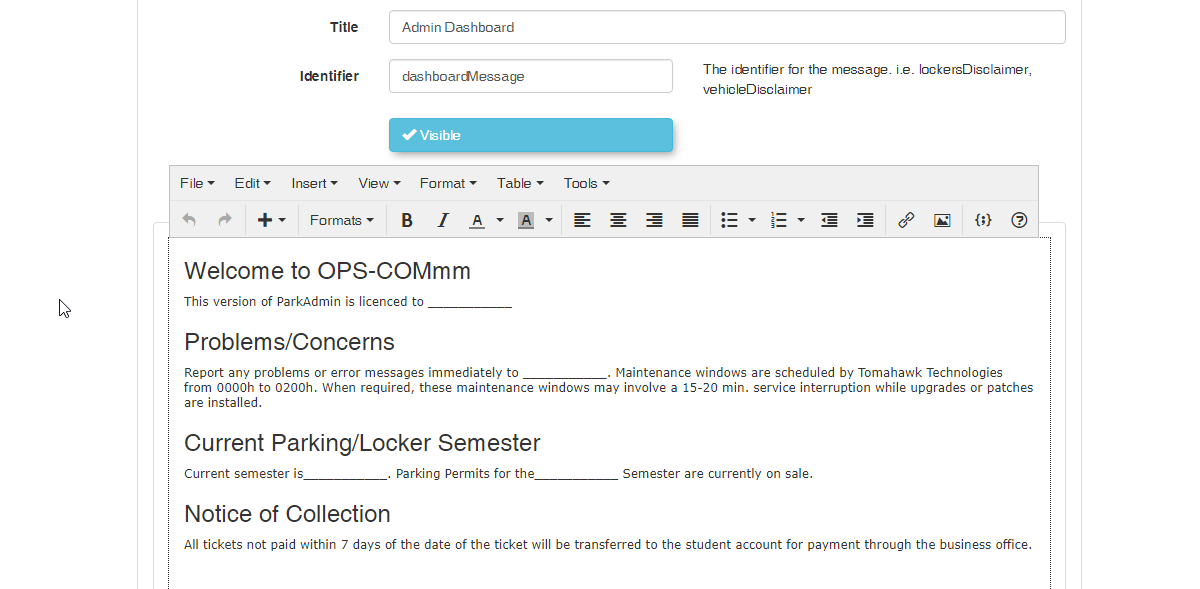

Add System Messages to Pages using Shortcodes
Now that you know how to create your Pages and System Messages you can bring them together using a Disclaimer Shortcode. A Shortcode is a small body of code surrounded by [ ] used to display complex templates or features. Shortcodes limit the technicality of our system by offering a convenient way to add interactive content without having to know how to script or code.
Please review the Shortcodes for Use on the User Portal for a detailed description of how shortcodes work. You can also find a list of Shortcodes currently available to you by going to the OPSCOM Shortcode Documentation.
Templates and Design
Overview
The User Portal system allows your clients to register, add vehicles, purchase permits and pay violations. It is an important extension of your business, and it should reflect your corporate branding.
Pages and Templates
The OPSCOM user Page will store the functionality and content of your main page, while the Templates will be used to change the functionality of your pages as well as the content around the Page.
Where to Find Templates and Design
Click System Configuration, Templates & Design to access these features.

All Default Templates
If at any point you feel that you have adjusted the Default <scripts> and <styles> to the point of breaking your site, or you are simply unsure what your changes have done, you can refer to these templates to restore your pages functionality and style.
Understanding Templates & Design
Templates & Designs are the visual functionality of your web page structured around your Page content. OPSCOM provides you with default templates which allow you to get started easily without having to know any code.
- Once you are on the landing page for Templates & Design, you can view a list of your current templates, or create a new one. Templates contain all of the sections found on your User Portal except for the Page content found in the middle of the page. To adjust this you will have to leave Templates & Design and navigate to System Messaging.

- OPSCOM gives you a total of 12 section templates, 6 in English and 6 in French. (Of course, you will have to create the French content yourself as we do not provide a translator).
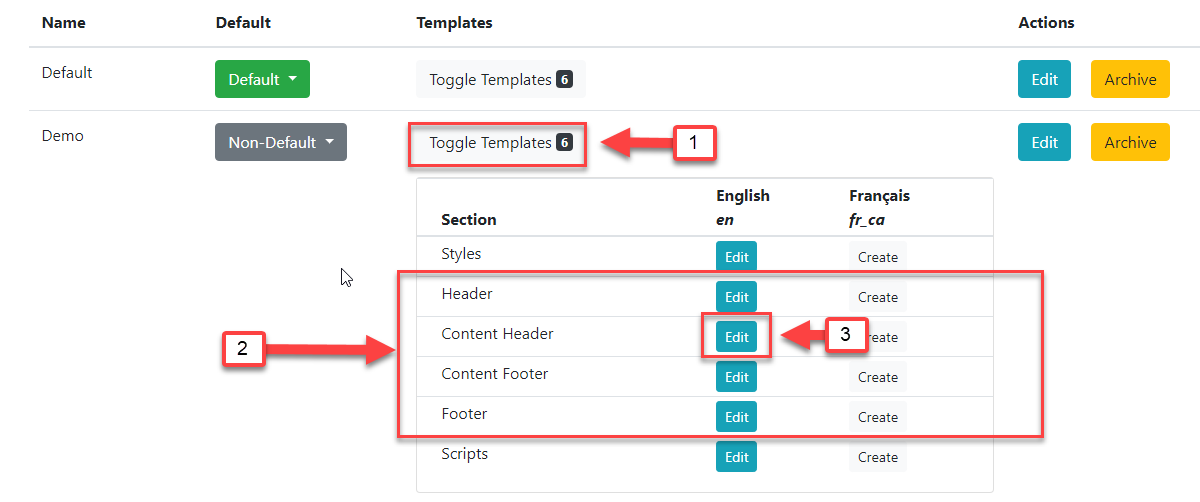
- Clicking on Toggle Templates will display all of the sections attached to that template. Templates can be created in English and French.
- The contents of our pages are split into four separate sections. Header(1), Content Header(2), Content Footer(4), and Footer(5). See Template Layout right below this guide to get a better understanding of the OPSCOM layout.
- To edit a template Section, simply click Edit next to the section name.
Template Layout
Below is a visual example of how your Pages are split into Sections using Templates. All of the Content (3) of our Pages are added through the System Messages under Pages.
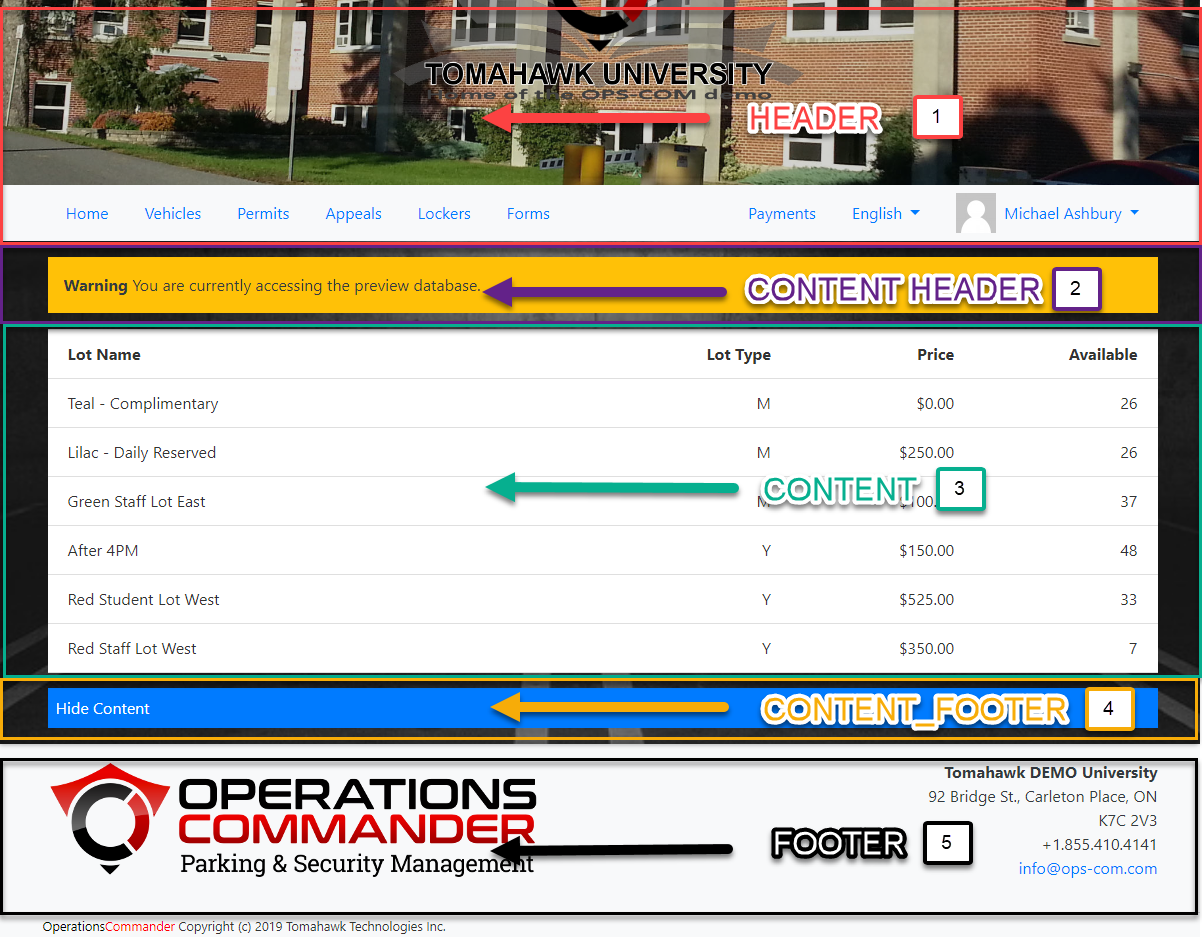
- Header - The header of your page, where you can find your header image and user navigation.
- Content_Header - Another header section for you to place content into, such as alerts or user information. Everything placed here will appear before the Content and Content Footer.
- Content - The content of your pages. Content may not be added from Templates & Design and will require you to navigate to System Messaging.
- Content_Footer - The footer of your Content. Everything placed here will appear after the Content Header and Content. Again, you can use this to display alerts, messages, or additional content to your Template.
- Footer - The footer of your page is where you can find useful information. You can use this area to advertise important information your users might need while using your system.
Page Layouts and Templates
Creating Layouts
To create a layout simply click the Create Layout button found at the top right of the Layouts page.

You will be presented with the Add Layout system message.
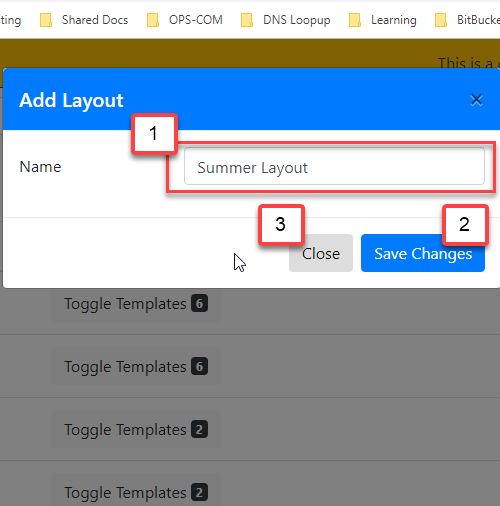
- Provide the name of your layout. In this example, we are going to create our own Summer Layout to be used, instead of the default layout.
- Click Save Changes when you are happy with the name of your layout. Once the Layout has been created, you can see it under the Layouts list.
- If you wish to cancel the creation of your layout simply click Close.
- You can see that our Summer Layout was added to the end of our Layouts List with no sections yet.
- You can choose whether or not your template is the Default template at any time by clicking the Non-Default drop-down and selecting Default.
- Anytime you add sections to your Templates it will display how many are attached next to Toggle Templates. As you can see, we don't have any Sections created yet so there are no numbers to be displayed, otherwise, clicking on Toggle Templates would show you a list of all the templates currently attached to that Layout.
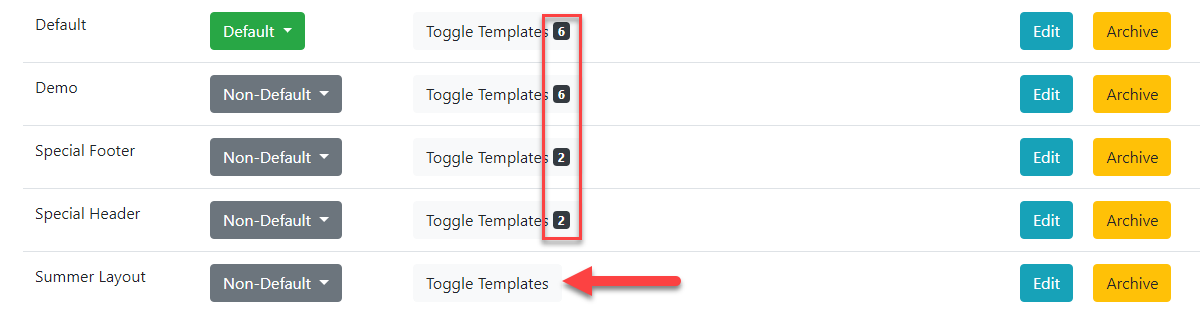
7. You can edit the layout name by clicking on the Edit button next to archive.
8. If you would like to archive a layout that you are no longer using, you can click the Archive button next to edit.
Creating Templates
Now that you have a better understanding of how Templates work with Layouts we can start creating our own.
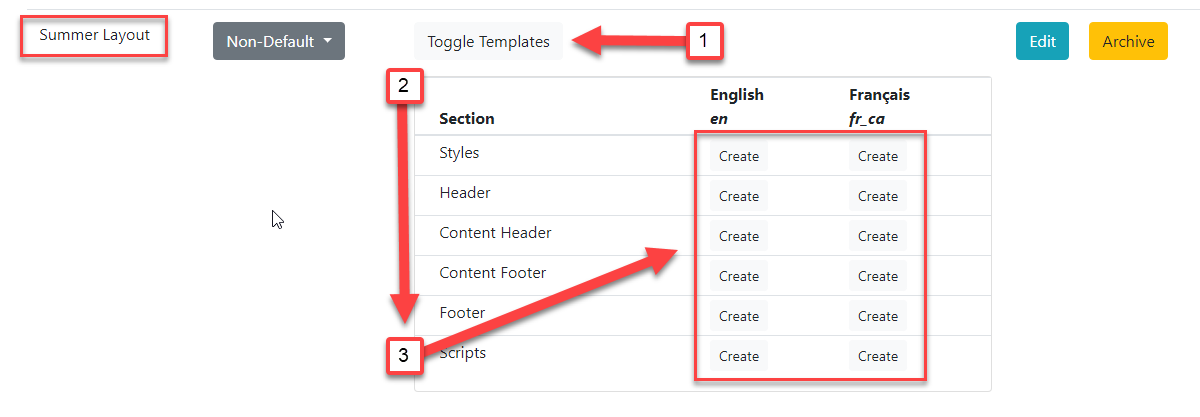
- Click on Toggle Templates.
- Clicking this will display the available Templates attached to the Summer Layout.
- You can now Create a variety of templates for your page, including bilingual support.
- If you are non-technical, it is advised not to change the code for Scripts, Styles, Header, and Footer Templates. You can use the default Style, Script, Header, and Footer Templates from All Default Templates. These can still be edited according to your company and their style guides. See Edit the Page Style and Edit the Page Behaviour below for more information.
Edit the Page Style (CSS)
Important
This guide is used if you intend to adjust the Templates provided to you by OPSCOM. If you choose to rewrite your own Templates you can choose to ignore this.
/* Style properties of our page body, this affects the entire page. */body { background: black url(/uploads/FILES/OC_TOMA/parking-deck.jpg) center center; background-size: cover; background-attachment: fixed; color: #FFF;}/* This changes the color property of --Find where these classes are used .card, .modal, .list-group-item { color: #333;} |
/* Below are all of the styles for our header slideshow at the top of each page. *//*--------------WORD BANK--------------- * ELEMENTS: Elements are the tags with '<>' around them such as <div> and <img> found in the default header and footer template. * We access them here by giving them a Class name or ID. * PROPERTIES: Properties are used to define certain styles to a class or ID. * CLASS: Generally used to assign a style to a group of HTML elements but can be used on single elements as well. * They are assigned within HTML elements like this: <div class="MyClass"></div> where MyClass would be your class name. * ID's: Generally used to assign styles to a single element but can be used on multiple elements as well. * *--------------CLASSES----------------- * * To learn more about the CSS Position Property see: https://www.w3schools.com/cssref/pr_class_position.asp * For more information on CSS Syntax and Selectors see: https://www.w3schools.com/css/css_syntax.asp * It is not recommended to adjust with the position of elements unless you are sure about the changes being made. This can dramatically change how content is positioned. *//* Class Names and Elements * [.slideshow-header]: Container that contains our slides and overlay. * * Properties * @position: Adjust the position of the slideshow-header. For more information see: https://www.w3schools.com/css/css_positioning.asp */ .slideshow-header { position:relative;}/* Class Names and Elements * [.slideshow-header]: Container that contains our slides and overlay. * [.slides]: Controls the style properties of the individual slides. * * Properties * @z-index: Adjust the stack placement of the [.slideshow-header] and [.slides] along the Z axis. * @position: Define the position of the page. * @top:Change in the position from the top of an element. * @left: Change in the position from the left of an element. * @right: Change in the position from the right of an element. * @bottom: Change in the position from the bottom of an element. * @display: Adjusts how the content is displayed on the page. See: https://developer.mozilla.org/en-US/docs/Web/CSS/display and https://www.w3schools.com/css/css_display_visibility.asp * @align-items: Aligns the child elements of this PARENT element to be centered. For a visual example see: https://developer.mozilla.org/en-US/docs/Web/CSS/align-items * @justify-content: Defines how the space disturbed around the child elements. For a visual example see: https://developer.mozilla.org/en-US/docs/Web/CSS/justify-content * * These are the style properties and values of the slideshow header and its individual slides. */.slideshow-header .slides { z-index: 0; position:absolute; top:0px; left:0px; right:0px; bottom:0px; display:flex; align-items: center; justify-content: center;}/* Class Names and Elements * [.slideshow-header]: A container that contains our slides and overlay. * [.overlay]: * * Properties * @z-index: Used to layer elements. Elements with a higher z-index number will appear before elements that are lower. * @position: Set the position property for the element. We recommend you do not adjust this property unless you have knowledge on how the changes will affect your page. * * These are the styles for the overlay, as well as additional properties for the slideshow-header. */ .slideshow-header .overlay { z-index: 1; position:relative;}/*--------------ID'S---------------*//* ID Names and Elements * [#slideshow-header] is the container used to contain the images you have chosen for your header * * Properties * @overflow: * @opacity: * @box-shadow: Create a box shadow for this element. * EX: box-shadow: a, b, c, d(e, f, g, h); */#slideshow-header {} /* ID Names and Elements * [#slideshow-header] is the container used to contain the images you have chosen for your header * * Properties * @width: 100% width will take of 100% of that element. * @position: */#slideshow-header > div { width:100%; position: absolute;} /* ID Names and Elements * [#slideshow-header]: is the container used to contain the images you have chosen for your header. * [div]: Refers to our HTML elements. * [img]: Refers to our images in the slideshow. * * Properties * @width: Defines the width of the images, divs and slideshow-header. A value of 100% will display the image across the entire page. */#slideshow-header div img { width: 100%;} |
Edit the Page Behavior (Scripts)
Disclaimer
Please review the list of supported scripting languages below. If a Javascript vendor is unverified it may break the functionality of your site.
API Integration
Additionally, you can use our API to integrate with pay stations and other devices that will allow you to grab useful information from your users.
Form 11 Shortcodes
Information
When issuing a Form 11, there are a number of shortcodes that can be placed in the template to auto-fill values relating to the violation.
The base short code is formatted like:
- [values show=violation._____]
The blank value must be filled with a value to pull from the violation info.
For each nested value in the data packet, the packet name must be added as part of the variable name, each part separated by a period, with the variable to be output by the shortcode as the final part of the variable.
The packet itself is called by 'violation', and the name must be placed at the start of any value call.
Violation Packet
The violation info packet is formatted like this example.
The values on the left are the variable names, the values on the right are the example values returned by this packet.
{
"ViolationID": 237,
"SemPermitID": null,
"Ticket": "TT-19026",
"VehicleID": 5,
"Spoiled": 0,
"TicketType": 1,
"Issued": "2024-07-17 16:11:00",
"convNotice": null,
"Due": "2024-07-27 16:11:00",
"ViolationTypeID": -1,
"Fine": "50.0000",
"AdjustedFine": "20.0000",
"Towing": "0.0000",
"taxAmount": "0.0000",
"Writer": 7,
"LocationID": 10,
"Comment": null,
"TicketAppeal": null,
"appealType": 0,
"appealFormat": null,
"AccessAdminID": 50,
"ActionedPer": null,
"Created": "2024-07-17 20:12:08",
"AppealUserID": 0,
"AppealProcessDate": null,
"AppealAdminID": 0,
"AppealComment": null,
"AppealAdminComment": null,
"AutoNotice": 0,
"ProcessedByCollection": null,
"SentToCollections": null,
"PrivateComments": "",
"DriveAway": 0,
"UUID": null,
"VioNotice": null,
"latitude": null,
"longitude": null,
"Warning": null,
"userid": null,
"incidentID": null,
"failToIdentify": null,
"pin": "YL",
"duplicate": null,
"AdjustmentReason": null,
"notices_count": 1,
"user_info": {
"UserID": 5,
"studentNo": null,
"employNo": "00800147",
"username": "mashbury",
"firstName": "Michael",
"preferredname": null,
"lastName": "Ashbury",
"street": "688 Zaproxy Ridge",
"city": "East Romaineburgh",
"prov": 9,
"postal": "K2G5B1",
"email": "mash-bury@tomahawk.ca",
"display_name": "Michael Ashbury",
"account_no": "00800147",
"prov_name": "Ontario",
},
"writer": {
"AdminAccessID": 7,
"Username": "admin",
"DisplayName": "Administrator"
},
"vehicle": {
"VehicleID": 5,
"Active": 1,
"Plate": "MASH",
"Year": 1998,
"TotalVio": 12,
"TotalUnpaid": 2,
"TotalWarning": 0,
"vehicleAlert": true,
"vin": "JNAMA43H9XGE50339",
"electric_vehicle": false,
"province": {
"ProvName": "West Virginia",
"ProvCode": "WV",
},
"make": {
"MakeName": "Toyota"
},
"colour": {
"ColourName": "Black"
},
"plate_type": {
"TypeName": " Passenger"
}
"vehicle_type": {
"TypeName": " Van"
},
},
"location": {
"LocationID": 10,
"LocationName": "Hospital & Administration Building",
},
"details": {
"ViolationsDetailID": 359,
"ViolationID": 237,
"Ticket": "TT-19026",
"ViolationTypeID": 16,
"LocationID": 10,
"offenceFine": 50,
"discountFlag": 1,
"discountAmount": 20,
"discountHours": 240,
"type": {
"ViolationTypeID": 16,
"ViolationDescr": "No Parking Snow Route - Mandatory Towing",
"DefaultCost": 50,
"discountFlag": true,
"discountAmount": 20,
"discountHours": 240,
}
}
}Examples
An example shortcode is provided for each section. To return a specific value in the same section, replace the provided variable name with the sibling value wanted for output.
| Example Shortcode |
Description |
|
[values show=violation.Ticket] |
Returns the violation ticket number. |
| [values show=violation.user_info.username] | Returns the username of the user the violation belongs to. |
| [values show=violation.writer.DisplayName] | Returns the display name of the admin who assigned the violation to the user. |
| [values show=violation.vehicle.Plate] | Returns the plate of the vehicle the violation was assigned to, if applicable. |
| [values show=violation.vehicle.province.ProvName] | Returns the province or state of the vehicle plate. |
| [values show=violation.vehicle.colour.ColourName] | Returns the colour of the vehicle. |
| [values show=violation.vehicle.plate_type.TypeName] | Returns the plate type of the vehicle. |
| [values show=violation.vehicle.vehicle_type.TypeName] | Returns the type of the vehicle. |
| [values show=violation.vehicle.make.MakeName] | Returns the make of the vehicle. |
| [values show=violation.location.LocationName] | Returns the name of the location the infraction happened. |
| [values show=violation.details.0.Ticket] | Returns the violation ticket number. Alternate value location. |
| [values show=violation.details.0.type.ViolationDescr] | Returns the violation type description. |
User Information Shortcodes
Shortcodes
Shortcodes used to display user information.
Keep in mind that the shortcode descriptions are also on the email template page for lost passwords.
| Shortcode |
Description |
| [user show="firstname"] | The first name of the user account receiving the email or messaging. |
| [user show="lastname"] | The last name of the user account receiving the email or messaging. |
| [user show="email"] | The email address of the user account receiving the email or messaging. |
| [user show="username"] | The username of the user account receiving the email or messaging. |
| [user show="salutation"] | The salutation of the user account receiving the email or messaging. |
User Configuration
User Types
User Types in OPSCOM categorize your system users (e.g., Student, Staff, Public) and control various aspects of their interaction with the system, including access to specific lots, available payment options, and the fields visible on their profile. Configuring user types allows administrators to tailor the OPSCOM experience to different user groups, ensuring appropriate permissions and functionalities.
Setup & Configuration
User Type configurations are managed through the User Type Administration tool.
This will open the User Type Administration page, displaying a list of your existing User Types.
Creating a New User Type
New user types must be assigned to one of these categories. These are hardcoded and cannot be changed.
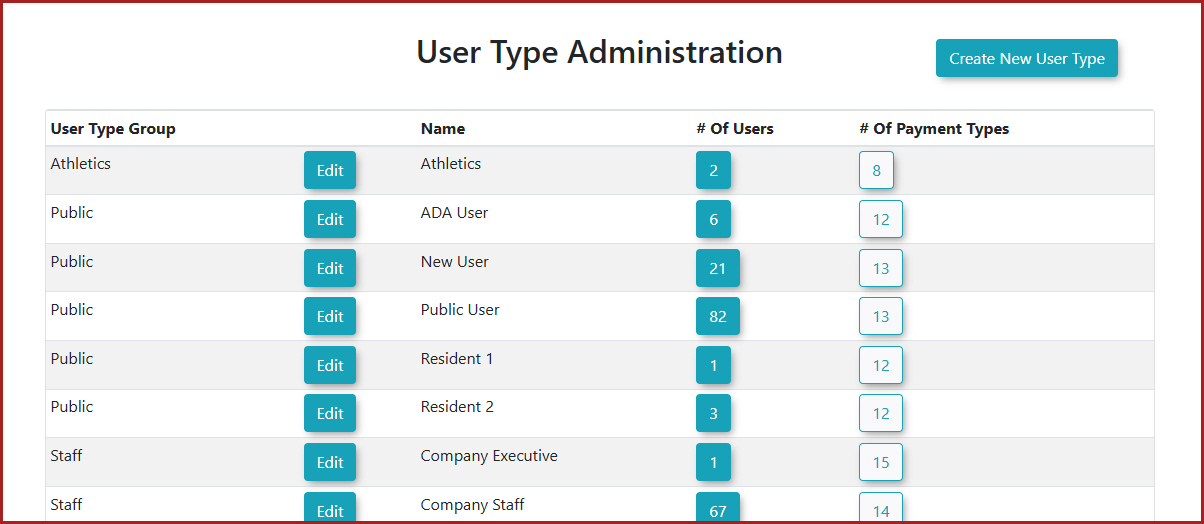
Once saved, your new user type (e.g., Public Parker) will appear in the list.
You can also create user types to allow you to categorize your archived users. Refer to this wiki article to learn about managing archived users by user type.
Using this Feature
Applying a User Type to a User
A User Type can be assigned to a user when their account is created or changed at any time later.
Searching by User Type
User Types can be used as criteria in various search tools within OPSCOM. You can use the User Search tool or you can click the # of Users button beside the lot to automatically perform a search for this user type.
Searching for Payment Types Assigned by User Type
You can click the # of Payment Types button to immediately see a list of all payment types associated to each user type.
Configuring Access to Lots with User Types
User Types play a critical role in controlling access to parking lots.
User-Side Lot Visibility
When a user logs into the system (e.g., as "Joseph Callaghan" who is a student), and attempts to purchase a permit:
Deleting or Archiving a User Type
Best Practices & Considerations
Limiting Active Vehicles
OPSCOM allows administrators to control the number of active vehicles a user can have associated with their profile. This feature, configured through User Types, helps manage parking inventory, prevent abuse, and ensures that users maintain a reasonable number of active vehicles in the system. This article explains how to set these limits and how they impact the user experience.
Setup & Configuration
Limiting active vehicles is controlled through the settings of individual User Types. For detailed information on working with user types, refer to this wiki article.
- Hover over System Configuration, then Users, and click Types. You'll be redirected to the User Type Administration page.
Editing Active Vehicle Limits for a User Type
- Locate the user type you wish to edit from the list (e.g., Full Time Student) and click Edit.
- Locate the Extra Active Vehicles field. This number represents how many additional active vehicles a user of this type may have on their profile, beyond the first required active vehicle.
- For example, if you set this number to
1, the user may have a maximum of2active vehicles (their one required active vehicle + one additional).
- For example, if you set this number to
- Enter the desired number to reflect the maximum additional active vehicles allowed.
- Click Update User Type to apply your new limit.
Using this Feature
Once the active vehicle limit is set for a user type, it directly affects how users interact with their vehicle information on the user portal.
What Users See on the User Portal
- A user logs into their portal and clicks the Vehicle tab to access their vehicle information section.
- This tab displays any vehicles currently associated with their profile (e.g., a "beige Acura" with plate "ABC316").
- The user attempts to add a new vehicle by clicking Add New Vehicle, fills out the information, and clicks Save Changes. A pop-up message will confirm the vehicle was successfully added, and it will appear on their Vehicles tab.
Exceeding the Active Vehicle Limit
If a user tries to add a vehicle that would exceed the configured limit (e.g., attempting to add a third vehicle when the limit is set to a maximum of 2 active vehicles):
- The user enters the vehicle information and clicks Save Changes.
- They will still receive a pop-up message indicating the vehicle was successfully added.
- However, the newly added vehicle will appear on the Vehicles page in an Inactive state.
- If the user attempts to make this third vehicle active by toggling its state, they will receive a pop-up message indicating that the vehicle cannot be made active due to the limit set for their user type.
Minimum Active Vehicle Requirement
Conversely, if a user attempts to make all vehicles on their profile inactive, a pop-up will appear indicating that the user must always have at least one active vehicle associated with their profile.
Best Practices & Considerations
- Understanding the "Additional" Limit: Remember that the
Active Vehiclesnumber you set represents additional vehicles beyond the one required active vehicle. A setting of0means a user can have a maximum of one active vehicle. A setting of1means a user can have a maximum of two active vehicles, and so on. - Existing Vehicles are Grandfathered:
- Important Note: If you reduce the number of allowed active vehicles for a user type, users who currently have more active vehicles than the newly reduced setting will not be immediately affected. They are "grandfathered in" with their current active vehicles.
- The new, stricter rule will only come into effect when the user attempts to add new vehicles or reactivate previously inactive vehicles in the future.
- Existing Vehicles Already in System: If the vehicle being added is already present in the system but not currently associated with the user's profile, the user will be prompted to add this existing vehicle. The same active vehicle rules described here will still apply to this process.
- Clarity for Users: While the system provides pop-up messages, it can be helpful to inform users about active vehicle limits in your FAQs or permit purchasing guidelines to manage expectations.
Manage User Departments
User Departments allow administrators to categorize users based on their departmental affiliation within an organization. This feature enhances user management by enabling better organization, reporting, and potentially targeted communications or access controls, ensuring that user data is structured and easily manageable.
Using this Feature
- Hover over System Administration, then Users, and click Manage User Departments. The Manage User Departments page will display. This page provides a simple interface to add, edit, and delete user departments.
Adding User Departments
- Click Add User Department and enter the desired Department Name.
- Click Save Changes.
Editing User Departments
- Locate the user department you wish to modify in the list.
- Click the Edit button next to the department.
- Update the existing name of that department.
- Click Save Changes.
Deleting User Departments
In order to delete a user department, it must not currently be in use by any user in the system. Administrators must first ensure that no users are assigned to this department before it can be removed.
-
Locate the department you wish to remove from the list.
-
Click the Delete button next to the department and click Confirm.
Best Practices & Considerations
- Reflect Organizational Structure: Create user departments that accurately reflect the departments or divisions within your organization. This helps with reporting and user organization.
- Consistency in Naming: Use clear, consistent, and recognizable names for your departments to avoid confusion.
- Data Integrity: Always ensure that no users are assigned to a department before attempting to delete it. Reassigning users to another department (or to "None" if applicable) is a necessary step to maintain data integrity.
- User Profile Integration: Remember that these departments are selected when creating or editing a user's profile, providing a key piece of information for user categorization.
- Reporting: Categorizing users by department can be highly valuable for generating targeted reports or analyzing trends across different parts of your organization.
Related Video
Locker User Types
Locker User Types allow administrators to categorize users specifically for the purpose of locker management. This enables flexible control over who can access and utilize certain locker areas or types, enhancing organizational efficiency and tailored access to locker resources.
Setup & Configuration
Locker User Types must be created within OPSCOM before they can be assigned. This is done via the Manage Locker User Types screen.
- Hover over System Configuration, then Users, and click Locker User Types.
The Manage Locker User Types screen appears, listing any existing Locker User Types. This list typically includes the Name of the locker user type, and the Number of user records associated to that type.
If you do not see the settings mentioned above, please contact support@ops-com.comcom to have them enabled for you. You will need the permission of your Primary Admin.
Adding a New Locker User Type
- Click on the Add Locker User Type button.
- Enter the full Name of the user type (e.g., Public User).
- Click Save Changes (or similar button).
The Manage Locker User Types screen will refresh, and your new user type will be added to the list.
Using this Feature
Assigning Locker User Types to User Profiles
- Hover over User Management and click User Search.
- Search for the user you want to edit.
- Edit their profile and choose the Locker User Type from the picklist.
- Click Submit Profile Information, review the submission, and click the Information Correct button.
Locker User Types are not editable or viewable on the User Side portal. They must be assigned by administrators only.
Assigning Locker User Types to Locker Areas
Once Locker User Types are created and assigned to users, they must also be associated with Locker Building Areas to control user access to specific lockers.
Refer to this wiki article for information about assigning Locker Types to Building areas.
Best Practices & Considerations
- Logical Categorization: Create Locker User Types that align with your organization's locker access policies (e.g., "Student Dorm," "Staff Locker," "Gym Member," "Public Day Use").
- Deletion Policy: A Locker User Type can only be deleted if no users are currently assigned to it. Once a user has been assigned to a Locker User Type, that user type will no longer display the delete button. You must reassign all users from a Locker User Type before it can be deleted.
- Clear Naming: Use clear and concise names for both the full Name and Short Name to avoid confusion.
- Coordinate with Locker Areas: Remember that simply assigning a Locker User Type to a user profile is not enough. You must also link the Locker User Type to the relevant Locker Building Areas to define actual access permissions.
- Admin-Only Assignment: Since Locker User Types are not visible or editable by users, ensure your administrative staff are properly trained on how to assign and manage them.
Login Sources (SSO)
Login Sources define the various methods by which users can sign into the system. This feature provides administrators with flexible control over user authentication, allowing for standard OPSCOM logins or integration with external identity providers like SAML or LDAP, enhancing convenience and security for diverse user populations.
Setup & Configuration
Login sources are managed under the System Configuration menu, within the Users section.
- Hover over System Configuration, Users, and click Login Sources.
Default Login Source
- OPSCOM is the default login source. This means that, by default, users will log in directly to OPSCOM using a username and password created within the system itself on the standard login screen.
- If you disable the OPSCOM default login source, then only other configured login sources, such as SAML or LDAP, will be active for user logins.
Adding Login Sources
OPSCOM supports multiple login sources, allowing some users to utilize SSO while others log in directly.
-
On the Login Sources page, click the Add Login Source button.
-
Fill out the required information:
- Red fields are required to be filled before you can click Save.
- Yellow fields are technically required for the login source to function correctly, but they will still allow empty or invalid values to be saved initially. Yellow fields can also indicate that a change has been made to the field.
The Login Source - Code field is crucial as it's what the user profile will match against when associating users with this new login source. However, only one login source code can be activated at a time for a particular type (e.g., you can have multiple SAML configurations, but only one primary 'SAML' code active for user matching at a time if the system differentiates by 'type' of code rather than unique code string across all). The source name (code) itself is typically determined by your Identity Provider, with the exception of 'OPSCOM' for direct logins.
-
Name can be anything that is identifiable to you.
- Login Source is what you will see on the user profile to indicate if this user will login with a special source. Often is is called SSO or SAML
- Domain Name for OPSCOM to use should be set to the OPSCOM domain without any references to admin etc. For example, if the domain name you login looks like CLIENTID.admin.OPSCOM.com/admin, this should be changed to CLIENTID.OPSCOM.com only.
- Do not fill out the rest of the fields until you are ready to follow the instruction for setting up your SSO information.
-
Click Save Changes to add the new login source.
Using this Feature
Once login sources are added, you can manage their status and properties.
Managing Login Sources
From the Login Sources page, you can manage your configured login sources using the buttons next to each entry:
- Click Edit to modify an existing login source's details. This will bring up the same form used for adding, allowing you to update its configuration.
- Click Delete to permanently remove a login source from the list. A confirmation pop-up will usually appear before deletion.
Active/Inactive/Hidden Login Sources
You can make Login Sources Active, Inactive or Hidden. If a source is made Inactive, users who were previously connected will no longer be able to login and must be changed to a different login source.
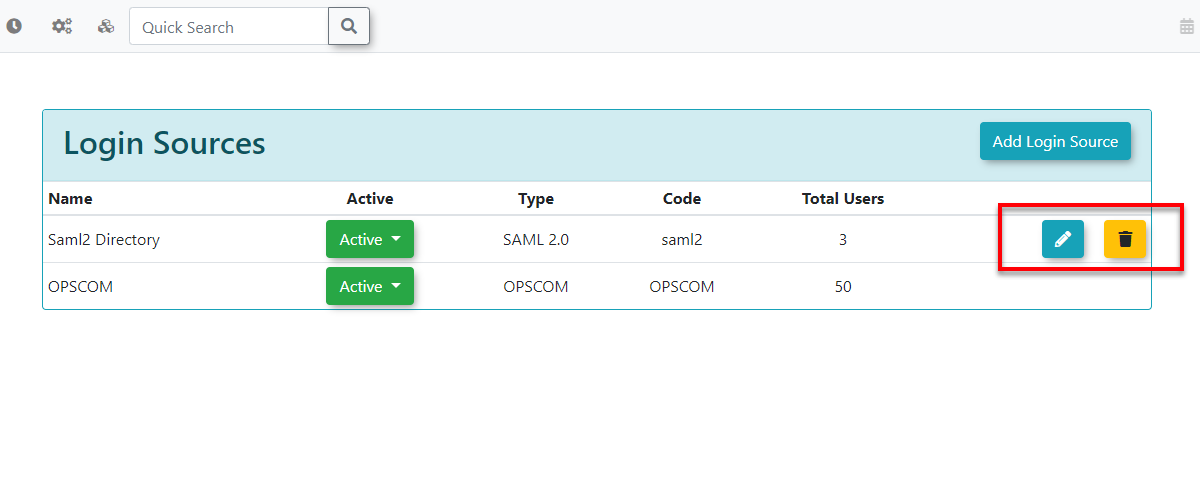
Best Practices & Considerations
- Strategic Planning for Multiple Sources: Carefully plan your login source strategy. Determine which user groups will use which login method (e.g., students via SAML, staff via LDAP, public users via OPSCOM direct login).
- User Provisioning: Consider how users will be created and linked to their login sources. Will they be auto-created on first login, or pre-imported? This linkage uses the Login Source - Code field.
- Disabling Default OPSCOM: If you intend for all users to access via an external SSO, ensure you disable the OPSCOM default login source. Test thoroughly before making this change in a live environment.
- Testing New Sources: Always thoroughly test any new login source after configuration to ensure users can successfully authenticate and access the system.
- Communication with Users: Clearly communicate to your users how they are expected to log in, especially if you introduce new SSO options or change existing methods. Provide clear instructions and links.
- Inactive vs. Deleting: Use the Inactive function for temporary deactivation or if you foresee needing to reactivate a login source in the future. Use Delete only when a login source is permanently no longer needed and has no associated active users.
Vehicle Configuration
Vehicle Plate Types
Vehicle Plate Types allow administrators to categorize vehicles based on their official plate designation (e.g., Passenger, Commercial, Motorcycle). This feature is crucial for accurate vehicle identification, reporting, and aligning with specific parking or violation rules, ensuring your system reflects diverse vehicle classifications. Plate Type, Plate Number and Province/State are considered the 3 essential criteria to making sure a plate is unique in OPSCOM.
Using this Feature
Managing Vehicle Plate Types is done through the Manage Vehicle Plate Types page.
Adding Plate Types
Editing Plate Types
Deleting Plate Types
In order to delete a vehicle plate type, it must not be in use by any vehicles in the system. Administrators must first ensure that no vehicles are currently assigned this plate type before it can be removed. This prevents vehicle records from having blank or invalid plate type information.
Best Practices & Considerations
Vehicle Colours / Colors
Vehicle Colours / Colors in OPSCOM allows administrators to define and manage the picklist of available vehicle colours used throughout the system. This feature is important for accurate vehicle identification, detailed record-keeping, and ensuring consistency in data entry, supporting efficient enforcement and management operations.
Using this Feature
Managing Vehicle Colours is done through the Vehicle Colours page.
Adding Vehicle Colours
Editing Vehicle Colours
Deleting Vehicle Colours
In order to delete a vehicle colour, it must not be in use by any vehicles in the system. Administrators must first ensure that no vehicles are currently assigned this colour before it can be removed. This prevents vehicle records from having blank or invalid information.
Best Practices & Considerations
Related Video
Vehicle Makes
Vehicle Makes in OPSCOM allows administrators to define and manage the picklist of vehicle manufacturers (e.g., Ford, Honda, Toyota) used throughout the system. This feature is essential for accurate vehicle identification, comprehensive record-keeping, and ensuring consistent data entry for all vehicle-related information.
Using this Feature
Managing Vehicle Makes is done through the Manage Vehicle Makes page.
Adding
Editing
Deleting
In order to delete a vehicle make, it must not be in use by any vehicles in the system. Administrators must first ensure that no vehicles are currently assigned this make before it can be removed. This prevents vehicle records from having blank or invalid information.
Best Practices & Considerations
Related Video
Vehicle Types
Vehicle Types in OPSCOM allows administrators to define and manage categories for different kinds of vehicles (e.g., Car, Truck, Motorcycle, Van). This feature is essential for accurate vehicle classification, supporting specific parking rules, and enhancing reporting capabilities within your OPSCOM system.
Using this Feature
Managing Vehicle Types is done through the Manage Vehicle Types page.
Adding Vehicle Types
Editing Vehicle Types
Deleting Vehicle Types
In order to delete a vehicle type, it must not be in use by any vehicles in the system. Administrators must first ensure that no vehicles are currently assigned this type before it can be removed. This prevents vehicle records from having blank or invalid information.
Best Practices & Considerations
Related Video
Parking Configuration
Lot Groups Management
Lot Groups in OPSCOM allow administrators to logically group similar parking lots together, treating them as a single entity for certain configurations. This feature simplifies management by enabling shared settings like free parking time and vehicle count limits across multiple lots, providing a more streamlined approach to parking administration.
Setup & Configuration
A lot may only belong to one group, and membership in a group is optional.
- Hover over System Configuration, then Parking, and click Manage Lot Groups.
- Click the Add Lot Group button.
- Lot Group: Enter a descriptive Group Name in the text box.
- Optionally, set a Free Parking Time Limit in minutes. This setting is typically used for lots equipped with pay-by-plate meters to provide a grace period for users to register their license plate.
- Offence Location: Offence locations for lot groups are used in conjunction with static cameras. Through the use of a static camera report, a violation can be written that uses the offence location associated to the lot group the camera is in.
- Vehicle Counts Limit: Enter a numerical value for the Vehicle Counts Limit. This sets a maximum vehicle count for the entire group of lots.
- Click Save Changes to create the new lot group. The newly created lot group will now appear in the list on the Manage Lot Groups page.
Assigning a Lot to a Lot Group
Once a Lot Group is created, you can assign individual lots to it from the Lot Edit Page:
- Hover over Parking Management, then Lot Administration, and click Pricing & Lot Admin.
- Click on the Lot Name of the lot you wish to assign to a group.
- On the General tab, locate the Lot Group dropdown menu.
- Select the desired Lot Group from the list.
- Click Update Lot to save your changes.
Best Practices & Considerations
- Logical Grouping: Group lots that share similar operational characteristics or pricing rules. For instance, all visitor lots could be in one group, or all faculty lots in another.
- Pay-by-Plate Integration: The Free Parking Time Limit is crucial for lots using pay-by-plate systems. Ensure this setting provides adequate time for users to complete their registration.
- Centralized Control: Using Lot Groups allows for centralized management of certain settings, reducing the need to configure them individually for each lot.
- Deletion Note:
- Deleting a lot group is a permanent action from the list.
- While the group will no longer appear, its associated data (connections to permits and parking lot historical data) remains stored in the OPSCOM system. This ensures data integrity for past transactions.
Managing Lot Zones
Lot Zones in OPSCOM allow administrators to define specific geographical or logical areas within a parking lot. This feature is crucial for managing pricing variations, access controls, and enforcement strategies tailored to different sections of a larger lot, enhancing flexibility and precision in parking operations.
Using this Feature
The Manage Lot Zones page provides a straightforward interface to add, edit, and delete various lot zones.
1. Hover over System Configuration, then Parking, and click Manage Lot Zones.
Adding Lot Zones
- Click the Add Lot Zone button.
- Complete the two required fields:
- Name: The full, descriptive name of the Lot Zone (e.g., "Day Care Center").
- Short Name: A shorter name used, for instance, with handheld devices (e.g., "DAY").
- Click Save Changes when finished to add the new zone to the list.
Editing Lot Zones
- Locate the Lot Zone you wish to modify in the list.
- Click the Edit button next to the Lot Zone.
- Enter the desired changes to the zone's name.
- Click Save Changes to apply your updates.
Deleting Lot Zones
A Lot Zone can only be deleted if no records are currently associated with it. Administrators must first ensure that the zone is not in use (e.g., linked to any specific parking spaces, permits, or configurations within lots) before it can be removed.
-
Locate the Lot Zone you wish to remove from the list.
-
Click the Delete button next to the Lot Zone.
-
A confirmation window will appear.
-
If you are sure you wish to delete the zone, click Delete in the confirmation window.
Best Practices & Considerations
- Granular Control: Use lot zones to apply different rules, prices, or restrictions to sub-sections within a single large parking lot.
- Clear Naming: Use descriptive names for your lot zones that clearly indicate their purpose or location (e.g., "North End Hourly," "Permit Holder Zone A").
- Data Integrity: Always ensure that a lot zone is not actively referenced by any other part of the system (like lot configurations or specific spaces) before attempting to delete it.
- Mapping Integration: If your system includes mapping features, ensure your defined lot zones can be visually represented for clarity for both administrators and users.
Common Lots
Common Lot Types in OPSCOM allow administrators to categorize parking lots based on shared characteristics or administrative distinctions. This feature provides a way to organize lots beyond their physical location, facilitating better management and reporting. This article guides OPSCOM administrators on how to navigate to, add, edit, and delete Common Lot Types.
Adding/Editing Common Lot Types
- Hover over Admin Options, then Parking, and click Common Lots.
- Click the Add Common Lot Type button at the top of the page (or Edit button next to an existing one).
- Enter/Change the Common Lot Type Name.
- Click Save Changes.
Making changes to lot types that are being used will reflect the entire system.
Deleting Common Lot Types
To delete a common lot type click the Delete button next to the type you wish to remove.
You are unable to delete common lot types that are currently being used by lots within the system. You must first reassign or remove the lot type from any associated lots before getting a Delete button.
Best Practices & Considerations
- Meaningful Categories: Create common lot types that genuinely help categorize and distinguish your parking lots (e.g., "Student Resident Lots," "Staff Permit Lots," "Hourly Pay Lots").
- Impact of Changes: Be aware that editing an existing common lot type will immediately update all lots currently assigned to that type.
- Deletion Prerequisites: Always ensure that no active lots are assigned to a common lot type before attempting to delete it. Reassigning lots to another type or to no type will be necessary.
- Consistency: Maintain consistent naming conventions for your common lot types to ensure clarity and ease of use for administrators.
Permit States
Permit States in OPSCOM allow administrators to define and manage the various statuses a parking permit can have within the system (e.g., Active, Expired, Voided, Lost). This feature is essential for accurately tracking the lifecycle of permits, facilitating efficient management, and providing clear reporting on permit validity and usage.
Using this Feature
The Manage Permit States page provides a simple interface to add, edit, and delete various permit states.
1. Hover over System Configuration, then Parking, and click Manage Permit States.
Adding Permit States
- Click the Add Permit State button.
- Enter the desired Permit State Name and choose if this permit will be a Valid state or not.
- Click Save Changes to add the new permit state to the list.
Editing Permit States
- To edit an existing permit state, locate it in the list.
- Click the Edit button next to the permit state.
- Make your updates
- Click Save Changes to apply your updates.
Deleting Permit States
In order to delete a permit state, it must not currently be in use by any permits in the system. Administrators must first ensure that no permits are currently assigned this permit state before it can be removed. This prevents permit records from having blank or invalid state information if the permit state is deleted while in use.
- To delete a permit state, locate it in the list.
- Click the Delete button next to the permit state.
- A modal window will appear, asking for confirmation.
- If you are sure you wish to delete the permit state, click Delete in the confirmation window.
Best Practices & Considerations
- Comprehensive States: Define a set of permit states that accurately reflect the entire lifecycle of a permit within your operations, from creation to expiration or invalidation.
- Clear Naming: Use clear, concise, and easily understandable names for your permit states (e.g., "Active," "Pending Payment," "Revoked," "Expired").
- Data Integrity: Always ensure that no permits are currently assigned to a specific state before attempting to delete it. Reassigning permits to another valid state is crucial to prevent data inconsistencies.
- Impact on Reporting: Permit states are fundamental for various reports, such as active permit counts, expired permit analysis, or voided permit reconciliation. Accurate state management ensures reliable reporting.
- Workflow Integration: Consider how different permit states fit into your operational workflows (e.g., what actions trigger a permit to change from "Pending" to "Active").
Location Configuration
Locations
The Manage Locations feature in OPSCOM allows administrators to define and organize various physical locations relevant to your operations, such as buildings, parking areas, or specific points of interest. This is crucial for accurate incident reporting, violation tracking, and providing clear geographical context within the system.
Using this Feature
The Manage Locations page provides a straightforward interface to add and delete various locations.
1. Hover over System Configuration, then Manage Locations, and click Manage Locations.
Adding Locations
- Click the Add Location button.
- Enter the name of your new location (e.g., "Mulloy Library").
- Select the Sub-Location(s) you would like associated with this main location.
-
Sub-Locations are specifically used in incident reporting and do not apply to vehicle violations.
-
- To make the location visible to violation writers on handheld devices or the admin side, enable the Writer Visible checkbox beside the location name.
- The GIS Number field is optional and is used by clients who utilize a geographic location code (GIS maps).
- Click Save Changes to create the new location.
The Manage Locations page will refresh and display a confirmation message indicating that the Location has been updated (or added).
Editing Locations
- Locate the Location you wish to modify in the list.
- Click the Edit button next to it.
- Make your updates and click Save Changes.
Deleting Locations
A location can only be deleted from the system if it is not associated with any existing records (e.g., incidents, violations, or other data where this location is referenced).
- If a location is eligible for deletion, you will see a Delete button specific to that location
- Click the Delete button and confirm. This action will permanently remove the location from the system.
Best Practices & Considerations
- Descriptive Naming: Use clear and concise names for your locations (e.g., "Main Campus Building A," "West Parking Lot," "Gymnasium Entrance"). This improves clarity for all users.
- Sub-Location Usage: Leverage sub-locations to provide more specific detail for incident reporting, which can be crucial for detailed record-keeping and analysis.
- Writer Visibility: Carefully consider which locations need to be "Writer Visible" for your enforcement officers to ensure accurate violation reporting.
- Data Integrity: Always ensure that a location is not actively referenced by any system records before attempting to delete it. Reassigning records to another valid location is crucial to prevent data inconsistencies.
Locations - Sub Locations
Sub-locations in OPSCOM allow administrators to define more granular areas within a main location, primarily for detailed incident reporting. This feature enhances the precision of incident documentation by pinpointing specific spots within a larger location, providing richer context for investigations and analysis.
Using this Feature
The Manage Sub-Locations page provides a straightforward interface to add and delete various sub-locations.
1. Hover over System Configuration, then Manage Locations, and click Manage Sub-Locations.
Adding Sub-Locations
- Click the Add Sub-Location button.
- Enter the name of your new location.
- The GIS Number field is optional and is used by clients who utilize a geographic location code (GIS maps).
- Click Save Changes to create the new location.
The Manage Sub-Locations page will refresh and display a confirmation message indicating that the Location has been updated (or added).
Editing Sub-Locations
- Locate the Sub-Location you wish to modify in the list.
- Click the Edit button next to it.
- Make your updates and click Save Changes.
Deleting Sub-Locations
A sub-location can only be deleted from the system if it is not associated with any existing records (e.g., incidents, violations, or other data where this location is referenced).
- If a sub-location is eligible for deletion, you will see a Delete button specific to that location
- Click the Delete button and confirm. This action will permanently remove the location from the system.
Best Practices & Considerations
- Detail for Incident Reporting: Sub-locations are primarily for incident reporting. Use them to add specific detail that goes beyond the general "Location" (e.g., within "Mulloy Library" you might have "Reading Room," "South Entrance," "Loading Dock").
- Clarity in Naming: Use clear and concise names for your sub-locations to make incident reports easily understandable.
- GIS Integration: If your organization uses GIS data, ensure your GIS numbers for sub-locations are accurate and consistent with your mapping systems.
- Data Integrity: Always ensure that a sub-location is not actively referenced by any system records before attempting to delete it.
Violations Configuration
Ticket Categories
Ticket Categories in OPSCOM allow administrators to define and manage different types of violations (e.g., Municipal, Parking, Bicycle). This feature is essential for accurate incident reporting, enforcing specific rules, and tailoring violation processes, including whether tickets apply to vehicles or users, and their visibility on handheld devices.
Using this Feature
The Manage Ticket Categories screen allows for comprehensive configuration of how different violations are classified and processed.
1. Hover over System Configuration, then Violations, and click Manage Ticket Categories.
Adding Ticket Categories
Editing Ticket Categories
Archiving Ticket Categories
Ticket Types can be deleted, however, they are not actually removed from the system's database. Instead, they are archived to preserve the integrity of any historical data associated with that Ticket Type (e.g., past violations that used this type).
Best Practices & Considerations
Ticket Offence Items
Ticket Offence Items define the specific violations (e.g., "Parked with No Proof of Payment," "Expired Meter") that can be issued within OPSCOM. This feature allows administrators to configure fine amounts, discounts, and specific behaviors for each offence, ensuring accurate and consistent enforcement across both web and handheld platforms.
Using this Feature
- Hover over System Configuration, then Violations, and click Manage Ticket Offence Items.
- The Manage Ticket Offence Items page opens. This page provides comprehensive tools to add, edit, and configure individual offence items.
Adding a New Offence Item
- In the top left box, select the Ticket Category (e.g., "Private Property") you wish to add an offence item to, or choose Unassigned Offence Items.
- Click Add New Offence Item.
- Fill out the following fields:
- Enter the Violation Type Description (e.g., "Parked With No Proof Of Payment").
- Select the Ticket Category it belongs to (e.g., "Private Property").
- Enter a Key. This optional field indicates specific tracking codes for violations (e.g., internal audit codes).
- Enter a By-Law code This optional field is used by municipalities to link violations to specific by-laws when sending them to court for collections. It is a text field that accepts up to 20 alphanumeric characters.
- Enable the Administrative Fee if required. (More about this below)
- Fine Amount, Adjustable Fine Amount, and Discount Settings are covered below.
- Click Save New Offence Item when complete.
Setting the Fine Amount and Discount
- Fine Amount: Set the base fine amount (e.g., "$30.00").
- Apply Discount: Enable this checkbox if you wish to offer a discount for early payment.
- Discount Amount: Enter the amount of the discount (e.g., "$10.00").
- Discount Days: Set the number of days within which the discount applies (e.g., "14" days).
- Example: If the fine is $30.00, and a discount of $10.00 is applied if paid within 14 days, the collected fine will be $20.00. After 14 days, the discount does not apply, and the full $30.00 is due.
- Click Save Ticket Offence Item to save this configuration. You will be returned to the list view with your new offence listed under its Ticket Category.
Is This Fine Amount Adjustable?
This can be useful for scenarios such as repeat offenders or multiple offences. Officers can, at their discretion, increase the ticket amount (e.g., for repeat violations) or reduce it (e.g., when issuing multiple violations for less than the combined full amount), in accordance with your organization's business rules.
Enable the Adjust Fine Amount checkbox in the ticket configuration screen:
- Default - (Off): By default, this feature is turned off. The fine amount will appear on handheld units as a grey, non-editable figure.
- Enabled - (On): When turned on, the fine amount will appear in black text on handheld units, allowing patrol officers to edit the amount.
Administration Fees
Admin Fees are useful for charges like Conviction Fees or Booting Fees. Offence items designated as Administration Fees do not show on handheld units. They are only visible on the admin interface, ensuring field officers don't issue them directly.
You can designate an offence item as an Administration Fee by selecting the Administrative Fee checkbox.
- Configuration Example: To set up a $20.00 administration fee for removing a boot from a vehicle:
- Toggle the Administration Fee checkbox On. This will also prevent the offence item from being synced with handhelds.
- Set the Fine Amount to "$20.00".
- Click Save Ticket Offence Item.
Editing, Deleting, and Archiving Offence Items
- Editing: Click the Pencil icon next to the Offence Item and make your changes. Click the Update Ticket Offence Item button to confirm.
- Deletion: Ticket Offence Items can only be deleted if there are no violations already written for that particular offence item.
- Archiving: Once a violation has been issued using a specific Offence Item, that item can no longer be deleted. Instead, it will be archived to preserve the integrity of any data associated with it, ensuring historical reports remain accurate.
Best Practices & Considerations
- Clear and Specific Offence Names: Use descriptive names for offence items to avoid ambiguity (e.g., "No Parking - Fire Lane" vs. "Parking Violation").
- Fine and Discount Strategy: Carefully define your fine amounts and discount structures to encourage timely payment and align with your enforcement policies.
- Handheld Visibility Management: Strategically decide which offence items are visible on handhelds. Keep the list concise for field officers, moving less common or admin-only fees to the "Administration Fees" category.
- By-Law Code Accuracy: For municipalities, ensure the By-Law Code is accurately entered and consistent with legal requirements for court collections.
- Ordering Violation Types: The system sorts the list of violation types alphanumerically. To achieve a specific custom sort order on both admin interfaces and handheld units, you can prefix the Offence Item Name with numbers or spaces. (A space is considered higher than an 'A'.)
- Example:
Zebra Offence,Test Offence,A Test Offence
- Example:
- Leverage "Adjust Fine Amount" with clear business rules for officers, and properly categorize "Violation Applies To" (Vehicle vs. User) to fit various enforcement scenarios.
Related Videos
Sort Violations for Quick Access
OPSCOM allows administrators to customize the display order of Ticket Offence Items (violations) for quicker access, especially useful for frequently used offences. By strategically adding spaces to the beginning of offence names, you can control their sorting order on both the admin interface and handheld devices, improving efficiency for enforcement officers and data entry personnel.
When managing a long list of violation offence items, it can be time-consuming to scroll and find specific offences. The challenge is to reorder this list for quick access, ensuring the most commonly used offences appear at the top.
The system sorts lists alphanumerically. We can take advantage of the fact that a space character () comes before all alphanumeric characters in the ASCII character table. By prefixing a violation name with one or more spaces, you can force it to appear higher in the sorted list.
Example of Sorting with Spaces:
Zebra Offence(two spaces, sorts first)Test Offence(one space, sorts second)Apple Offence(no space, sorts third)Bottle Offence(no space, sorts fourth)
Let's walk through a practical example of reordering a list of violations.
- Hover over System Configuration, then Violations, and click Manage Ticket Offence Items.
- In this example, we will select Private Property as the ticket category. This will display a list of violations categorized under "Private Property."
Reordering Violations - An Example
We want to reorder the list so that "Parked in No Parking Area" lists first, "Parked Blocking Fire Hydrant" lists second, and the rest of the violations list in alphabetical order after that.
-
Modify "Parked in No Parking Area":
- Click on Parked in No Parking Area to select it. The screen will refresh with the entry information for the violation.
- Add a single space to the very beginning of the Violation Type Description field.
- Click Save Violation Type.
- Result: The list will now show " Parked in No Parking Area" (with the space) as the first item.
-
Modify "Parked Blocking Fire Hydrant":
- Next, select Parked Blocking Fire Hydrant.
- Add a single space to the beginning of its Violation Type Description.
- Save the violation type.
- Result: The listing will change again. However, since both now have one space, " Parked Blocking Fire Hydrant" will appear before " Parked in No Parking Area" due to alphabetical sorting of the rest of the name.
-
Adjusting Order with Multiple Spaces:
- To ensure "Parked in No Parking Area" appears first and "Parked Blocking Fire Hydrant" second, we need to use a different number of spaces.
- Select Parked in No Parking Area again.
- Add a second space to the beginning of its Violation Type Description (so it has two spaces:
Parked in No Parking Area). - Save the violation type.
- Result: The list on the left now shows " Parked in No Parking Area" in the first position, followed by " Parked Blocking Fire Hydrant" in the second position, and then the rest of the violations in alphabetical order.
Best Practices & Considerations
- Consistency is Key: If you start using spaces to sort, apply the method consistently across all relevant lists (e.g., if you sort one category of offences, consider sorting others for a uniform experience).
- Minimal Spaces: Use the fewest number of spaces necessary to achieve your desired order. For example, if you only need one item at the very top, one space is sufficient. If you need two items, one gets two spaces, the other gets one.
- Handheld Impact: Remember that this sorting method affects the display order on both the admin interface and handheld units, directly impacting the efficiency of your enforcement officers in the field.
- Documentation: If multiple administrators manage ticket offence items, document your sorting strategy internally to maintain consistency and prevent accidental reordering.
- No Wildcards: This method relies on actual space characters, not wildcards (
*) or other special characters that might not function as expected in sort orders.
Handhelds Devices Settings (Handheld Commons)
The Handhelds Devices section in OPSCOM allows administrators to manage and configure handheld devices used for enforcement and data collection. This includes registering new devices, pushing messages, and updating device settings, ensuring seamless operation for field personnel and accurate data synchronization.
Setup and Configuration
In order to use the handheld as a ticket writer, you will need to have the following permission set:
- Display as Ticket Writer: Ability to be a ticket writer on the Handheld Tablets or on the system.
This setting comes with the role Patrol Officer by default. To check if this role is set up in your system:
- Go to System Configuration, Admin Management, and click Manage Roles.
- Select the role for Patrol Officer and click on the tab for violations.
- You should see the box labeled Display as Ticket Writer checked.
For more information on managing roles, click here!
Before accessing a handheld device for the first time, new admin users are required to log in through the online admin portal and complete their initial password reset.
Using this Feature
- Click Tools, then Handhelds Devices. Alternatively, you can access this on the Violations menu as well.
- The Handhelds - Common Settings screen appears, where you can manage various aspects of your handheld fleet. From here, you can edit settings such as ticket due dates, customize ticket footers, view device information, and add or manage individual handheld units.
Adding a New Device
When adding a new handheld device, the process involves both the device itself and the OPSCOM system configuration.
- Install Software: Start by installing the OPSCOM enforcement app on the handheld device.
- Obtain UUID: After the first login attempt on the device, you'll receive a notice indicating the device isn't registered. This message will display a UUID (Universally Unique Identifier) number. This is a 16-digit alphanumeric code typically found under your login screen on the device.
- Register Device in OPSCOM:
- Once on the Handhelds - Common Settings page in the admin portal, click Add New Device.
- A new screen will open. You must add the following information:
- UUID: Enter the UUID obtained from the handheld device.
You will need to include all characters in the UUID, including dashes between the groups of characters. Some UUIDs do not have dashes.
-
-
- Server to Sync with: Always start by selecting the Production Server. This is a critical step for initial device registration, regardless of whether the device will eventually be used for testing on a Preview server (explained further in "Production Server First (Crucial)" under Best Practices & Considerations).
- Name: Enter a descriptive name to easily identify this device (e.g., "Patrol Unit 1," "Enforcement Officer John's Device").
- Ensure the Enabled checkbox at the top of the entry form is selected.
- Click Add Device once all information is in place.
-
Pushing Messages
You can send messages directly to your configured handheld units:
- On the Handhelds - Common Settings screen, click the Push Message button.
- Follow the prompts to compose and send your message to the selected devices.
Updating Device Data
To modify settings for an existing handheld device:
- On the Handhelds - Common Settings screen, click on the device name you wish to update. This will open a drop-down list of editable settings.
- Make your desired changes to the device's configuration.
- Once finished, ensure you click Process Updates to save and apply your changes to the device.
To edit the ticket footer, you must have the permission level and role of Primary Admin.
Best Practices & Considerations
- Production Server First (Crucial):
- Important Note: Due to the underlying logic of the Handheld Common tool, you must always register a new handheld unit on the Production admin portal first, even if its ultimate purpose is for testing on a Preview site.
- The system initially connects to the production server, then references the
PA Common/handheld assignmenttable (which is written from production) to determine if a unit is registered for Production or Preview. This ensures the correct routing is established in the database. - This initial production-side registration is also why you can refresh preview sites without losing the handheld units configured for them.
- Adding a Handheld Unit to Preview for Testing:
- Start by refreshing your preview site to ensure it’s using the latest data. For details, see Create or Refresh a Preview Space.
- First, add the handheld unit to Handhelds - Common Settings on the production admin portal as described in "Adding a New Device," but select your Preview Server in the Server to Sync with field. This sets the proper database route.
- Next, navigate to the preview admin portal and enter the exact same device information into its Handhelds - Common Settings section.
- Finally, perform a reinstallation of the OPSCOM enforcement application on the handheld device itself. This reinstallation allows the handheld to pick up the newly set path to the preview server.
- Switching Between Production and Preview:
- Once a handheld entry exists in both Production (configured for Preview sync) and Preview, you can generally switch between environments by re-pointing the Sync With setting on both the Production and Preview admin portals to your preferred path.
- However, remember that you must perform a reinstallation of the software on the handheld unit each time you change the synchronization path in the system for the handheld device itself to update with the selected path.
- UUID Accuracy: Ensure the UUID is entered precisely, as any error will prevent the device from connecting.
- Descriptive Naming: Use clear, identifiable names for your handheld devices to simplify management and troubleshooting.
Incidents Configuration
Managing Incident Categories and Sub-Categories
Incident Categories and Sub-Categories in OPSCOM are used to define and classify incidents reported within the system. This feature allows administrators to organize incident types, control their visibility in reports, and manage associated checklists, ensuring precise documentation and effective analysis of various occurrences.
Using this Feature
The Edit Categories and Sub Categories page allows you to add, edit, and manage both main incident categories and their more specific sub-categories.
- Hover over System Configuration, then Incidents, and click Categories.
Adding Categories
- On the Edit Categories and Sub Categories page, click Add New Category located at the bottom of the page.
- Fill out the details for your new Category Name.
- Enter the GIS number (optional, used by clients with geographic location codes).
- Select whether it's an "In House" category (for internal use).
- Select if you'd like this category to be Included in Reports.
- Click Save Incident Category.
Editing Categories
- On the Edit Categories and Sub Categories main page, locate the desired category from the listed items.
- Click the pencil icon next to it to edit.
- Make your changes and click Save Incident Category to apply your changes.
Managing Sub-Categories
Sub-categories provide a finer level of detail for incidents.
- To check a category for its sub-categories, click the Sub button next to the Category name.
- The list of Sub-Categories for that item will display. You can add a new sub-category at the bottom of the list.
- Enter the Name of the sub-category and enable the desired functions:
- If a Checklist is required for incidents under this sub-category, click Required.
- If it's to be Included in Reports, click Include.
- If you wish to archive it, enable the Archive checkbox.
- If you want to change the name of an existing one, click in the text box and change it.
Once you have finished, click Save Sub-Categories.
Best Practices & Considerations
- Logical Hierarchy: Create a clear and logical hierarchy between categories and sub-categories to ensure accurate incident classification (e.g., Category: "Theft," Sub-Categories: "Vehicle Theft," "Personal Belongings Theft").
- Report Inclusion: Carefully consider which categories and sub-categories should be Included in Reports based on your organization's analytical and compliance needs.
- In-House vs. Reportable: Distinguish between "In House" categories (for internal tracking) and those intended for broader reporting or external sharing.
- Checklists for Consistency: Utilizing the "Required Checklist" option for sub-categories can ensure that all necessary information is collected consistently for specific types of incidents, improving data quality.
- Regular Review: Periodically review your incident categories and sub-categories to ensure they remain relevant to your incident reporting needs and operational changes.
Managing Incident Flags
Incident Flags in OPSCOM allow administrators to create custom tags or labels that can be attached to incident reports. This feature is vital for quickly categorizing, highlighting, or drawing attention to specific characteristics of an incident, improving reporting, search capabilities, and internal communication.
Using this Feature
The Edit Flags page allows you to add and edit incident flags, as well as control their visibility in reports.
- Hover over System Configuration, then Incidents, and click Flags.
Adding Flags
- At the bottom of the list, click on the empty text box provided for adding a new flag.
- Fill in the name (e.g., "High Priority," "Follow-Up Required," "Safety Concern").
- Toggle the Include In Reports checkbox if you do not want this flag to show up in reports. By default, this checkbox is on.
- Click Add. The new Flag entry will now appear in the list and is ready to be used when creating or editing incident reports.
Deleting Flags
1. Click the Delete button next to the flag and Confirm.
Best Practices & Considerations
- Clear and Concise Names: Use short, descriptive names for your flags that clearly convey their purpose (e.g., "Critical," "Resolved," "Requires Manager Review").
- Report Inclusion: Carefully consider whether each flag should be Included In Reports. Flags used purely for internal workflow might not need to appear in aggregated reports.
- Standardization: Develop a standardized list of flags to ensure consistency across all incident reporting. This makes it easier to filter, search, and analyze incident data.
- Workflow Integration: Think about how flags can integrate with your incident management workflow. For instance, a "Follow-Up Required" flag could trigger a review process.
Managing Ethnic Types
Ethnic Types in OPSCOM allows administrators to define and manage a picklist of ethnic classifications for use within incident reporting. This feature supports detailed demographic data collection for incidents, enabling organizations to analyze trends, ensure fair and equitable practices, and comply with reporting standards.
Using this Feature
The Manage Ethnic Types page provides a straightforward interface to add, edit, and delete various ethnic types.
- Hover over System Configuration, then Incidents, and click Ethnicity.
Adding
- Click Add Ethnic Type.
- Fill in the name.
- Click Save Changes.
Editing
- Click the Edit button next to the Ethnic Type you want to change.
- Make your edits and click Save Changes.
Deleting
In order to delete an Ethnic Type, it must not be in by any records in the system. You will not see a delete button unless there are no records associated to this type.
Best Practices & Considerations
- Standardization: Use consistent and recognized terminology for ethnic types to ensure data accuracy and facilitate meaningful analysis.
- Data Integrity: Always verify that an ethnic type is not actively linked to any records before attempting to delete it. This prevents data inconsistencies.
- Reporting and Analysis: Accurate ethnic type data can be crucial for generating demographic reports related to incidents, helping organizations identify patterns and inform initiatives related to diversity, equity, and inclusion.
- Sensitivity and Purpose: When collecting and managing demographic data such as ethnic types, ensure that the purpose is clearly defined, aligns with organizational policies, and adheres to privacy regulations. This information should be handled with sensitivity and used responsibly.
- Compliance: If your organization has specific reporting requirements related to demographics (e.g., for government or grant purposes), ensure your configured ethnic types support those needs.
Managing Incident Relations
Incident Relations in OPSCOM allows administrators to define specific types of connections or relationships between individuals involved in an incident (e.g., "Witness," "Victim," "Suspect," "Reporting Party"). This feature is crucial for accurately documenting complex incident scenarios, ensuring all parties are properly identified, and facilitating comprehensive reporting and investigation.
Using this Feature
The Relation Administration page provides a straightforward interface to add and edit various incident relation types.
1. Hover over System Configuration, then Incidents, and click Relations.
Adding Relations
- Locate the empty text box provided at the bottom of the list for adding a new relation.
- Type in the desired relation name (e.g., "Witness," "Victim," "Suspect," "Reporting Party").
- Choose a unique color for this type.
- Click Insert New to add the new relation to the list.
Editing Relations
- Locate the relation you wish to modify in the list and click the Edit button.
- Make your changes and click Save Changes.
Best Practices & Considerations
- Comprehensive Definitions: Define all relevant relationship types that might occur in your incident reporting to ensure accurate and complete documentation.
- Clear Naming: Use concise and unambiguous names for relations to avoid confusion (e.g., "Victim" vs. "Complainant" if they represent different roles in your context).
- Standardization: Encourage consistent use of defined relations by all personnel involved in incident reporting to improve data quality and reporting consistency.
- Data Integrity: Always ensure that a relation is not actively linked to any incident parties before attempting to delete it, to prevent data inconsistencies.
- Reporting Value: Properly categorized relations are essential for generating accurate reports on incident demographics and the roles of individuals involved.
Extended User Profile Options
Extended User Profile Options in OPSCOM allow administrators to define and manage additional, highly granular descriptive categories and values for user profiles, typically used in incident reporting. This feature enables officers to record unique physical features or identifiers of individuals involved in an incident, enhancing the detail and accuracy of incident reports.
Using this Feature
The User Extended Values Administration page allows you to add and update a variety of descriptive values for user profiles.
- Hover over System Configuration, then Incidents, and click Ext. User Profile Options.
The User Extended Values Administration page displays a list of currently defined extended values. Notice the various types you can choose from in the dropdown menus to categorize your extended values. A Value Type acts as a category (e.g., "Hair Type"), while the Value Description details the specific characteristic (e.g., "Balding," "Red," "Long").
Adding Extended User Value Types
- Scroll to the bottom of the page and select a Value Type from the dropdown menu (e.g., "Hair Type," "Clothing Color," "Tattoo Location").
- Type the Value Description in the textbox provided (e.g., "Curly," "Blue," "Left Arm"). Value descriptions can include a range of physical features/identifiers of a user, such as the location of a tattoo, the color of clothing, or the style of hair.
- Click Insert New to add and save the new extended user value.
Editing Extended User Value Types
- Locate the extended value you wish to edit in the list and click Edit.
- Adjust the Category (Value Type) and/or the Name (Value Description) by selecting the appropriate textbox and making the desired changes (e.g., changing "Bald" to "Balding").
- Click Save Changes to save and continue.
Best Practices & Considerations
- Granular Detail for Incidents: Leverage extended values to capture specific, unique identifiers for individuals involved in incidents, which can be critical for identification and investigation.
- Standardized Terminology: Establish clear, consistent terminology for both Value Types and Value Descriptions to ensure uniformity in data collection across all officers and administrators.
- Training for Officers: Train officers on the importance of these fields and how to accurately select and describe extended values when creating incident reports.
- Avoid Redundancy: Review existing categories and values before adding new ones to prevent duplication.
- Privacy Considerations: Be mindful of privacy regulations and your organization's policies regarding the collection of detailed personal identifiers. Ensure that the collection of such data is justified and used responsibly.
Missing Property Types
Missing Property Types allows administrators to define and categorize different kinds of missing or stolen property (e.g., Electronics, Jewelry, Documents) within incident reports. This feature enables detailed and structured data collection for lost or stolen items, enhancing the accuracy of incident documentation and supporting investigations.
Using this Feature
The Edit Missing Property Types and Fields page allows you to define both the broad categories of missing property and the specific details (fields) you want to collect for each category.
- Hover over System Configuration, then Incidents, and click Missing Property Types.
Adding Property Types
- Click the Add New Type button.
- Type the Name for the new missing property type and click Add New.
Adding Fields to Types
- Click View Fields next to the Property Type you want to add a field to.
- Click Add New Field.
- Type in the Field Name (e.g., "Serial Number," "Color," "Brand").
- Select the Field Type from the dropdown menu (e.g., checkbox, textbox, dropdown, etc.).
- Select whether or not it is a required field by clicking the Required checkbox.
- Click Add New to save the new field.
Editing Property Types
- Click the name of the property type you wish to change.
- Change the name and click Save Changes.
- Click the View Fields button if you want to edit any fields associated to this.
Deleting Property Types
Deleting a missing property type is a two-step process if it has associated fields.
- If there are NO fields found associated with that property: You can immediately click Delete Property Type.
- If there ARE fields found associated with that property:
- Click View Fields and then click Delete All.
- Click Save Changes to delete the selected fields.
- Follow step one to Delete Property Type.
Best Practices & Considerations
- Structured Data Collection: Use fields within each property type to ensure structured and consistent data collection for stolen or missing items (e.g., for "Electronics," you might add fields for "Make," "Model," "Serial Number").
- Clear and Concise Names: Use descriptive names for both property types and their fields to improve usability and clarity for officers filling out incident reports.
- Required Fields: Carefully consider which fields are truly Required to avoid unnecessary data entry burden while ensuring critical information is captured.
- Data Integrity: Remember that a property type cannot be deleted if it has associated fields. This mechanism helps prevent orphaned data and ensures the integrity of your incident records.
- Reporting Value: Well-defined missing property types and their fields can significantly enhance the quality of reports, aiding in investigations and property recovery efforts.
Alerts Configuration
Email Alert List
The Email Alert List in OPSCOM allows administrators to define a specific set of email addresses that will receive automated warning notifications from the system. This feature is crucial for ensuring that designated personnel are promptly alerted to important system events or potential issues, enabling timely intervention and management.
Setup & Configuration
The Email Alert List is accessed through the System Configuration menu.
You'll be redirected to the Manage Alert Emails page, where you can manage the list of recipient email addresses.
Using this Feature
The Manage Alert Emails page enables you to add, edit, or delete email addresses that are designated to receive warning notifications. You can also use the Toggle Archived checkbox if you want to see inactive email addresses.
Adding an Email Address
Editing an Email Address
Deleting an Email Address
Best Practices & Considerations
Manage Email Warnings
Manage Email Warnings in OPSCOM allows administrators to define and manage a list of email addresses that will receive critical system alerts. This feature is vital for ensuring that designated personnel are promptly notified of important events, such as security breaches, system errors, or specific operational triggers, enabling swift response and management.
Setup & Configuration
Manage Email Warnings is accessed through the System Configuration menu.
You'll be redirected to the Manage Email Warnings page, where you can manage the list of recipient email addresses.
Using this Feature
The Manage Email Warnings page enables you to add, edit, or delete email addresses that are designated to receive warning notifications.
Adding an Email Address
Editing an Email Address
Deleting an Email Address
Best Practices & Considerations
Payments Configuration
Manage Deposit Types
Deposit Types allow administrators to define and manage various categories of deposits (e.g., for permits, equipment, or specific services). This feature is essential for accurately tracking refundable amounts, providing clear financial oversight, and ensuring proper accounting for deposited funds within the system.
Using this Feature
The Manage Deposits page provides a straightforward interface to add, edit, and view the usage of various deposit types.
- Hover over System Configuration, then Payments, and click Manage Deposit Types.
Adding a Deposit Type
- Click Add Deposit Type.
- Fill out the information as needed:
- Label: This is the name that will be used to identify the deposit type (e.g., "Permit Deposit," "Key Fob Deposit").
- Placeholder Text: This field is optional. It provides a prompt or sample information that will appear in the deposit information text field when creating a deposit record.
- Flags: This toggle controls the ability to edit the Assignable Text field in the resulting active deposit record. This text will appear in the user's profile associated with the deposit.
- Amount: The amount that the deposit will cost.
- Active checkbox: This determines if the deposit is currently available to be assigned.
- Click Save Changes.
Editing a Deposit Type
- Locate the deposit type and click the Edit button next to it.
- Make any necessary changes to the fields.
- Click Save Changes.
Deleting a Deposit Type
1. If no records are associated with this deposit you can click the Delete button.
Best Practices & Considerations
- Clear Labeling: Use descriptive labels for your deposit types (e.g., "Annual Permit Deposit," "Visitor Pass Deposit") to ensure clarity for both administrators and users.
- Placeholder Text Utility: Utilize the Placeholder Text to provide clear instructions or examples for administrators when entering deposit information.
- Understanding "Flags": The "Flags" setting for
Assignable Textcan be useful for adding specific, customizable notes to individual deposit records on user profiles, allowing for unique details per transaction. - Financial Reconciliation: Accurately tracking deposit types is crucial for financial reconciliation and managing refundable amounts.
Managing Payment Types
Managing Payment Types allows administrators to control which payment methods are available throughout the system. This comprehensive control enables you to define new payment options, assign them to specific user types (e.g., Staff, Students, Public), and configure their usage for subscriptions or guest payments, thereby streamlining transactions and ensuring alignment with your organization's financial policies.
Using this Feature
The Payment Types screen gives you a comprehensive interface to create, edit, and view details about different payment methods available in OPSCOM.
- Go to System Configuration, then Payments, and click $ Setup Payment Types.
Adding Payment Types
Use Case - For this example, we will setup a Payment type that will use the provider Always Successful. This will allow payments to immediately be flagged as fully processed with no intervention of any admin. This is often used for things like Payroll deduction. For example, you want your users to be able to purchase a permit through Payroll deduction that will immediately be valid upon checkout. The actual payments will take place through payroll and have nothing to do with OPSCOM.
- Click the Add Type button.
- The list of Providers is hard coded and controlled by Tomahawk. You will not be able to change this picklist. The tooltip below the provider will tell you what each provider means.
- Pick Always Successful for this example.
- Click Next Step.
- Provide a Type Name.
- Choose the User Types this will be available to.
- On the Settings tab, Enable the checkboxes as you required.
- In the section Allowed Payment Types, you will see any payment types that are currently active first, then a list of inactive payment types after.
- Click Update Payment Type.
Hosted Payment Providers
The following links will detail the process of setting up a Hosted Payment provider, of which currently support. Click the link matching the payment provider you are adding below and follow the steps outlined on those articles.
- OpenEdge:
- We need the following credentials to work with OpenEdge;
- Auth Key: a multi-digit string key
- Terminal ID: a 8 digit numeric key
- X-Web ID: a 12 digit numeric key
- Moneris Checkout:
- We need the following credentials to work with Moneris Checkout;
- store_id: store#
- api_token: xxxxxxx
- checkout_id: xxxxxxxxStore#
- Bambora Checkout:
- We need the following credentials to work with Bambora Checkout (JSBambora):
- Payment Authorization Header: An alphanumeric passcode
- Profile Authorization Header: An alphanumeric passcode
- Payment Authorization Header: An alphanumeric passcode
- We need the following credentials to work with Bambora Checkout (JSBambora):
Once you retrieve the required values from your hosted payment provider of choice, save the credentials securely and contact OPSCOM Support for further instructions.
The information you obtain in the above documentation are credentials that secure the information exchanged between OPSCOM and the provider. Please save these in a secure manner, it is important they are stored properly to ensure operational security.
Extended Payment Information
For each payment type, you can view extended information on the Payment Types screen.
- A general description of the payment type.
- An indication of what the user will be prompted for when selecting that payment type. For example, in a hosted payment scenario like EdgeExpress, the user might be prompted to enter an email address before being redirected to the payment provider to enter credit card information.
- The number of users associated to this payment type.
There are also three columns on the far right that use an X or checkmark to indicate specific uses of the payment type:
- Column 1: Indicates if this payment type can be used for guest payments.
- Column 2: Indicates if this payment type can be used for permit and invoice renewal payments.
- Column 3: Indicates if this payment type can be used for Text2ParkMe subscriptions.
Configuring Payment Types for Subscriptions and Guest Payments
You can fine-tune how specific payment types are used for subscriptions and guest payments.
- Find the payment type you wish to configure and click the Pencil icon.
- Click the Settings tab.
- Select the items you wish to allow the payment type to be used for (e.g., enable Text2ParkMe, subscriptions to permit renewals, as well as guest payments).
- Prompt Information can be changed as well. You can enable only an email address or full address information. Full address info is required when the provider is doing Address Verification using AVS, 3DS or other similar service. This controls what shows up on the QR Code reservations screen after the Payment Type is selected.
- Click Update Payment Type.
Processing as an Admin
When processing payments as an administrator, the payment types presented will be split into two categories:
- What the user would be allowed to use for their specific User Type.
- What an administrator can choose (which may include additional options not visible to the user).
Best Practices & Considerations
- Granular Control: Leverage User Types to restrict payment methods, ensuring users only see relevant options. For example, you might only allow "Payroll Deduction" for Staff users.
- Clear User Experience: By limiting available payment types based on context or user, you simplify the checkout process and reduce confusion for users.
- Refund Alignment: Ensure that appropriate refund types are linked to their corresponding payment types to facilitate smooth and accurate refund processing.
- Subscription Compatibility: When enabling payment types for subscriptions (recurring billing), verify that the chosen payment gateway provider fully supports recurring transactions.
- Regular Review: Periodically review your payment type configurations and their associated settings to ensure they remain aligned with your organization's financial policies and evolving needs.
Managing Convenience Fees
Convenience Fees in OPSCOM allow administrators to add an additional flat-rate charge directly to user payments, managed entirely within the OPSCOM system. This feature provides flexibility to offset processing costs, incentivize certain payment methods, or cover administrative burdens, distinct from any transaction fees imposed by external payment providers.
Difference Between Transaction Fees and Convenience Fees
It's crucial to understand the distinction between these two types of fees:
- Transaction Fees: These are charges applied by your payment provider (e.g., credit card processor) for processing a payment. They are independent of OPSCOM's internal settings. Depending on your setup, OPSCOM and end-users may not be directly aware of these fees as they are managed solely by the payment provider.
- Convenience Fees: These are additional charges that are managed and applied directly through OPSCOM. For example, your OPSCOM system can add a $5 convenience fee onto a payment. This fee amount is visible within OPSCOM and is added to the grand total before being sent to the payment provider.
It is possible for a system to utilize both Convenience Fees (managed by OPSCOM) and Transaction Fees (managed by the payment provider), but recognizing their distinct origins and management is important.
Using this Feature
The Fees Page allows you to set up various convenience fees.
You can only use Convenience fees if you have Bambora/Worldline as your payment provider.
Fee Limitations
Before configuring, understand these limitations:
Fee Examples and Setup
Admin Collected Fee for Collecting Cash and Cheques (Deterrent Fee)
Admin Collected Fee for Permits
Admin Charges a Convenience Fee to Cover an OPSCOM Collected Transaction Fee
Admin Includes the Transaction Fee in the Price of the Item (No Fee Setup in OPSCOM)
Setting Up the Fees
You can access the Fees page to accommodate any of the scenarios above.
- Hover over System Configuration, then Payments, and click Fees.
- Click Add Fee and follow the diagram below.
- Click the Update button to save.

Best Practices & Considerations
Taxes
The Taxes configuration page in OPSCOM allows administrators to define and manage the tax percentages applied to payments made within the system. This feature is crucial for ensuring accurate tax calculation during checkout, maintaining compliance with local tax regulations, and providing transparency to users regarding applicable taxes.
Setup & Configuration
You must be a Primary Admin with the permission to Manage System Configuration to be able to edit the system settings.
If you do not see the settings mentioned in this article, please contact support@ops-com.com to have them enabled for you. You will need, in writing, the permission of your Primary Admin.
Using this Feature
The Taxes page allows you to configure multiple settings for each tax type, ensuring accurate calculation and display.
1. Hover over System Configuration, then Payments, and click Taxes.
Editing a Tax Type
When editing an existing tax type, the following settings are available:
- Enable: Check this box to enable the tax type, making it active and applied to transactions. Uncheck to disable it.
- Percentage: Enter the numerical percentage of tax to be calculated (e.g.,
13for 13%). - Tax Label & Translation: This field defines how this tax will be displayed to users during the cart and checkout process (e.g., "HST," "Sales Tax," "VAT"). Multiple languages are supported for translation to ensure clarity for diverse users.
- Apply to the following items: Check the specific system modules or item types to which you want this tax to be applied (e.g., Permits, Violations, Lockers, Access Cards).
Best Practices & Considerations
- Compliance: Ensure your tax configurations (percentages, labels, and applicability) are always compliant with current local, provincial/state, and national tax regulations.
- Clarity for Users: Use clear and understandable Tax Labels that resonate with your users (e.g., "HST" for Canadian users where applicable).
- Module Applicability: Carefully select the "Apply to the following items" checkboxes to ensure taxes are only applied to the correct modules and items, preventing incorrect charges.
- Testing: After making any changes to tax settings, perform test transactions in a Preview Space to verify that taxes are calculated and displayed correctly in the cart and on receipts.
- Communication with Finance: Coordinate closely with your organization's finance or accounting department to ensure OPSCOM's tax configuration aligns with their reconciliation processes.
The Invoice Template
Editing the template
To access the template, go to the System Config menu and click on Email Templates.
The screen will refresh with a list of possible templates to edit. In our case, we want to click on the Edit button for Permit Invoice to access the template.
The screen will refresh with the complete Template form as seen below.
The form contains 4 areas:
At the top, Meta Data for this specific template.
On the left, a list of possible Short Codes that can be used on this template form.
On the right, the actual Template.
At the bottom, a Text Content field (This field can be configured for a plain text version of the
Meta Data
Label - Enter a name for this Template.
Type - This field auto fills.
Language - Choose the language of the template.
Layout - Choose default layout.
Subject - This text will appear as the Email Subject. Note that the use of short code is permitted in this field. In this case, we are calling up the account name for the company being invoiced.
Short Code List
The template allows the use of special tokens, or short codes, to pull information from the database to appear on the invoice when sent.
These include:
[invoice account="number"] The account number for the company.
[invoice account="name"] The account name for the company.
[invoice account="fulladdress"] The full address for the company.
[invoice account="invoice_comments"] The invoice comment value that is editable for companies only. Any line breaks will be preserved.
[invoice show="invoiceno"] Invoice Number.
[invoice show="duedate"] Invoice due date.
[invoice show="billdate"] Invoice bill date.
[invoice show="subtotal"] Subtotal of all items before tax.
[invoice show="taxtotal"] Total amount of tax.
[invoice show="amounttotal"] The total sum amount for all outstanding permits for this invoice.
[invoice show="counttotal"] The total number of permits for the selected sales window.
[invoice show="details"] The list of permits, cost and who has the permit.
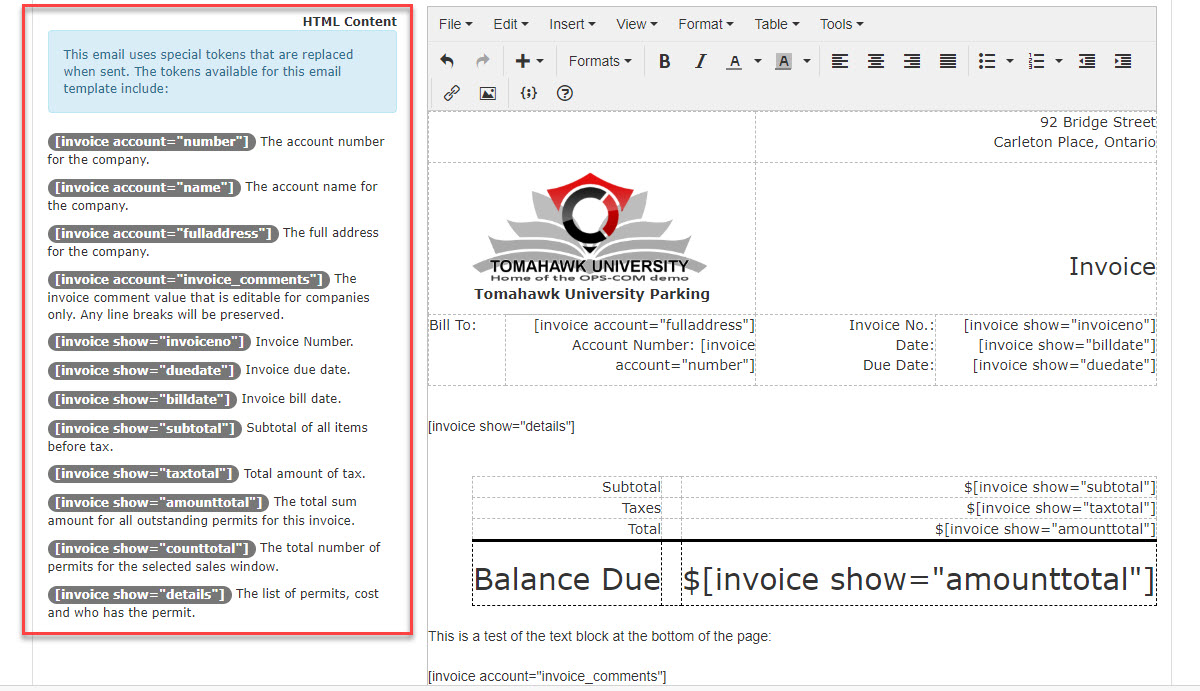
These tokens can be placed anywhere on the template and will pull data from the system, similar to a mail merge functionality.
For example, in the Bill To: area, the system will retrieve the Full Address of the Company as well as the Company Account Number using these two short code tokens:
[invoice account="fulladdress"] The full address for the company.
[invoice account="number"] The account number for the company.

The Template
There are a number of areas on the template that can be edited by the admin. To add branding to the template there are two areas that will be of concern.
The Company Logo Field:
This is where you would place your company logo. Using a .JPEG or .PNG file format is recommended.

Your Company Address:
Enter your company address here.
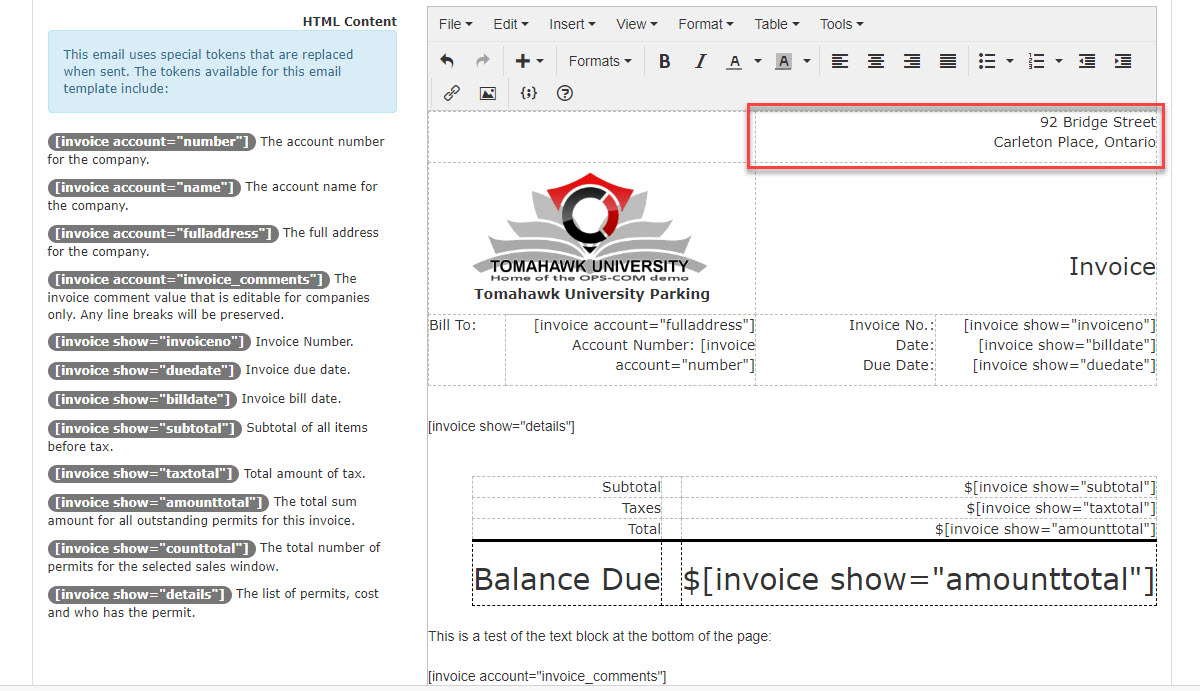
Invoice Identification:
In this section use short code to pull in the Invoice Number, Billing Date, and Due Date.
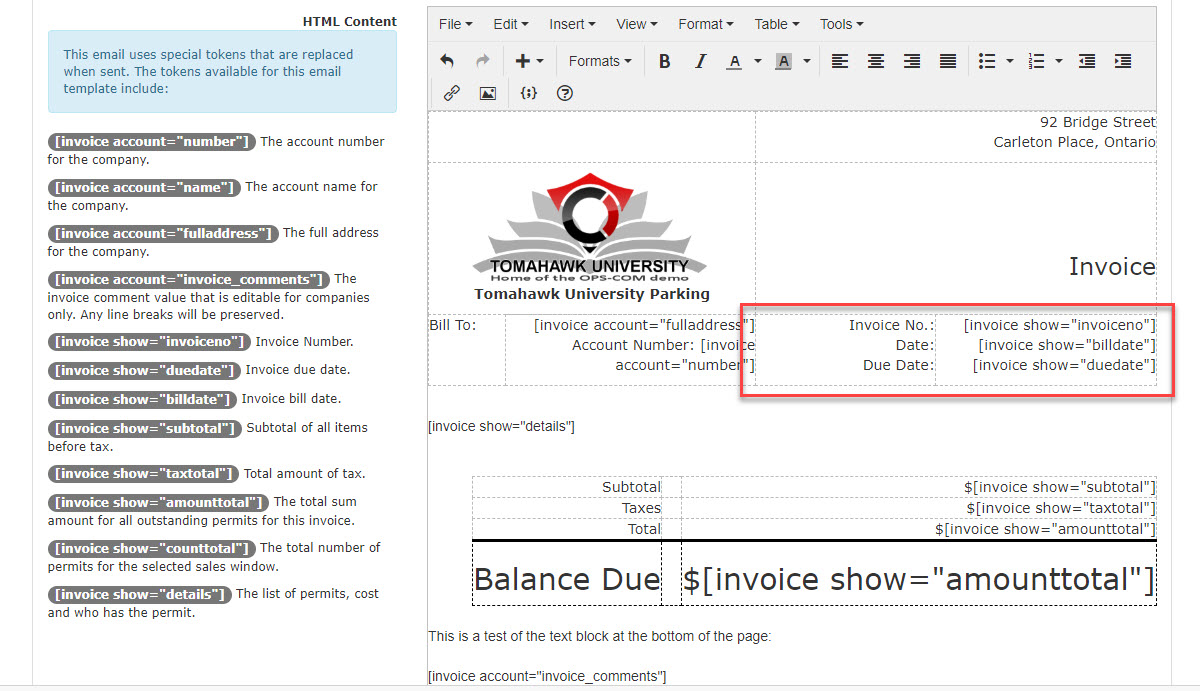
Invoice Details:
The short code [invoice show="details"] pulls in the list of permits that will appear on the Invoice. (See a sample of the Invoice below)
These include:
Parker's Name
Item type being Paid for (Permit, Access card, etc.)
Item number (Permit Number)
Sales Window
Lot Name
Quantity
Cost
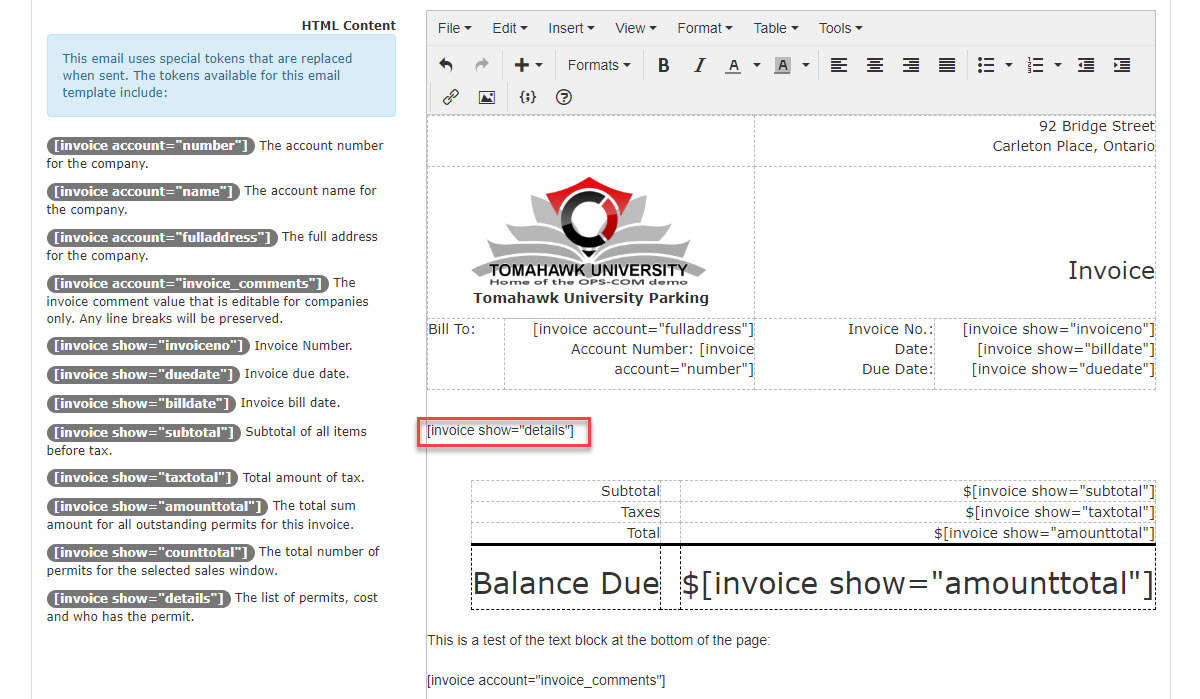
Payment Information (Billing Cost):
In this section use short code to pull in the billing information such as Subtotal, Calculated Taxes, and Total Billing Amount.
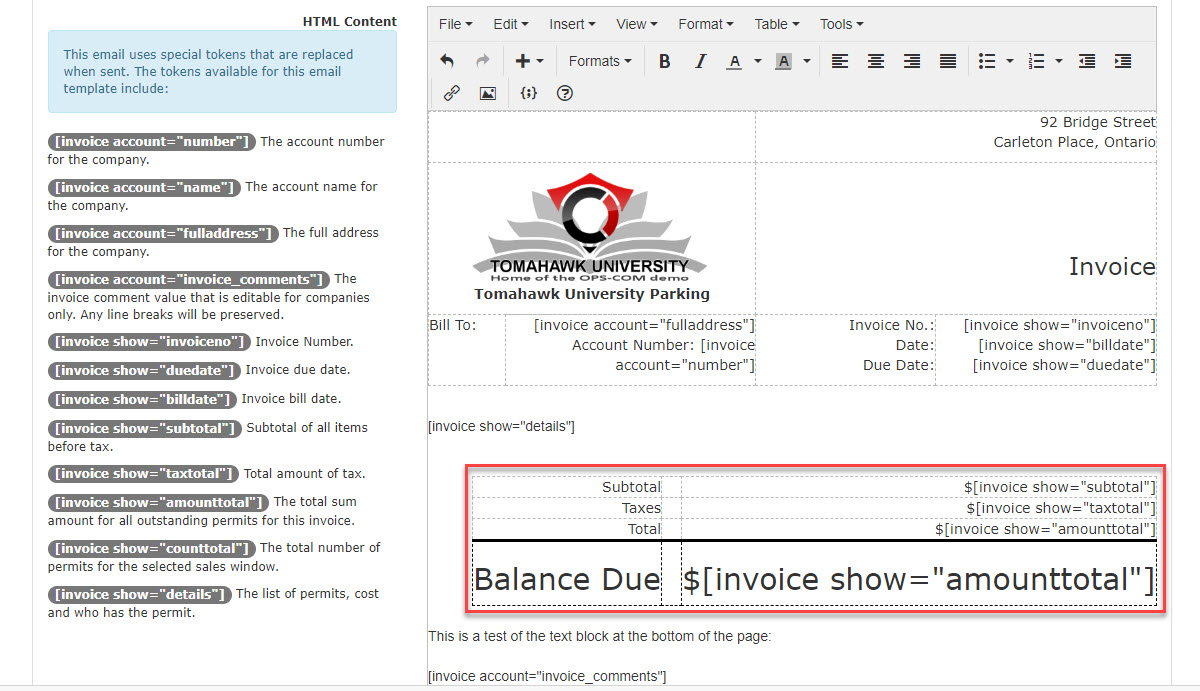
You may also wish to add comments to the invoice. Comments can be added in the company configuration.
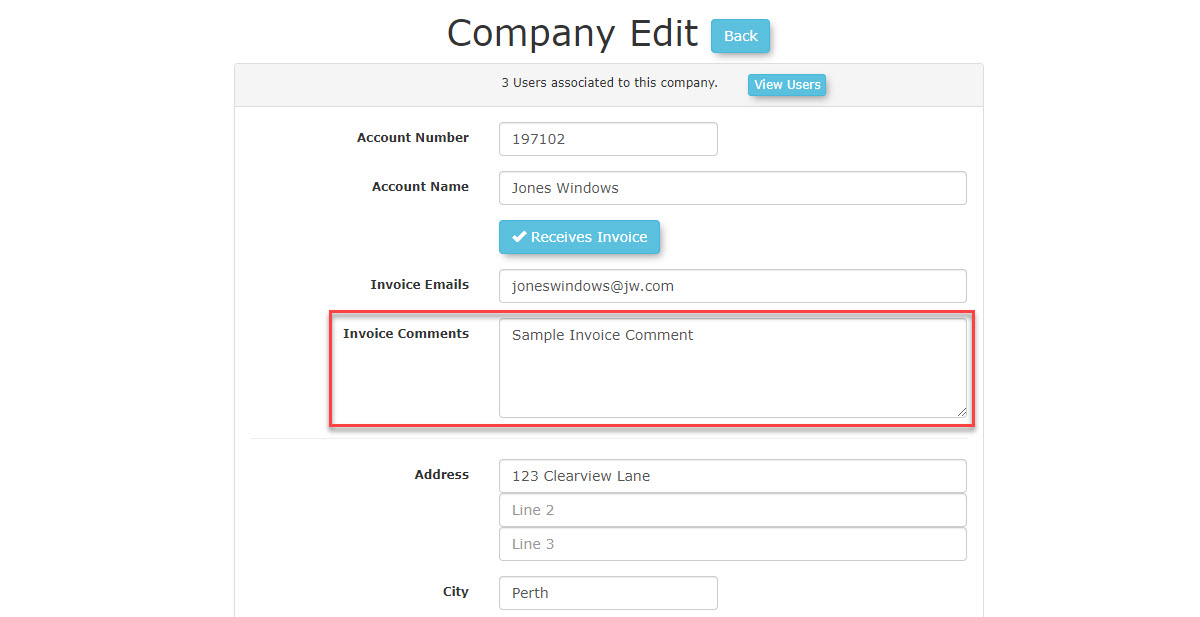
The Email with PDF attached:
Here is a sample of what the resulting email would look like. There is also a .PDF version of this invoice attached to the email.
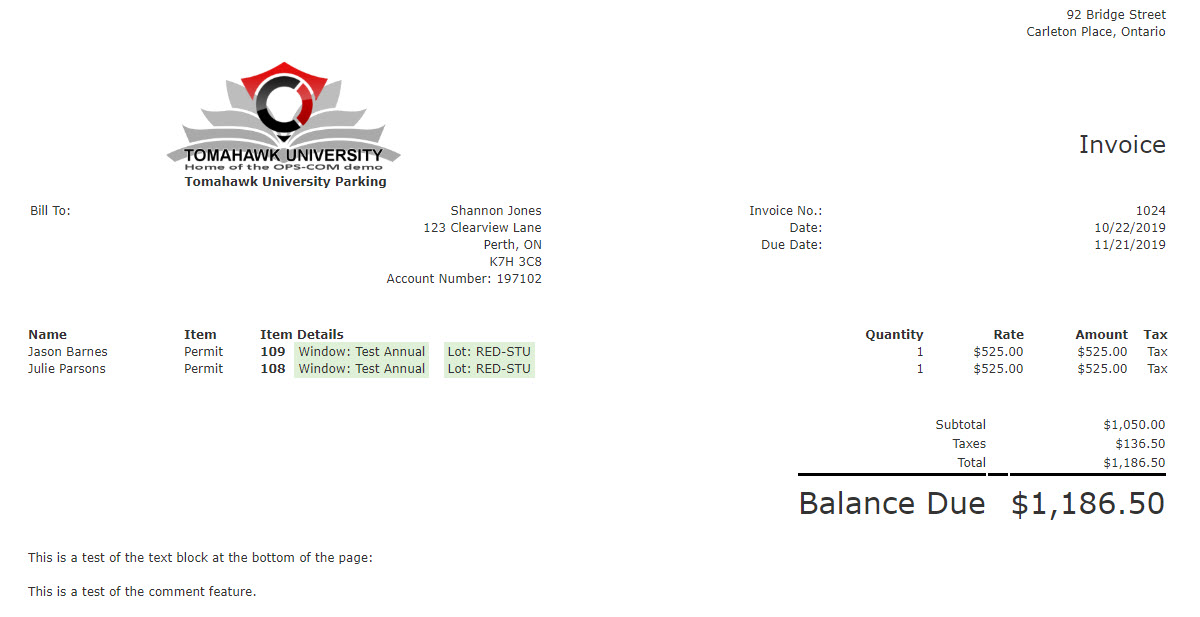
Setup payments with Flex Dollars
This article describes the Flex Dollar and Payroll Deduction feature, a specialized payment method for handling partial payments with credits. This feature allows your users to apply a pre-defined amount of flex dollars towards a permit purchase, with the system automatically notifying administrators of the remaining balance to be processed via payroll.
OPSCOM Support Configuration
The Flex Dollar Payment feature is a custom development, tailored specifically for one client. It is not intended to be useful to, or available to all clients. Its availability is controlled by specific configurations set up by an OPSCOM Support team member.
This feature requires configuration by an administration of your system, and must also be enabled by an OPSCOM support team member before it can be used. The setup involves defining the selectable flex dollar amounts, setting the notification email, and assigning the payment type to the appropriate users.
This feature is enabled by a system-level setting that is typically configured by OPSCOM support upon request. Once enabled, you may proceed with the steps below.
Configuration and Functionality
-
To enable flex dollars, hover over System Configuration, and click System Settings.
-
Click Permits.
-
Enable the checkbox beside Enable Flex Dollars.
Configure Email Notifications
An email address must be configured to receive a notification internally and each time this payment method is used (and the details of the transaction for accounting).
-
Hover over System Configuration, Payments and click Manage Flex Dollars
-
In the Flex Dollars Alert Email text box, enter an email address you will be monitoring.
This email address must be monitored for any changes to be made to student flex dollar balances.
Define Flex Dollar Amount
Create the specific flex dollar values that users can select during checkout.
-
Hover over System Configuration, Payments, and click Manage Flex Dollars.
-
Click the Add New button.
-
Enter a Label. This is the text the user will see in the drop-down menu (e.g., "Apply $100 of Flex Credit").
-
Enter the corresponding numeric Value (e.g.,
100.00). -
Click Save.
-
Repeat this process for all the pre-determined flex dollar amounts your organization offers.
Assign Payment Method to User Types
Finally, this payment method must be enabled for the specific user types who are permitted to use it.
-
Hover over System Configuration, Users, and and click User Types.
-
Select the user type you wish to grant access to (e.g., Staff).
-
In the user type settings, assign the Flex Dollars/Payroll Deduction payment option.
-
For detailed instructions, please refer to the User Types Administration wiki article.
Using this Feature
Once configured, the feature provides a streamlined workflow for users and a clear notification process for administrators.
User Purchase Workflow
-
An eligible user adds a standard term permit to their shopping cart.
-
On the checkout page, they select Flex Dollars/Payroll Deduction as the payment method.
-
A new drop-down menu appears, populated with the flex dollar Labels you configured.
-
The user selects an amount and completes the transaction. Their permit is considered valid and is issued immediately.
Administrator Workflow (Post-Purchase)
-
Upon successful purchase, an email is automatically sent to the address configured in "Flex Dollar Alert Email" field.
-
This notification contains the key information needed for manual processing:
-
User's Name and Contact Information
-
Permit Details
-
Flex Dollar Amount Applied
-
Remaining Balance Due
-
-
Your administrative team (e.g., Payroll or Parking department) uses this information to confirm users flex dollar balances the remaining balance via your organization's internal payroll system.
-
For auditing purposes, a note detailing the flex dollar amount is also automatically added to the users transaction payment record.
The payroll deduction component is not an automated process and neither is the updating of Flex Dollar balance. The system's function is to calculate and report the remaining payroll deduction balance to administrators.
Best Practices & Considerations
-
This payment option will only appear to eligible users when their cart contains only standard permits. It will not be available if other items, such as violation payments or locker rentals, are also in the cart.
-
Use clear and descriptive labels for the flex dollar amounts (e.g., "Use $75 Payroll Credit"). This transparency is key to reducing user confusion and support requests during the checkout process.
-
Ensure the staff who manage payroll are aware of this workflow and understand how to act on the email notifications. Clear internal communication is critical to the success of this feature.
-
External Verification & Reconciliation: It is critical to understand that OPSCOM does not verify real-time flex dollar balances with any external system. Administrators are solely responsible for independently verifying the spent flex dollar amounts with their HR/payroll department and managing any discrepancies or adjustments outside of the OPSCOM system.
Note: this type of payment is treated as a full, successful payment. The system does not have split-payment logic or backend validation of flex balances beyond recording the user's chosen amount.
Stripe Payment Provider Setup
This feature shows how to integrate with Stripe to process credit card payments directly within the system. Its primary purpose is to provide a secure and seamless checkout experience for users while simplifying financial reconciliation for operations. This article is intended for OPSCOM administrators responsible for financial setup.
Setup and Configuration
Admin Portal
To begin the integration, an administrator must setup a payment type in OPSCOM, with will be linked to their Stripe account. This is handled through the central administration portal where you will input your unique credentials.
- Hover over System Configuration > Payments, then click Setup Payment Types.
- Click Add Type.
- Click the Payment Provider drop-down menu and choose Stripe.js from the available options.
Once the provider is selected, you can name the payment type, select applicable user types, and then go to the settings tab.
Now, you have to get the API keys for your Stripe account, and setup webhooks, which can be found on the stripe dashboard, which you should be logged into, from a previous step. Your Publishable Key, and Secret Key, can be found and copied here. You can click on these values to copy them, and paste them into the payment type settings in OPSCOM.
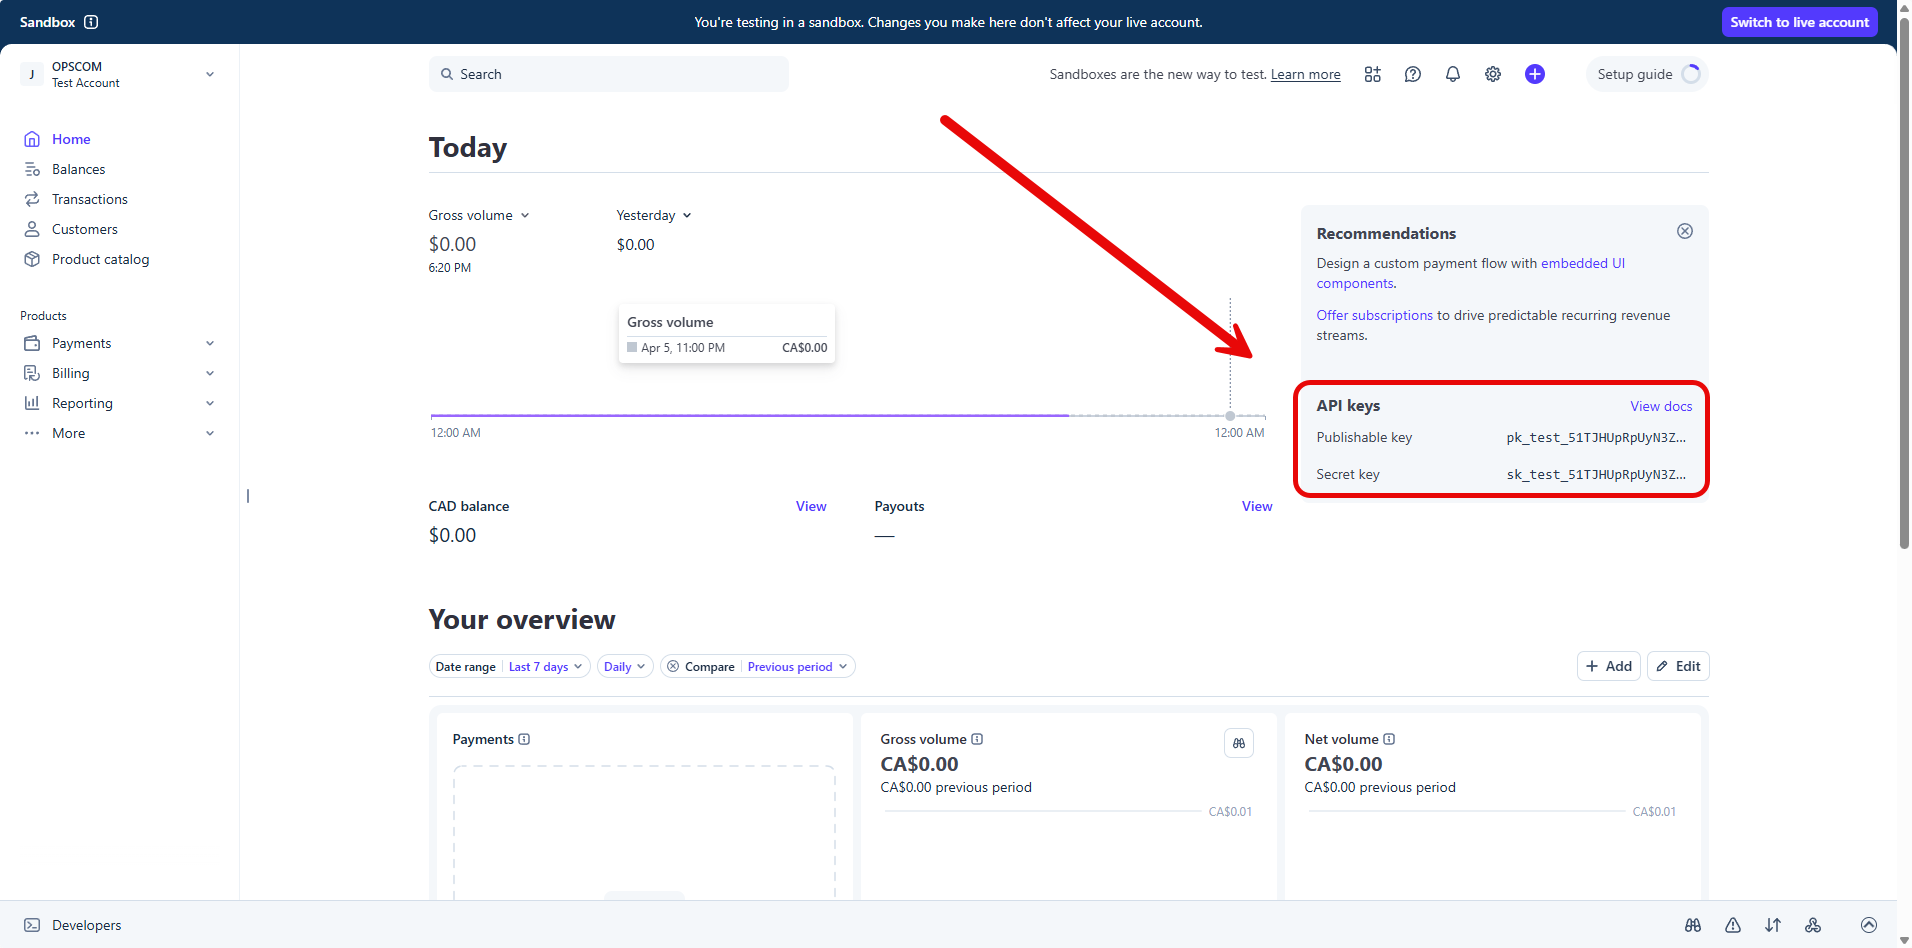
You must provide your unique identification keys. Enter your Stripe public key into the Publishable Key field and your Stripe secret key into the Secret Key field. Only enter the Testing Credentials until you are ready for your users to have access to this.
Take this time to ensure that the Currency setting is correct, in the payment type settings (the default is US dollars). The next steps will be about populating the Webhook ID and Webhook Secret fields, in OPSCOM, with the correct information from your Stripe dashboard.
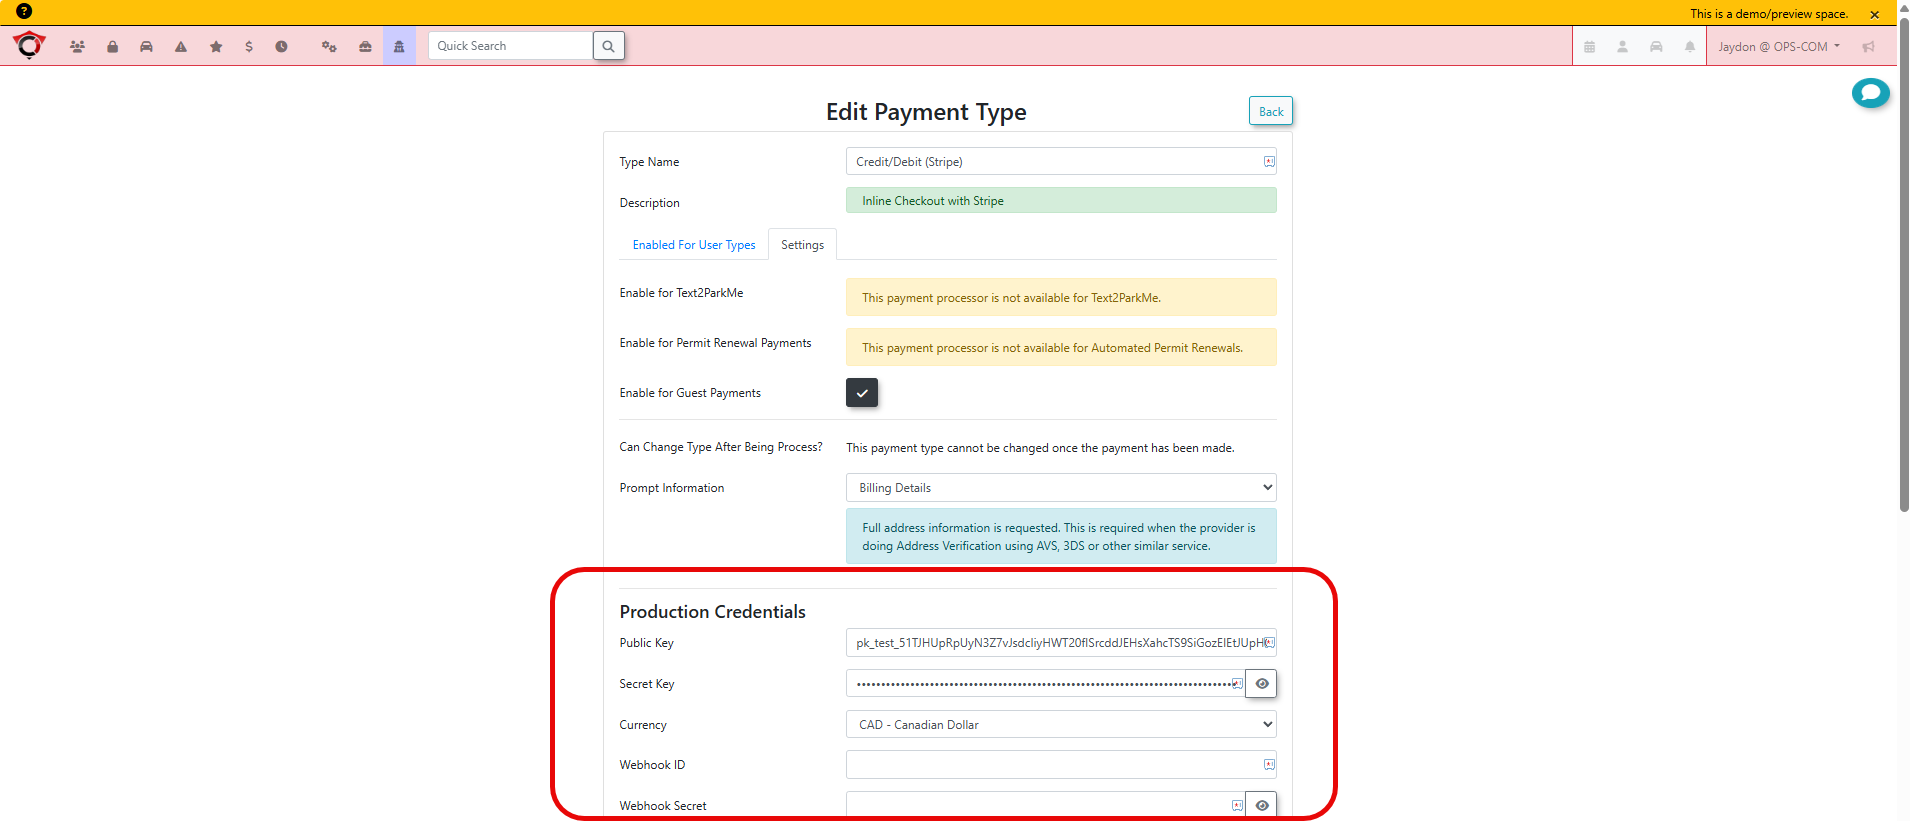
Third-Party Webhook Configuration
Webhooks are essential for Stripe to notify OPSCOM regarding payment successes or refund completions.
Without these Webhooks, the system WILL NOT communicate any transaction information to OPSCOM.
| Sub-section | What it covers |
|---|---|
| Register Your Endpoint | Step-by-step Stripe Dashboard instructions to create an event destination, select event types, and enter the OPSCOM webhook URL |
| Retrieve Your Signing Secret | How to reveal and copy the whsec_ secret, and destination ID into OPSCOM |
| Test Your Endpoint | Stripe CLI commands to forward live test events locally before going live |
| Secure Your Endpoint | Signature verification explanation and IP allowlisting recommendation |
| Manage Event Delivery | Delivered/Pending/Failed status descriptions and how to manually resend events |
Register Your Endpoint
To begin receiving notifications, you must define where Stripe should send transaction data. In your Stripe Dashboard, click on Developers (bottom left) and select Webhooks.
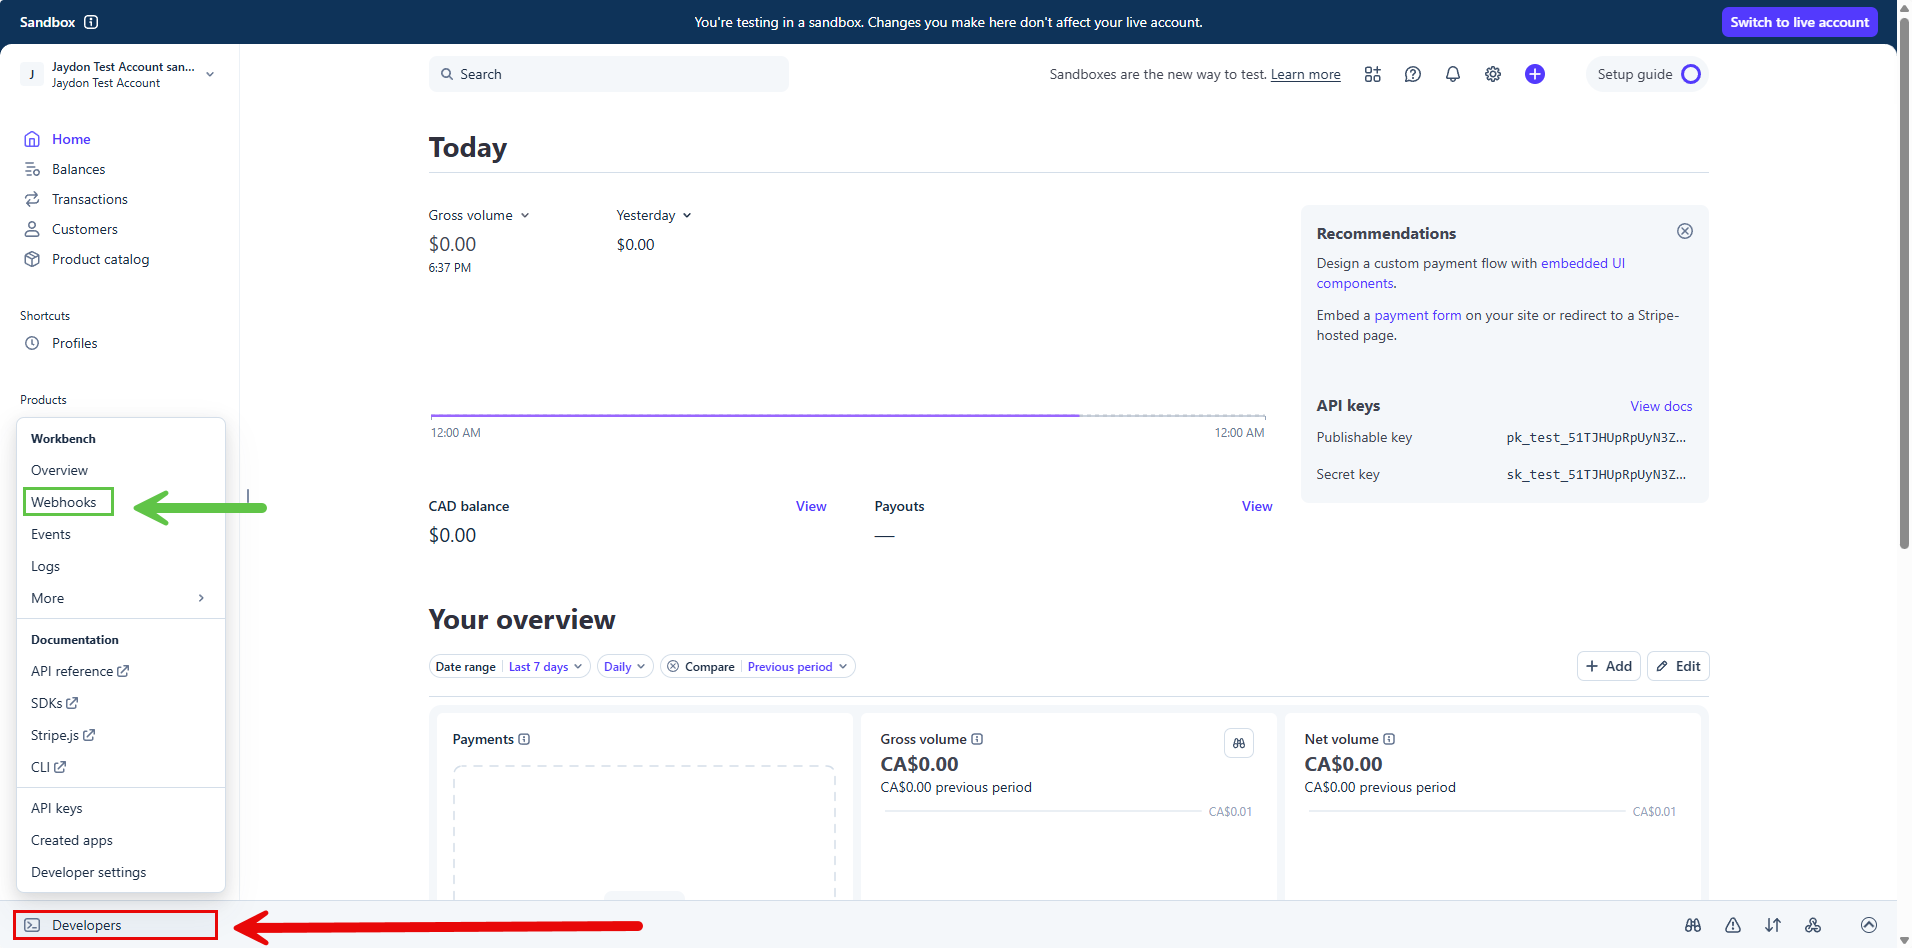
Click the Add Destination button to open the configuration window.
You must select the specific event types the system needs to process. For a standard setup, ensure you select payment_intent.succeeded for successful payments, payment_intent.payment_failed for failed payments, and payment_intent.canceled for canceled payments. Now click Continue.
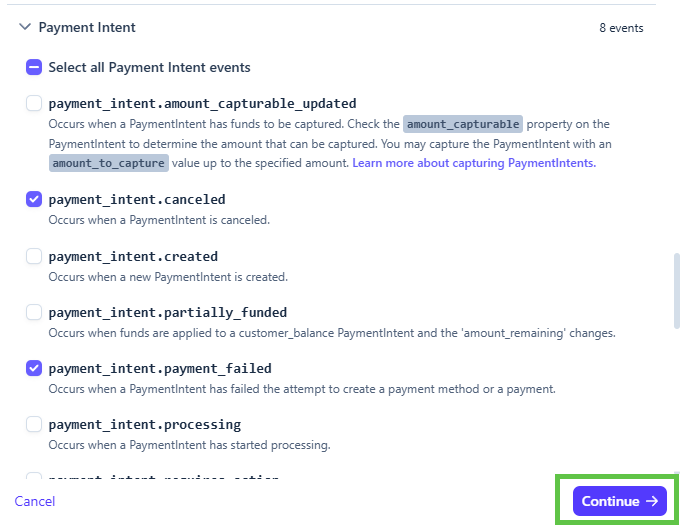
Select Webhook endpoint, and click continue again.
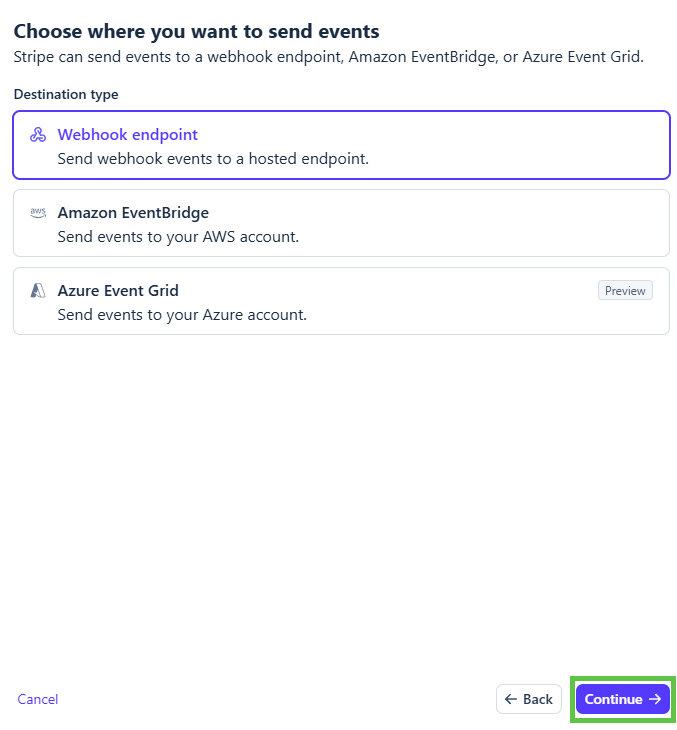
Give the webhook a descriptive name, and in the Endpoint URL field, enter the specific URL provided by OPSCOM, in this format: https://[CLIENTID].ops-com.com/api/system/payments/stripe/callback
Retrieve Your Signing Secret
Once the endpoint is created, Stripe generates a unique security key to verify that the data sent to your server is authentic. On the summary page for your newly created webhook, locate the Signing secret section.

Click Reveal to display the string, which typically begins with the prefix whsec_.
Copy (highlighted in a green box in the picture above!) this entire string and navigate back to your OPSCOM Payment Gateway settings. Paste the secret into the Webhook Secret field. This handshake ensures that OPSCOM only processes legitimate requests from Stripe and ignores any unauthorized attempts to alter transaction data.
Once the endpoint is saved, you'll see the Signing secret, and Destination ID provided by Stripe. Return to your OPSCOM configuration and paste the Signing secret into the Webhook Secret field, and the Destination ID into the Webhook ID field to ensure all incoming data is securely verified.
Ensure that your Webhook Secret is correctly matched between Stripe and OPSCOM to prevent "Pending" status errors on completed payments.
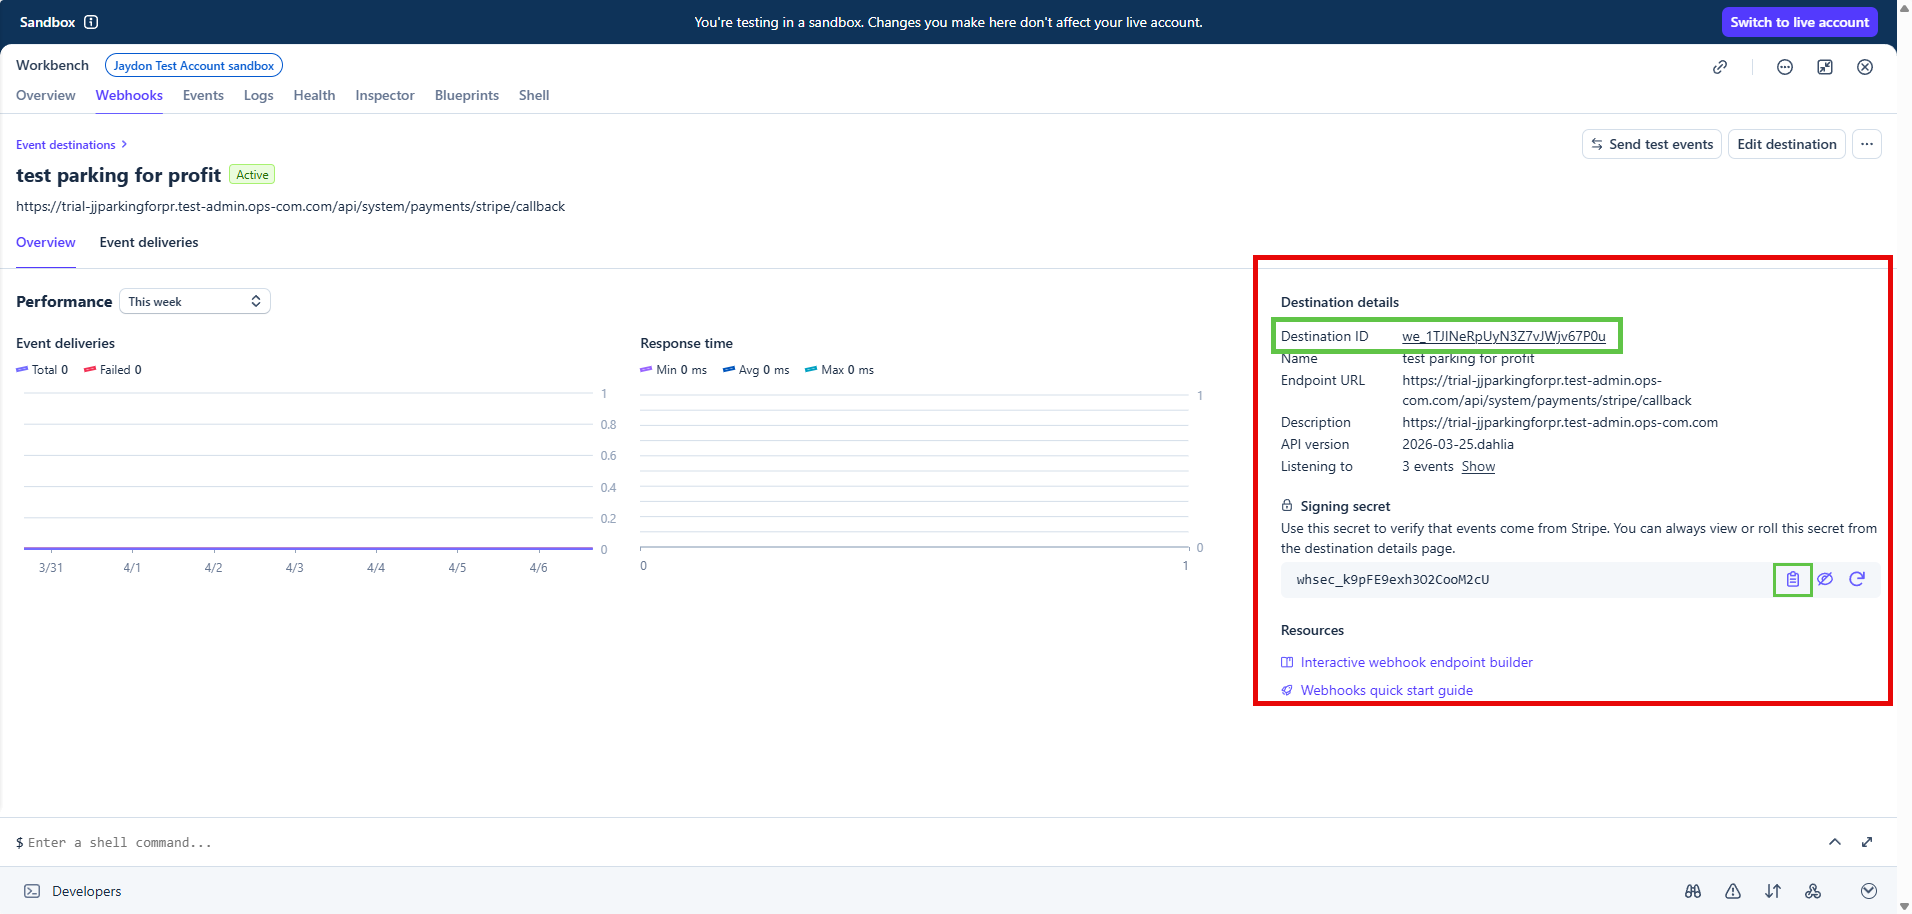
User Experience and Handheld Use
Web Portal Transactions
Users will interact with the Stripe interface during their standard checkout process. When they reach the final stage of a transaction, they simply click the Pay with Credit Card button to open the secure payment form. After they enter the credit card details into the form, they click the Submit Payment button to complete the purchase.
Handheld App — OPSCOM Parking Enforcement
For administrators or staff using handheld units in the field, the process is optimized for touch interaction. Tap Checkout to open the payment summary within the app. From there, tap Select Payment Method and choose Stripe. To prevent accidental charges, the final step requires you to tap and hold the Process Payment button to finalize the transaction.
Managing Transactions and Reports
Administrators can review all processed payments and manage financial returns through the standard reporting interfaces. Hover over Financial Management and click Transaction Reports then Recent Payments to view a live list of activity.
Within this report, the Status column displays the current state of each payment, while the Payment Date indicates exactly when the transaction occurred. If you need more detail, click the View Details icon next to a specific transaction to see the full Stripe receipt.
If a correction is needed, click the Refund Payment button to initiate a return of funds. You will then click the Confirm Refund drop-down menu and choose Full Refund to finalize the reversal.
You can quickly find a specific transaction by using the search bar to enter a user's name or a specific receipt order ID/Confirm Code.
Best Practices and Considerations
- Deployment Testing Organizations should always keep Live Mode disabled during the initial deployment until all testing is verified with test credit card information. It is highly recommended to process a single, small test transaction in Live Mode using a real card before making the payment option available to the general public.
- Security Requirements Maintaining the security of your financial environment is critical. You should never share your Stripe Secret Key or Webhook Secret with anyone or store it in plain text outside of the secure administration configuration screens.
- Change the signing secret periodically, and only subscribe to required event types.
Dispatch Configuration
Managing Dispatch Categories
Dispatch Categories allow administrators to define and classify the types of dispatchable events or incidents (e.g., "Parking Incident," "Security Alert," "Maintenance Request"). This feature is crucial for organizing dispatch logs, streamlining response protocols, and enabling accurate reporting on the nature of dispatched activities.
Using this Feature
The Dispatch Categories Administration page provides a straightforward interface to manage your various dispatch categories.
Click System Administration, Dispatch, and click Manage Dispatch Categories.
Adding Dispatch Categories
- Click the Add Dispatch Category button.
- Type in the Name and click Save Changes.
Editing Dispatch Categories
- Choose the Edit button next to the category you wish to edit.
- Make the changes and click Save Changes.
System-Wide Impact of Edits - When you make changes to a dispatch category that is currently in use by records in the system, these updates will be reflected across the entire system for all associated dispatch logs and related data.
Best Practices & Considerations
- Comprehensive Classification: Define categories that accurately represent all types of dispatchable events your organization handles.
- Clear and Concise Names: Use descriptive and unambiguous names for your categories to facilitate quick understanding and accurate logging by dispatch personnel.
- Impact on Reporting: Dispatch categories are fundamental for generating reports on types of incidents, call volumes, and resource allocation. Accurate categorization ensures meaningful data analysis.
- Training: Ensure that dispatch personnel are well-trained on selecting the correct categories for various events to maintain data quality and reporting consistency.
- Regular Review: Periodically review your dispatch categories to ensure they remain relevant to your current operations and incident types.
Managing Dispatch Sources
Dispatch Sources in OPSCOM allow administrators to define and categorize the origins of dispatch calls or events (e.g., "Phone Call," "Email," "Officer Initiated"). This feature enables better tracking of incident intake, facilitates efficient routing to relevant categories, and enhances reporting on the origins of dispatch activities.
Using this Feature
The Dispatch Category Link Administration page allows you to define where your dispatch calls originate from and link them to relevant dispatch categories.
1. Click System Administration, then Dispatch, and click Manage Dispatch Sources.
Adding a Dispatch Source
- Click the Add Dispatch Source button.
- Type in the Name (e.g., "Walk-In," "Radio," "Internal Alert").
- Select the categories that should be linked to this source from the connected dropdown menu.
- Note: If you want to select all categories, you can left-click on the first category and use CTRL Click to select them all.
- Click Save Changes
Editing a Dispatch Source
- Choose the Edit button next to the source you wish to edit.
- Make the changes and click Save Changes.
Best Practices & Considerations
- Comprehensive Definitions: Define all common methods by which dispatch calls or alerts are received in your organization (e.g., "Emergency Line," "Non-Emergency Phone," "Email," "Mobile App Submission").
- Logical Category Linking: Link each source to all relevant dispatch categories it might generate (e.g., "Phone Call" might link to "Parking Incident," "Security Alert," "Maintenance Request").
- Consistency: Ensure consistent use of defined dispatch sources by all personnel involved in dispatch activities to maintain accurate reporting.
- Reporting Value: Properly categorized dispatch sources are invaluable for generating reports on call volume, types of incidents by source, and identifying trends in how incidents are reported.
- Review Regularly: Periodically review your list of dispatch sources to ensure they remain current and relevant to your operational needs.
Changing the Organization Name Displayed to Parkers
This article describes how to change your organization's display name. This global setting updates the name that appears on the public-facing website and on the screen of all connected handheld units. It also controls the name that appears at the top of violation printouts.
Using this Feature
This is a core system setting and does not require any special configuration to access or modify.
-
Go to System Configuration, and click System Settings.
-
Click General System Settings from the list.
-
Locate the following two fields at the top of the page:
-
Organization Name: Website (This appears on your website)
-
Organization name: Handheld (This appears on your handhelds, and violation notices printed with a handheld)
-
-
Enter the desired display name into each field.
-
Scroll to the bottom of the page and click the Save Changes button.
Best Practices & Considerations
- The Organization name: Handheld setting is a global configuration. The name you enter here will be displayed on all handheld units connected to your system. This setting cannot be changed on the individual handheld devices themselves.
- The Organization Name: Website is a public-facing setting. Ensure the name is spelled correctly and reflects your official branding before saving, as it will be visible to all end-users on your portal.
- For brand consistency, it is recommended to keep the Website and Handheld names the same unless your organization has a specific reason for displaying them differently.