User Types
User Types in OPSCOM categorize your system users (e.g., Student, Staff, Public) and control various aspects of their interaction with the system, including access to specific lots, available payment options, and the fields visible on their profile. Configuring user types allows administrators to tailor the OPSCOM experience to different user groups, ensuring appropriate permissions and functionalities.
Setup & Configuration
User Type configurations are managed through the User Type Administration tool.
- Hover over System Configuration, then Users, and click Types.
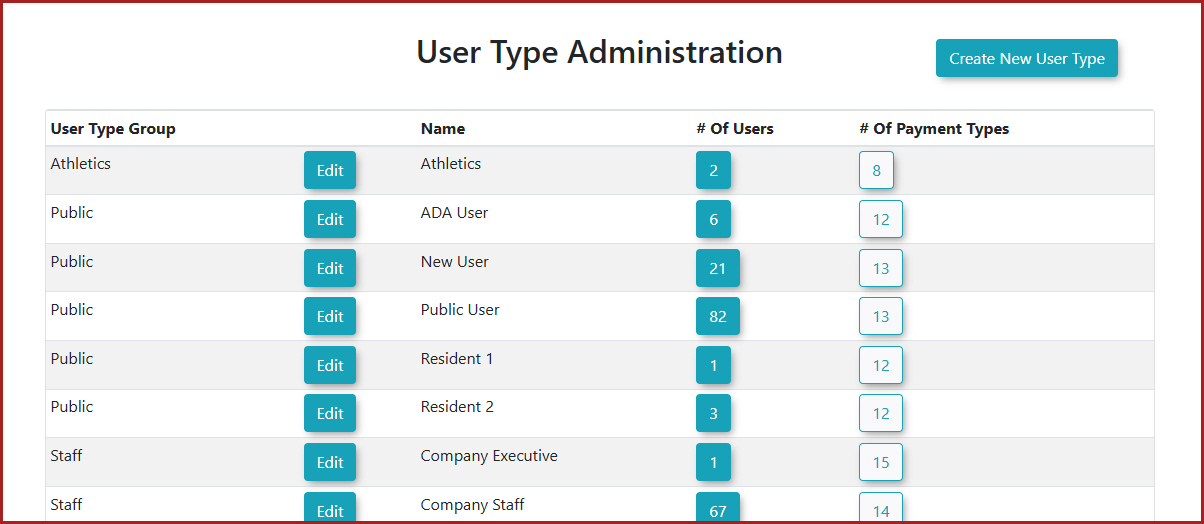
This will open the User Type Administration page, displaying a list of your existing User Types.
Creating a New User Type
- Click the Create New User Type button.
- Enter the Type Name for your new user type (e.g., Public Parker).
- Set the Grouping for this user type. This is crucial as it links to OPSCOM's internal master user categories, which govern access to other system items and the appearance of profile forms. The four main internal categories are:
- Staff
- Student
- Public
- Athletics
New user types must be assigned to one of these categories. These are hardcoded and cannot be changed.
Once saved, your new user type (e.g., Public Parker) will appear in the list.
You can also create user types to allow you to categorize your archived users. Refer to this wiki article to learn about managing archived users by user type.
Using this Feature
Applying a User Type to a User
A User Type can be assigned to a user when their account is created or changed at any time later.
- Hover over User Management and click User Search.
- Search for the user you want to edit.
- Edit the user profile and click the User Type picklist.
- Choose the desired User Type (e.g., Public Parker).
- Click Submit Profile Information, review the submission, and click the Information Correct button.
Searching by User Type
User Types can be used as criteria in various search tools within OPSCOM. You can use the User Search tool or you can click the # of Users button beside the lot to automatically perform a search for this user type.
Searching for Payment Types Assigned by User Type
You can click the # of Payment Types button to immediately see a list of all payment types associated to each user type.
Configuring Access to Lots with User Types
User Types play a critical role in controlling access to parking lots.
- Hover over Parking Management, then Lot Administration, and click Pricing & Lot Admin.
- Click on the Lot Name of the lot you wish to configure.
- On the General Tab, under the Lot Access section, ensure User Type Lot is selected.
- Select the specific user types you wish to allow access to this lot in the Lot Types picklist. Ctrl + Click to select multiple types.
- Scenario Example: For a particular lot, you might allow students and public parkers to purchase permits but restrict access for Staff/Faculty users.
- When viewing the list of lots in Lot Administration, you can click Show/Hide Lot User Types to quickly see which user types a lot is configured for.
User-Side Lot Visibility
When a user logs into the system (e.g., as "Joseph Callaghan" who is a student), and attempts to purchase a permit:
- The system will only display lots that are configured for that user's specific User Type.
- In this example, the user might only see "Standard Permit Lot" and "Text2Park" if those are the only lots accessible to their user type.
Deleting or Archiving a User Type
- A user type can only be deleted or archived if no users are currently assigned to it. You must reassign all users from a user type before it can be removed. Once you have done so, edit the user and click the Delete User Type button.
Best Practices & Considerations
- Align with Organizational Structure: Create user types that directly reflect the categories of individuals interacting with your system (e.g., Faculty, Undergraduate, Graduate, Visitor).
- Control Vehicle Limits: Use the Extra Active Vehicles setting to manage the number of vehicles associated with users, which can impact parking availability and system load.
- Granular Access Control: Leverage user types in Lot Administration to precisely control who can access and purchase permits for specific parking areas, enhancing security and resource allocation.
- Impact on Profile Fields: Remember that the Grouping (Staff, Student, Public, Athletics) you assign to a User Type affects the visibility of fields in the user's profile registration form. For instance, student users might see specific student ID fields that staff users would not.
- Payment Type Restrictions: Utilize the Allowed Payment Types to ensure only relevant payment methods are available to specific user types (e.g., restricting payroll deduction to Staff users only).
- Clear User Communication: Ensure users understand their assigned user type and how it affects their system experience, including visible lots and payment options.
