
Email Templates
The Email Templates feature allows administrators to customize the content and appearance of automated emails sent by the system. Its primary purpose is to enable the creation of dynamic, informative messages using shortcodes and a smart editor, ensuring clear and consistent communication with portal users. This article is intended for OPS-COM administrators responsible for managing system communications and visual design.
Setup and Configuration
This feature is a core administrative tool used to manage outbound email content.
Admin Side: Administrators must have the appropriate system role permissions enabled to access the contents and design configuration menus. If your organization has multiple languages installed, you can click the Create button from the main template list to build localized versions of your messages.
User Side: This feature is strictly a backend administrative tool. End-users interact with the results of this configuration when they receive automated emails (e.g., password resets, appeal updates) in their personal inboxes.
Using this Feature
Administrators can use the following instructions to navigate the template list, edit default automated messages, and create custom templates for manual communications.
Editing Default Email Templates
-
Hover over System Configuration, then Contents & Design, and click Email Templates to view the active list.
-
Locate the specific template you wish to edit in the list.
-
Click the Edit button next to the template to open the dedicated editor interface.
-
Make the desired changes to the available fields and content areas.
-
Click the Save button to apply the changes.
Available Configuration Fields
When editing an email template, administrators must configure the following fields:
-
Label: Enter a descriptive name to easily identify the email template within the system's list.
-
Type: A non-adjustable value that indicates the specific purpose or system trigger for this email template (e.g., "Appeal Submitted," "Password Reset").
-
Language: Select the appropriate language for the template if your system supports options like French or English.
-
Layout: Select a pre-defined layout that surrounds your message. Layouts dictate your email header, footer, and overall styling.
-
Subject: Enter the exact text that will appear as the subject line of the email message.
-
HTML Content: Write the main body of the message here. This smart editor supports rich text formatting, the insertion of images, and the use of shortcodes to create visually appealing emails.
-
Text Content: Enter a plain text version of the message. This serves as a fallback for strict email clients that do not render HTML. It does not support shortcodes or any formatting.
Using Shortcodes
Each email template has a specific set of available shortcodes that allow you to dynamically insert user or event information into your message.
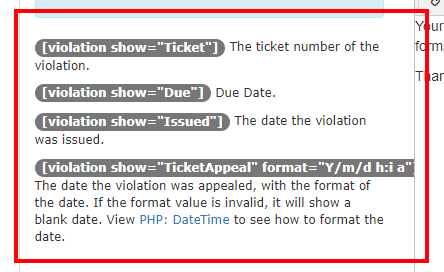
The shortcode tokens are typically displayed on the left side of the template editor. You can insert these directly into the HTML Content editor on the right side. For example, the template for an appeal might offer [ticket_appealed_date] or [ticket_number]. The system automatically replaces these shortcodes with the appropriate information when the email is generated and sent.
Creating and Using Custom Email Templates
Administrators can create and store frequently used emails that are not tied to specific system triggers. These templates automatically populate the email body when manually drafting a message to a user.
-
Click the Create button on the main templates page.
-
Enter a descriptive name into the Label field.
-
Compose the message using the HTML Content and Text Content fields.
-
Click the Save button.
-
Navigate to the compose email page to draft a manual email to a user.
-
Select your new template from the Load Template drop-down menu to automatically populate the email contents.
-
Complete any highlighted required fields in the interface before clicking the Send Email button.
Unlike system-defined default templates, custom templates include a Delete button on their configuration page, allowing you to quickly remove them from the system when they are no longer needed.
Best Practices and Considerations
-
Maximize the use of shortcodes: Utilize shortcodes fully to make your emails dynamic, personalized, and informative. Automating data entry reduces manual effort and prevents potential typographical errors in critical communications.
-
Maintain consistent branding: Use email layouts configured in the Email Headers and Footers section to maintain consistent branding across all system-generated emails. Consistent logos, colors, and contact info create a professional appearance.
-
Populate both content sections: Always ensure both the HTML Content and Text Content sections are populated and convey the message clearly. This guarantees compatibility for all email clients, even those that strip out HTML formatting.
-
Test all templates after editing: After making changes to an email template, send a test email to yourself or a test account. Verify that all shortcodes are rendering correctly, the formatting behaves as expected, and the message is clear.
-
Manage language-specific templates carefully: If your system supports multiple languages, ensure you create and maintain separate templates for each language. When using the Load Template feature for manual emails, remember that custom templates display for all users regardless of the selected language, so ensure the correct version is chosen before sending.