New Client Onboarding
- Enterprise Onboarding Schedule
- Starting your Enterprise Onboarding
- Phase 1 - Learning the Basics
- Setup Checklist
- Phase 2 - Payment Provider Setup
- Phase 3 - Configuration and Admin Options
- Using Your Own Domain - Vanity URL
- Phase 4 - Learning to Use OperationsCommander
- Phase 5 - Final Preparations before Go Live
- Preparing to Import Your User Data
Enterprise Onboarding Schedule
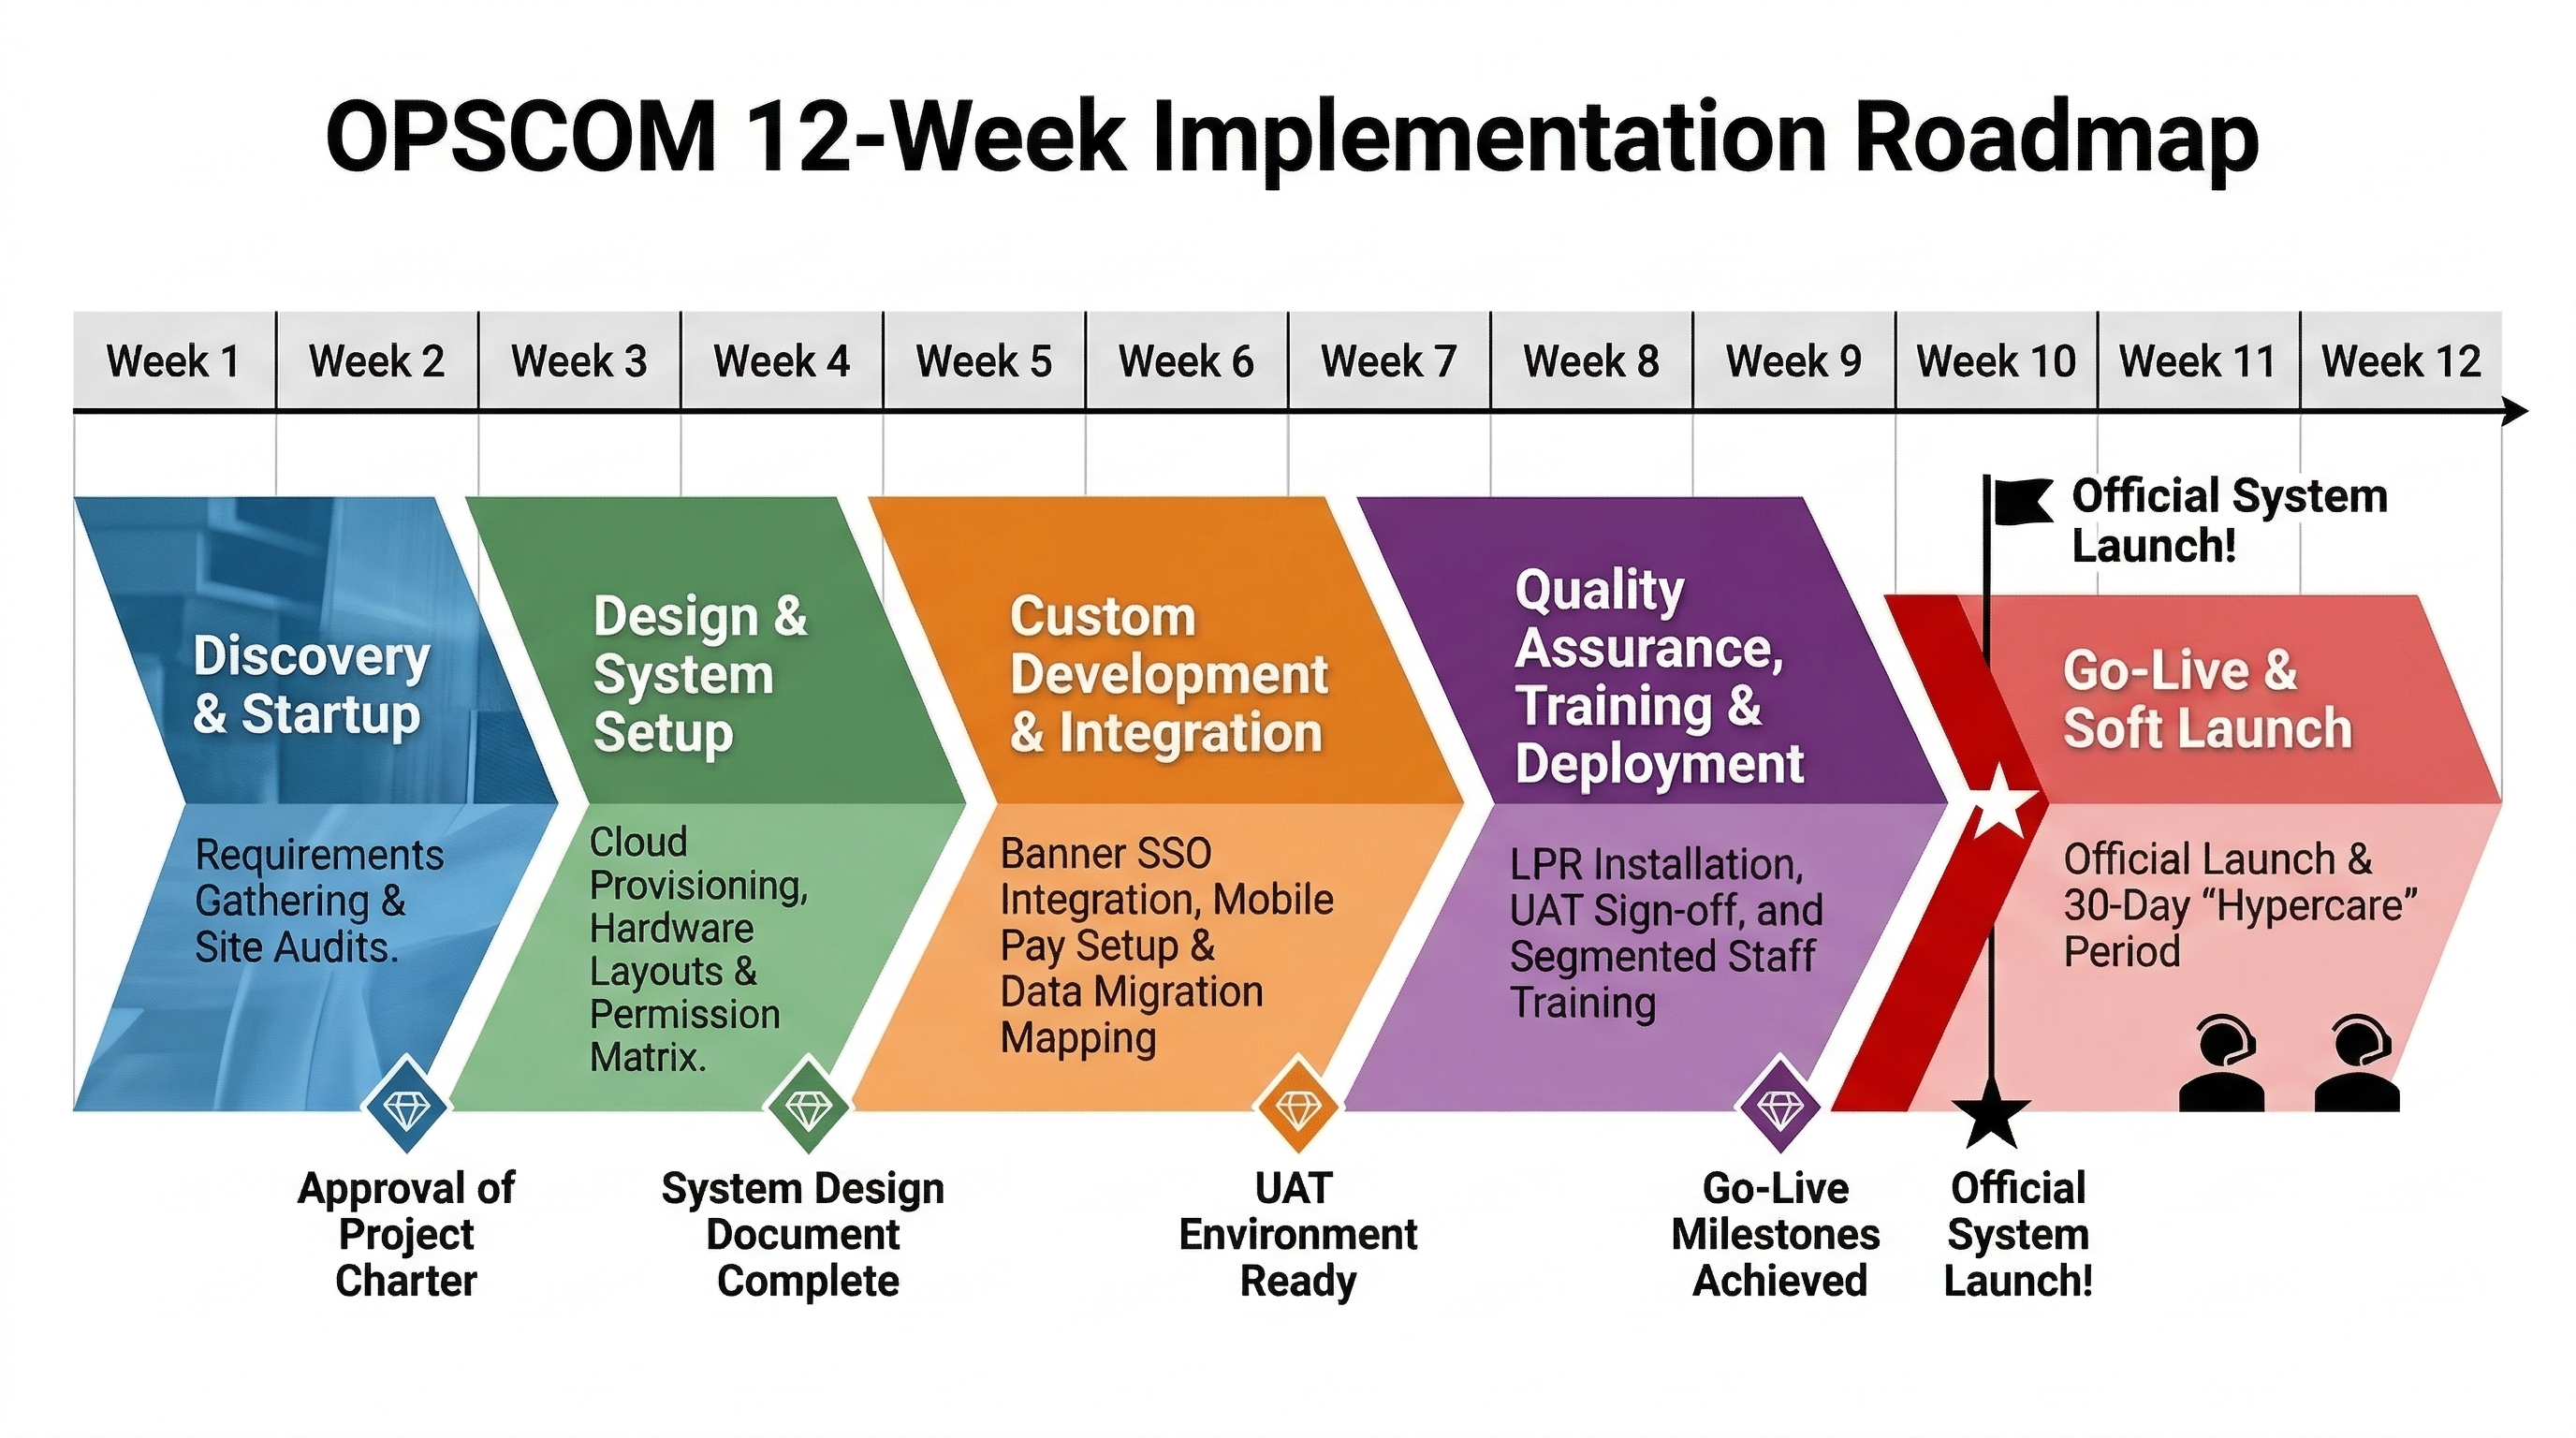
This article outlines the standard 12-week enterprise onboarding process for new OPS-COM clients. It provides an overview of the project phases, from initial discovery through to the final live launch, ensuring administrators understand their responsibilities during the rollout.
Project Phases Overview
The onboarding journey is structured into five distinct phases designed to ensure a smooth and successful system deployment.
Phase 1: Learning the Basics (Estimated: 2 Weeks)
Following the receipt of your signed contract, an OPS-COM representative will initiate the project with a discovery call. This meeting is crucial for aligning expectations and defining project scope.
-
Participate in a project kick-off meeting via Google Meet.
-
Identify and invite relevant team members to discovery sessions.
-
Review the roles and responsibilities of the OPS-COM team and your organization.
-
Receive your system site setup and login credentials via email.
Billing commences immediately upon site creation. All clients are provided with net 30 payment terms.
Phase 2: Standard Component Assembly (Estimated: 2 Weeks)
This phase focuses on the technical and financial foundation of your installation. Your Account Executive and Trainer will guide you through these core configurations:
-
Configure Admin and Client Domains.
-
Determine access requirements for the system.
-
Establish your Roles and Permissions.
-
Create Administrator Accounts.
Phase 3: Tailored Configuration (Estimated: 3-4 Weeks)
In this phase, the focus shifts to tailoring the system to your specific operational needs, including any custom development or data imports.
-
Configure Admin Options, Lots, Permit Options, and Violation Options.
-
Set up System Messaging and User Portal templates.
-
Customize Email Templates.
-
Place orders for necessary Violation stock.
During this phase, you will be introduced to the self-guided training agenda. Use this opportunity to explore your Preview System to gain familiarity with the platform's functionality.
Phase 4: Final Testing (Estimated: 2-3 Weeks)
This is the final testing phase designed to identify any operational needs or system bugs before the public launch.
-
Collaborate with your Training representative to ensure full system comprehension.
-
Attend scheduled live training sessions to walk through key system modules.
-
Conduct comprehensive testing of all installation functionalities.
Phase 5: Go Live (Estimated: 1 Day)
Once all requirements are met and testing is complete, the final launch occurs.
-
Complete all remaining custom requirements.
-
Verify system readiness with your project team.
-
Launch your live site for public use.
This is what a 12 Week Enterprise Onboarding schedule looks like.
Best Practices and Considerations
-
Team Involvement: Ensure the appropriate stakeholders from your organization are involved early in the discovery phase to clarify business processes and expectations.
-
Production vs. Preview: While you should use your Preview System to test and learn, ensure all final configurations are applied directly to your Production environment.
-
Active Participation: The onboarding process is a collaborative effort. Maximize the value of your training sessions by preparing specific questions about your organization's unique operational workflows.
Starting your Enterprise Onboarding
This article outlines the collaborative team structure and initial administrative requirements for new OPS-COM enterprise clients. It is intended for administrators and project leads to ensure all stakeholders are prepared for a seamless system deployment.
Team Accountability
A successful deployment relies on a collaborative approach between your organization and the OPS-COM team. To ensure the system aligns with your specific operational processes, we require clear roles and responsibilities from both sides.
OPS-COM Team Responsibilities
-
Overall Project Manager: Manages the technical deployment, coordinates training, assists with system setup, and ensures all custom requirements are met.
-
Setup and Configuration Specialist: Advises on system best practices, shares solutions from other clients, and assists in mapping your current business processes to the system. You will receive a document containing business requirement questions that must be completed before the configuration phase begins.
-
Trainer and Support Liaison: Provides system training and introduces you to post-launch support processes.
Client Responsibilities
Every client must designate an internal Project Manager—often the Parking Manager—who understands your business goals and can dedicate time to the project. This person is responsible for assembling the following team:
-
IT Contact: Manages Single Sign-On (SSO) and system integrations.
-
Hardware Contact: Manages handheld devices, printers, and cameras.
-
Financial Contact: Manages hosted payment details and billing information.
If your organization is unable to provide a dedicated Project Manager, one can be provided by the OPS-COM team for an additional fee.
Setup of Customer Account and Billing
Once your contract is signed, you will be initialized in our billing system and receive a welcome email containing your account details. To finalize your account setup, please provide the following:
-
Accounts Payable Contact: Provide a name, email address, and telephone number.
-
Main Project Contact: Provide a name, address, email address, and telephone number.
-
Departmental Contacts: Provide the names and email addresses for your IT, Hardware, and Financial contacts.
-
Purchase Order Number: Provide this if applicable to your organization.
Security and Support
Communication of Security Information
We prioritize data safety and system security. If your IT department requires documentation regarding our security protocols, please share the OperationsCommander Security White Paper. If further information is required, email support@ops-com.com to arrange a consultation with our security specialist.
Utilizing OPS-COM Support
Our support team is dedicated to your success throughout the rollout process. You will be directed to communicate various setup requirements and questions directly to support@ops-com.com. Do not hesitate to reach out to this address for assistance throughout your deployment.
Best Practices and Considerations
-
Active Participation: Your Project Manager must be available to attend the Project Kickoff, as well as all subsequent training and setup sessions.
-
Preparation: Complete all pre-configuration questionnaires promptly to ensure your project timeline stays on schedule.
-
Integration Planning: Engage your IT Contact early in the process to ensure all technical requirements, such as SSO or hardware integrations, are identified before the configuration phase begins.
Phase 1 - Learning the Basics
Welcome to OperationsCommander! We are delighted to have you on board as you begin your journey toward seamless parking management. We believe in making every step a delight, and these first steps are designed to be intuitive and efficient. Please click on any of the titles below to discover more information and proceed with your setup.
Admin and Client Domains
Your OperationsCommander platform consists of two distinct portals:
-
Admin Portal: Accessed via
yourdomain.OPSCOM.com/admin. This is where administrators manage system operations. -
User Portal: Accessed via
yourdomain.OPSCOM.com/u. This client-facing site should be shared with your end-users.
You can customize the User Portal by adding your organization’s logo and colors to ensure it aligns with your brand. Reference this URL in all client-facing communications.
First Time Login and Orientation
Upon your initial login using the credentials provided by the OPS-COM team, you will be greeted by the Admin Dashboard.
-
Secure Access: The initial account provided is configured for the highest level of access and should be reserved for high-level administrators only.
-
Setup Checklist: Use the built-in Setup Checklist on your Admin Dashboard to ensure all essential settings are configured correctly before moving to the next implementation phase.
-
Training Materials: Access the Learn Dash Training Materials directly from your dashboard to begin your onboarding journey
System Environments
OperationsCommander provides two separate environments to ensure system stability and operational integrity:
-
Production Site: Your live environment used for actual daily operations.
-
Preview Spaces: A secure, isolated testing environment that mirrors your Production data. Use these spaces as a sandbox to test new features, stage configuration changes, or conduct staff training without impacting your live operations.
Learn more about Preview Spaces and Production Sites here.
Access and Security Configuration
Administrators can tailor system access to fit unique organizational needs.
-
Roles and Permissions: Use Roles to group specific permissions and restrict access to information or features. Admins can be assigned multiple roles to provide the exact level of access required for their job function (e.g., a Patrol Officer role).
-
Creating Administrator Accounts: Upon setup, one master administrator account is provided. To add additional administrators, follow the steps outlined in the Creating Administrator Accounts wiki article.
-
Admin Dashboard Customization: You can edit the landing page of the Admin Portal to display critical information for your team, such as Pricing Information, Contact Information, Scheduling Information, Organizational Information, or Legal Notices.
Best Practices and Considerations
-
Training: Utilize the OPSCOM Wiki and Training modules to transition your staff to the new system at their own pace.
-
Security: Ensure the master account provided during setup is limited to authorized high-level personnel to maintain system security.
-
Testing: Always perform functional testing and staff training within your Preview Spaces before applying changes to your Production site.
Setup Checklist
The Setup Checklist is a central tool designed to guide new OPS-COM administrators through the critical process of configuring a new site. This article helps administrators prioritize essential configuration tasks and system messaging updates required for a successful launch.
Understanding the Setup Checklist
The Setup Checklist categorizes necessary tasks by priority to help you focus your efforts efficiently.
-
Important: Critical configurations that must be completed for system functionality.
-
Moderate: Recommended configurations to optimize your system setup.
-
Minor: Optional adjustments to further refine your site's design and user messaging.
The checklist can be expanded to display all configuration and page update tasks that a new user should consider during the onboarding process.

Using this Feature
Administrators can use the checklist to navigate directly to the areas requiring attention, streamlining the setup workflow.
1. Click on any section within the Setup Checklist to expand the list and view specific tasks.
2. Click the Edit button associated with a task to be brought directly to the relevant configuration or page update screen.
Best Practices and Considerations
-
Prioritize Tasks: Focus on completing items labeled as Important first to ensure your production system is functional before moving on to moderate or minor refinements.
-
System Messaging: Use the Edit button within the messaging sections to ensure your portal communications, disclaimers, and email templates are tailored to your organization’s needs.
-
Regular Review: As you progress through your onboarding, revisit the Setup Checklist to track your completion status and identify any remaining configuration gaps.
Phase 2 - Payment Provider Setup
This article outlines how OPS-COM administrators can implement Hosted Payments to securely manage financial transactions within the OperationsCommander system. It is intended for administrators responsible for configuring payment processing and managing organizational payment policies.
Setup and Configuration
Hosted Payments allow a third-party payment processor to handle sensitive credit card information directly, providing an essential layer of security by ensuring that payment data is never stored within the OperationsCommander environment.
-
Contact your Account Executive to initiate the setup process with one of our integrated hosted payment providers.
-
Once your provider account is established, navigate to the specific configuration steps for your chosen provider.
-
Consult the Managing Payment Types wiki article to complete the configuration for your specific payment method.
Integrated Payment Providers
OPS-COM seamlessly integrates with the following hosted solutions:
Using this Feature
Administrators have comprehensive control over how payments are processed and who can access specific payment methods.
Managing Payment Types
The Managing Payment Types section allows you to customize available payment methods based on your organization's financial policies.
-
Define new payment options.
-
Assign specific payment methods to User Types (e.g., Staff, Students, or the Public).
-
Configure payment methods for recurring subscriptions or guest checkout scenarios.
Guest Payments
Guest Payments (QuickPay) provide a streamlined experience for users, allowing them to look up, appeal, or pay citations without requiring an account login. This reduces administrative overhead and increases user satisfaction.
To finalize your payment configuration, you will need to proceed with the tasks outlined in Phase 3 Config & Admin Options.
Best Practices and Considerations
-
Security: Always utilize Hosted Payments whenever possible to minimize your organization’s exposure to sensitive credit card data.
-
Consistency: Ensure your payment types are correctly mapped to the appropriate User Types to maintain accurate financial reporting.
-
Planning: Coordinate with your Account Executive early in the deployment process to ensure your chosen payment provider is configured to meet your organization's specific billing cycle and policy requirements.
Phase 3 - Configuration and Admin Options
This article provides OPS-COM administrators with a roadmap for Phase 3 of the system implementation. During this phase, you will configure core operational settings, customize user-facing portals, and prepare your enforcement modules for deployment.
Setup and Configuration
Phase 3 focuses on tailoring the system to your organization's specific business processes. Administrators should focus on the following key areas:
-
User Types: Categorize your users (e.g., Student, Staff, Public) to define distinct parking rules, permissions, and system functionalities.
-
User Profile Settings: Adjust the visibility and requirements of profile fields to collect necessary information from users during registration.
-
Vehicle Configuration: Define the vehicle description parameters your organization needs to track for enforcement and permitting purposes.
-
System Settings Customization: Utilize the centralized System Settings area to fine-tune core functionalities, including general parameters, security protocols, and module-specific behavior for parking, violations, and payments.
-
User Portal Branding: Configure your Default Site Logo and Default Site Header to ensure your branding remains consistent across all user-facing interfaces.
-
Email Templates: Use the smart editor to customize automated email notifications, ensuring communication with your users is clear and professionally branded.
-
System Messaging: Review and update priority messages and elements across the User Portal, including:
-
System Messages/Pages: Login, Permits, and User Registration.
-
System Messages/Messages: Admin Dashboard, The Vehicle Disclaimer, and The Permit Disclaimer.
-
Email Headers and Footers: Customize your Header and Footer templates.
-
Email Templates: Review Lost Password and User Receipt templates.
-
Module-Specific Setup
ViolationAdmin Setup
To configure the ViolationAdmin module, you must complete the following mandatory tasks:
-
Setup Ticket Categories.
-
Setup Offence Items.
-
Setup Locations.
Violation Stock Management
If your organization uses printed tickets, coordinate with your Account Executive to approve the ticket design.
-
If sourcing your own stock, allow 4–6 weeks for printing and shipping.
-
Order your stock early to avoid deployment delays.
Handheld Enforcement
Review the Handheld Training documentation before meeting with your Training Coordinator to ensure you are prepared for practical instruction.
Data Imports
If you are transitioning data from a legacy system, ensure your data is cleaned and formatted correctly. Refer to the Preparing to Import your Data wiki article for detailed requirements.
Best Practices and Considerations
-
System Integrity: Before proceeding to live payments, run a Penny Test to verify that your transaction flow and payment processing are functioning correctly.
-
Standardization: Ensure all System Messaging and Email Templates are thoroughly reviewed for tone and accuracy before your go-live date.
-
Advanced Configuration: While this article provides a high-level overview, refer to the full Setup and Configuration section of the wiki for granular instructions on each module.
Using Your Own Domain - Vanity URL
OPS-COM supports the use of vanity URLs, allowing organizations to maintain consistent branding by using their own custom domain for portal access. This article is intended for OPS-COM administrators who wish to configure a custom domain or subdomain for their user and admin portals.
Setup and Configuration
Before beginning, please note that not all service levels include this option and additional fees may apply. Contact your Sales Representative at sales@ops-com.com for confirmation regarding your account eligibility.
Domain Requirements
You may use any legal and registered domain that your organization owns or controls.
-
Domains and subdomains cannot contain spaces.
-
Character strings are case-insensitive.
-
Subdomains may consist of a combination of A-Z, 0-9, and hyphens.
DNS Configuration
The setup process involves pointing a CNAME record at the OPS-COM server. Refer to the table below for the appropriate DNS entry based on your preferred configuration:
| Option |
Format |
DNS Entry |
Notes |
| 1 | yourdomain.com | @ CNAME <client>.OPSCOM.com | Points the entire domain to your OPS-COM installation. |
| 2 | subdomain.yourdomain.com | subdomain CNAME <client>.OPSCOM.com. | Points a specific subdomain to your OPS-COM installation. |
Using this Feature
Once your DNS records are configured, the vanity URL will be used to access your portals.
Resulting URLs
Depending on your chosen configuration, your portal access links will appear as follows:
-
Option 1 (Domain):
-
User Portal: https://yourdomain.com
-
Admin Portal: https://yourdomain.com/admin
-
-
Option 2 (Subdomain):
-
User Portal: https://subdomain.yourdomain.com
-
Admin Portal: https://subdomain.yourdomain.com/admin
-
Implementation Process
-
Email support@ops-com.com to inform the support team of your chosen registered domain or subdomain.
-
Receive the specific connection details from the OPS-COM team.
-
Add the required CNAME record to your organization's DNS settings.
-
Notify the support team once the DNS update is complete.
-
Wait for the installation of a secure SSL Certificate (provided via Let's Encrypt), after which your domain will be active.
Best Practices and Considerations
-
Certificate Registration: SSL security is a requirement. Once your subdomain points to our servers, the certificate request can be processed. Ensure your IT team is prepared to assist with DNS updates to minimize downtime during this transition.
-
Planning: Since this process requires coordination between your IT department and our support team, initiate this request early in your implementation timeline to ensure your branding is ready for your official system launch.
Phase 4 - Learning to Use OperationsCommander
This article provides OPS-COM administrators with an organized curriculum for mastering the OperationsCommander platform. The self-guided training is structured into modules to facilitate a comprehensive understanding of the system's core functional areas.
Training Overview
Following the completion of your initial system setup, you may begin your training journey. These resources are designed to help you navigate administrative tasks, enforcement workflows, and financial management efficiently.
If you require more in-depth guidance, paid training sessions are available. Please email support@ops-com.com for assistance or to coordinate a specialized training session for your team.
Training Modules
User Management
This module covers the lifecycle of user accounts, including registration, profile management, and communication.
- Manage your Payment Methods & Subscriptions (User Portal)
- How to Make a Payment in Your User Profile (Or as a guest)
Permit & Lot Management
Master the administration of parking lots, permit sales, and automated renewal workflows.
-
Setting Up A Lot To Be Visible and Available To The End User
-
Rollover: Auto Selection and Automatically Processing Payments
Violations & Enforcement
Learn to effectively manage parking enforcement, citation issuance, and license plate recognition technology.
Payments
Best Practices and Considerations
-
Self-Paced Learning: Progress through these modules at a speed that suits your team's operational needs.
-
Hands-on Experience: Apply the concepts learned in each module directly to your Preview System to reinforce your understanding without affecting live production data.
-
Support: Keep support@ops-com.com as a primary contact for technical questions or to request additional training resources as you gain proficiency.
Phase 5 - Final Preparations before Go Live
This article serves as a final checklist for OPS-COM administrators prior to the official system launch. Following these steps ensures your production environment is fully configured, tested, and ready for public use.
Pre-Launch Checklist
Before proceeding to go live, perform a comprehensive review of your system settings and user-facing portals.
-
User Portal Review: Conduct a final walkthrough of the User Portal to ensure all branding, messaging, and layout elements are presented exactly as intended for your customers.
-
Experience Testing: Create a test user account and log in via the portal to experience the platform from the customer's perspective.
-
Payment Verification: Perform a Penny Test to confirm your payment provider integration is active and processing transactions correctly.
-
Violation Module Configuration: Verify that all Offences and Locations are correctly set up if you intend to issue citations.
-
Permit and Locker Sales: Ensure your Sales Windows are properly configured for all permits and lockers you intend to offer.
-
Enforcement Readiness: Confirm that all Lot Zones are established if your operations include parking enforcement.
Support and Troubleshooting
If you encounter any issues or have concerns while completing these final preparations:
-
Capture a clear screenshot of the specific error or area of concern.
-
Email the screenshot and a description of the issue to support@ops-com.com.
Thoroughly testing your Sales Windows and Penny Test is critical. Do not move to a live launch until you have successfully verified that both your payment processing and permit sales workflows are fully operational.
Best Practices and Considerations
-
System Familiarity: Ensure your administrative team is comfortable navigating the system and that they have reviewed the Phase 1 Learning the Basics training materials prior to launch.
-
Data Integrity: Double-check that any imported data from legacy systems is appearing correctly in your production environment.
-
Documentation: Maintain a list of internal contacts for your IT, Hardware, and Financial departments so you can quickly resolve any issues that may arise immediately following the go-live date.
Preparing to Import Your User Data
This article provides OPS-COM administrators with the requirements and best practices for importing existing user data into the system. Proper data preparation is essential for a successful migration and ensures all user profiles, vehicles, and permits are correctly associated within OperationsCommander.
Data Preparation Strategy
Before initiating an import, ensure your data is clean and your strategy is clearly defined.
Clean Data
Export your data from your legacy system and perform a thorough cleanup:
-
Remove duplicate entries.
-
Correct typographical errors.
-
Standardize formatting (e.g., date formats, capitalization, and phone numbers).
Data Strategy
Define your User Management strategy before starting the import process:
-
Unique ID: Select a Unique ID (e.g., email address, username, or student/staff number). This ID is mandatory for stacking data and associating future records (like vehicles or permits) to the correct user. Ensure this ID is never duplicated.
-
SSO: If your organization utilizes Single Sign-On (SSO), determine your required login source.
-
Mandatory Fields: Identify which user profile details are required.
-
System Configuration: Ensure the following areas are configured in OperationsCommander before importing:
-
User Types
-
Lots
-
Vehicle types, colors, and makes
-
Login sources
-
User profile settings for mandatory fields
-
Data Mapping
To ensure successful imports, your CSV file headers must match the system's expected attributes.
-
Review the Request Object Attributes section in the API documentation to identify the Possible Names and Limits for every field you intend to import.
-
Ensure your CSV column headers align exactly with these attribute names.
-
Build your CSV file, ensuring that all Required fields, such as unique_id, adhere to the specified character limits.
-
Follow the steps in the Using the Database Importer (Beta) guide to begin the upload process.
| Unique ID | String | 50-character alphanumeric including dashes. | unique_id | (Required) An unique identification number of the user. |
Building on Your Data
Once your initial user import is complete, you can begin adding related data.
-
Use the Unique ID established during the user import to associate subsequent records (such as Vehicles or Permits) to the correct user profile in future CSV uploads.
Post-Import Actions
After the import process concludes, perform the following steps to ensure data integrity:
-
Verification: Perform a spot-check of various user profiles and vehicle records to confirm that all information migrated accurately.
-
Error Log Review: Monitor your email for the post-import error log. This document is critical for identifying and troubleshooting any records that failed to import.
Data imports can be complex and may incur additional costs. Please contact your Account Executive or email support@ops-com.com to confirm whether a data import is included in your system purchase or to learn more about the Data Importer (BETA) tool.
Best Practices and Considerations
-
Data Integrity: Prioritize the accuracy of your Unique ID, as this is the foundation for all future data associations in the system.
-
Consultation: Reach out to the support team if you are unsure about mapping specific fields or encounter unexpected errors during your initial import tests.