
What does a refund look like in the system?
The refund process allows OPSCOM administrators to reverse completed transactions directly from a user's profile. This feature helps administrators return purchased items (like permits or lockers) back to active inventory or reverse payments for accounting purposes, such as handling Non-Sufficient Funds (NSF). This guide is intended for OPSCOM administrators responsible for financial processing and user account management.
Setup and Configuration
Processing refunds is a core administrative function that does not require any additional system setup or configuration. It is accessed entirely through the individual user's profile.
Using this Feature
Administrators interact with the refund feature by locating the original transaction in the user's history and initiating a reversal.
Processing a Refund
-
Search for and open the target user's profile.
-
Click the History tab and select All Records.
-
Locate the specific transaction you wish to refund.
-
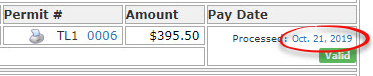
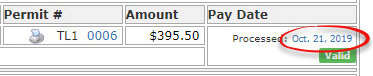
For standard permits, temporary permits, or lockers, click the Processed date link.
-
-
For violations, click the Processed text link.
-

-
-
Click the Refund button on the Transaction Details screen to open the refund window.
-
Enter an internal Requisition Code if required by your organization (this is optional).
-
Enter the total Refund Amount, ensuring you include applicable taxes.
-
Enter a required justification in the comment field.
-
Click the Refund Payment Record button to proceed, and accept any on-screen confirmations to continue.
-
Select the desired refund type from the Adjustment Information window.
-
Click the Process This Adjustment button to finalize the transaction.

Visual Cues and Status Indicators
Once the refund is processed, the system updates the user's profile to reflect the changes:
-
Transaction Details: The refunded amount will appear as a negative adjustment (e.g., $-395.50) on the transaction record.
-
User History: Under the History tab (All Records), the original purchase will display a Released date alongside a note indicating the item was "Released back to system by refund process." The financial transaction will also be logged under Adjustment Records.
Handling NSF Payments
Sometimes, a payment fails after it is recorded (e.g., a bounced cheque, known as Non-Sufficient Funds or NSF). Administrators must "refund" this payment in the system to create an outgoing record that neutralizes the failed incoming payment, keeping financial reporting accurate.
-
Payment Type: Always select the identical payment type (e.g., Cheque) as the original failed payment when processing an NSF refund. This ensures the Processed Payment Report accurately reflects the attempt and the subsequent removal of funds.
-
Clear Notes: Always leave comprehensive and detailed notes documenting the failed payment. This creates a transparent audit trail for anyone reviewing the accounting later.
Ensure you are certain about releasing all items on a transaction before clicking the Refund Payment Record button. Once a permit is released back to inventory, it can be purchased immediately by another user.
Best Practices and Considerations
-
Partial Refunds: Refunding an entire transaction reimburses all items associated with that confirmation number and releases them back into inventory. If you only need to reimburse a single item from a multi-item purchase, process an adjustment instead of a full refund.
-
Item Status After Refund: Refunding a permit or locker releases the item back to the general inventory to be sold again. Refunding a violation does not cancel the ticket; it simply returns the violation to an "awaiting payment" status.