
Electronic Fund Transfer Configurations
The Electronic Fund Transfer (EFT) feature allows administrators to export batch payment data into a flat file for external bank processing and subsequently reconcile the returned transaction statuses. Its primary purpose is to seamlessly manage recurring subscriptions or bulk payments directly through your banking institution. This article is intended for OPSCOM administrators.
Setup and Configuration
If your organization plans to use EFT as a payment method, you must configure your specific bank client number in the system. This identifier is provided by your banking institution (e.g., Royal Bank of Canada) and dictates where the funds will be deposited.
Tomahawk Assistance: Depending on your initial onboarding process, the Tomahawk support team may have already entered this information for you.
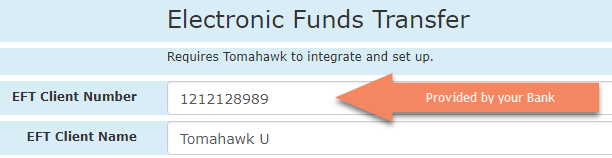
To verify or update this configuration:
-
Hover over System Configuration and click System Settings.
-
Scroll down to locate the Payments section.
-
Enter your bank-provided client number into the appropriate EFT configuration field.
-
Save your system settings.
Using this Feature
The EFT workflow consists of two main administrative phases: generating the export file to send to your bank, and later updating the system based on the bank's transaction report.
Creating EFT Files for the Bank
Once user subscriptions are properly set up and you have performed a system rollover, you can generate the flat file containing the pending EFT information.
-
Hover over Payments and click EFT Export.
-
Download the generated flat file.
-
Submit this file to your banking representative for processing according to your institution's specific procedures.
Marking EFT Items as Paid or Failed
After your bank processes the flat file, they will provide you with a return report detailing which submitted payments were successful and which were declined (e.g., due to insufficient funds). You must manually update these statuses in OPSCOM.
-
Hover over Payments and click EFT Process.
-
Review the list of pending transactions on the Electronic Funds Transfer Process window.
-
Adjust the state for each payment using the available checkboxes.
-
Click the Mark as Indicated button to finalize the process and update the system records.
Available Actions and States:
-
Waiting: This is the default status of all newly exported payments. If a specific payment has not yet been fully processed or confirmed by the bank, leave the record in this default waiting state.
-
Paid: Enable the Paid checkbox to mark the transaction as successfully processed and deposited.
-
Failed: Enable the Failed checkbox if the payment was returned, declined, or flagged as NSF by the bank. Selecting this action will automatically return the specific item to the user's profile as awaiting payment and archive the failed transaction record.
Best Practices and Considerations
-
Prompt Reconciliation: Always process your bank's return report in OPSCOM immediately after receiving it. Delaying the EFT reconciliation process can result in users continuing to hold active permits despite having failed payments on their accounts.
-
Bank Compatibility: The standard flat file generated by the EFT Export tool is specifically formatted to align with the Royal Bank of Canada (RBC). If you are using a different banking institution, please contact support@ops-com.com to confirm compatibility or discuss custom formatting options.