
Banner Report
Setup and Configuration
There is no specialized system configuration required to access this report, provided your institution utilizes a Banner system for student or staff financials. Generating the report is a standard administrative function available to users with the appropriate financial reporting and payment management permissions enabled on their account profile.
Using this Feature
Administrators can use this tool to define the payment batch parameters, export the data for Banner, and mark the items as resolved in OPSCOM.
Generating and Exporting the Report
-
Hover over Payments and click Banner Report.
-
Select the demographic you wish to report on from the User Types drop-down menu.
-
Select the specific item you are processing (e.g., yearly permits) from the Choose Item Type drop-down menu.
-
Select the end date of the billing period using the Up To and Including date picker.
-
Enter the appropriate payment identification code into the Banner Code field (e.g., 100).
-
Enter the exact item representation code into the Detail Code field (e.g., YP2020).
-
Enter your specific administrator ID into the Admin Code field to track who is making this payment report.
-
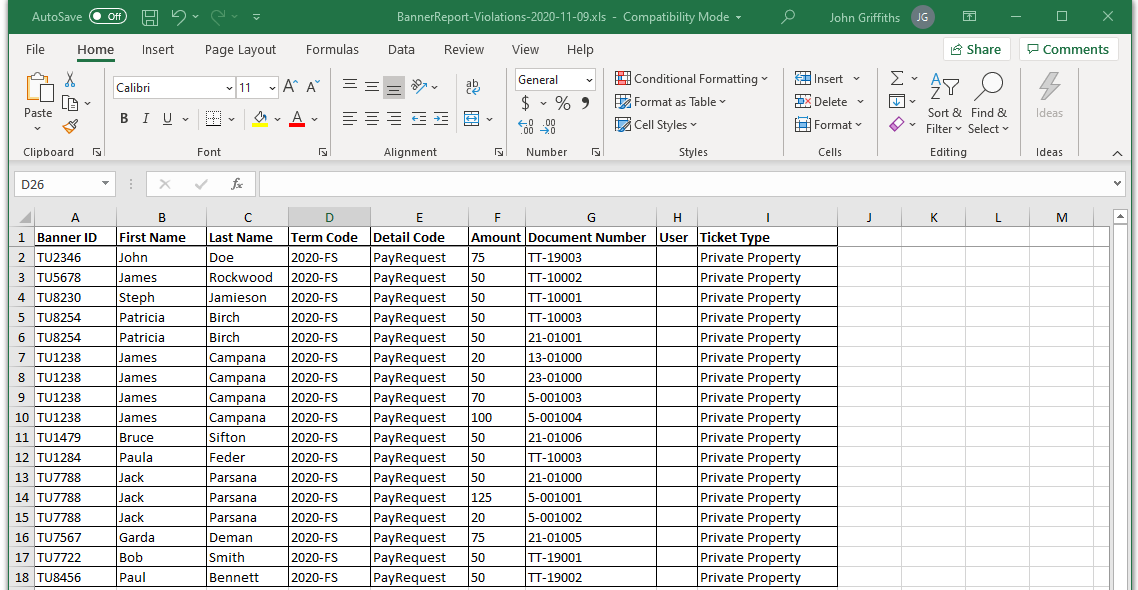
Click the Export to Excel button to download a spreadsheet of the selected names and payments. This file can then be imported directly into Banner to facilitate payment through central student or staff accounts.
Marking Items as Paid
Once the report parameters are set and you are ready to resolve the balances in OPSCOM:
-
Click the Mark as Paid button to begin the internal payment process.
-
Click the Confirm button on the popup window to finalize the transaction.
Export Before Paying: Always click the Export to Excel button before clicking the Mark as Paid button. Once you mark the items as paid in OPSCOM, they are cleared from the pending queue. If you do not have the exported spreadsheet saved, you will not be able to process the actual transfer of funds within your Banner system.
Key Information Displayed and Status Indicators
-
Transaction Code Generation: Once the bulk payment is confirmed, a final screen will display a unique transaction code for the batch.
-
Payment Status: Searching for this specific transaction code using the standard OPSCOM payment search tools will return a list of all items included in the report, verifying that they are now successfully marked as paid in the system.
Best Practices and Considerations
-
Code Accuracy: Coordinate closely with your finance department to ensure the values you enter into the Banner Code and Detail Code fields perfectly match your external system's current formatting requirements. Incorrect codes will cause the Excel import to fail in Banner.
-
Record Keeping: Keep a log of the generated OPSCOM transaction codes alongside your Banner import records to ensure easy auditing and cross-system reconciliation.